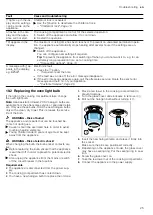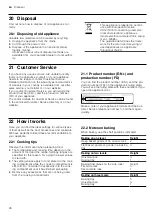
background image

How it works

 en

27

Notes

¡

When baking on several layers, always use hot air.
Baked goods that are placed in the oven at the
same time will not necessarily be ready at the same
time.

¡

Position baking tins/dishes either next to one an-
other or offset on different shelves so that they are
not directly one above the other in the cooking com-
partment.

¡

For best results, we recommend using dark-col-
oured metal bakeware.

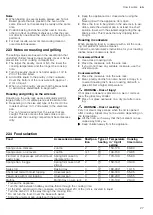
22.3 Notes on roasting and grilling

The setting values are based on the assumption that
unstuffed, chilled, ready-to-roast poultry, meat or fish is
placed into a cold cooking compartment.

¡

The larger the poultry, meat or fish, the lower the
cooking temperature and the longer the cooking
time.

¡

Turn the poultry, meat or fish after approx. 1/2 to
2/3 of the time listed.

¡

Add a little liquid to the poultry in the cookware.
Cover the bottom of the cookware with approx. 1–
2 cm of liquid.

¡

When you turn poultry, ensure that the breast side
or skin side is underneath to begin with.

Roasting and grilling on the wire rack

Roasting on the wire rack works particularly well for
large poultry or for multiple pieces at the same time.

¡

Depending on the size and type of the food to be
roasted, add up to 1/2 litre water to the universal
pan.
You can make a sauce from the juices that are
caught. This also means that less smoke is pro-
duced and the cooking compartment becomes less
dirty.

¡

Keep the appliance door closed when using the
grill.
Never grill with the appliance door open.

¡

Place the food to be grilled on the wire rack. In ad-
dition, slide the universal pan in at least one shelf
position lower, with the slanted edge facing the ap-
pliance door. This means that any dripping fat is
caught.

Roasting in cookware

When preparing food in cookware with a lid, the cook-
ing compartment remains cleaner.
Follow the manufacturer's instructions for your roasting
dishes. Glass cookware is best.

Cookware without lid

¡

Use a deep roasting dish.

¡

Place the cookware onto the wire rack.

¡

If you do not have any suitable cookware, use the
universal pan.

Cookware with lid

¡

Place the cookware onto the wire rack.

¡

Meat, poultry and fish can also become crispy in a
covered roasting dish. Use a roasting dish with a
glass lid. Set a higher temperature.

WARNING ‒ Risk of injury!

If hot glass cookware is placed on a wet or cold sur-
face, the glass may shatter.

Place hot glass ovenware on a dry mat after cook-
ing.

WARNING ‒ Risk of scalding!

Very hot steam may escape when the lid is opened
after cooking. Steam may not be visible, depending on
the temperature.

Lift the lid in such a way that the hot steam can es-
cape away from you.

Keep children away from the appliance.

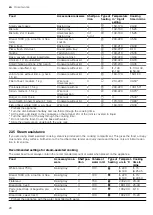
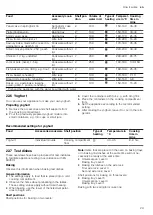
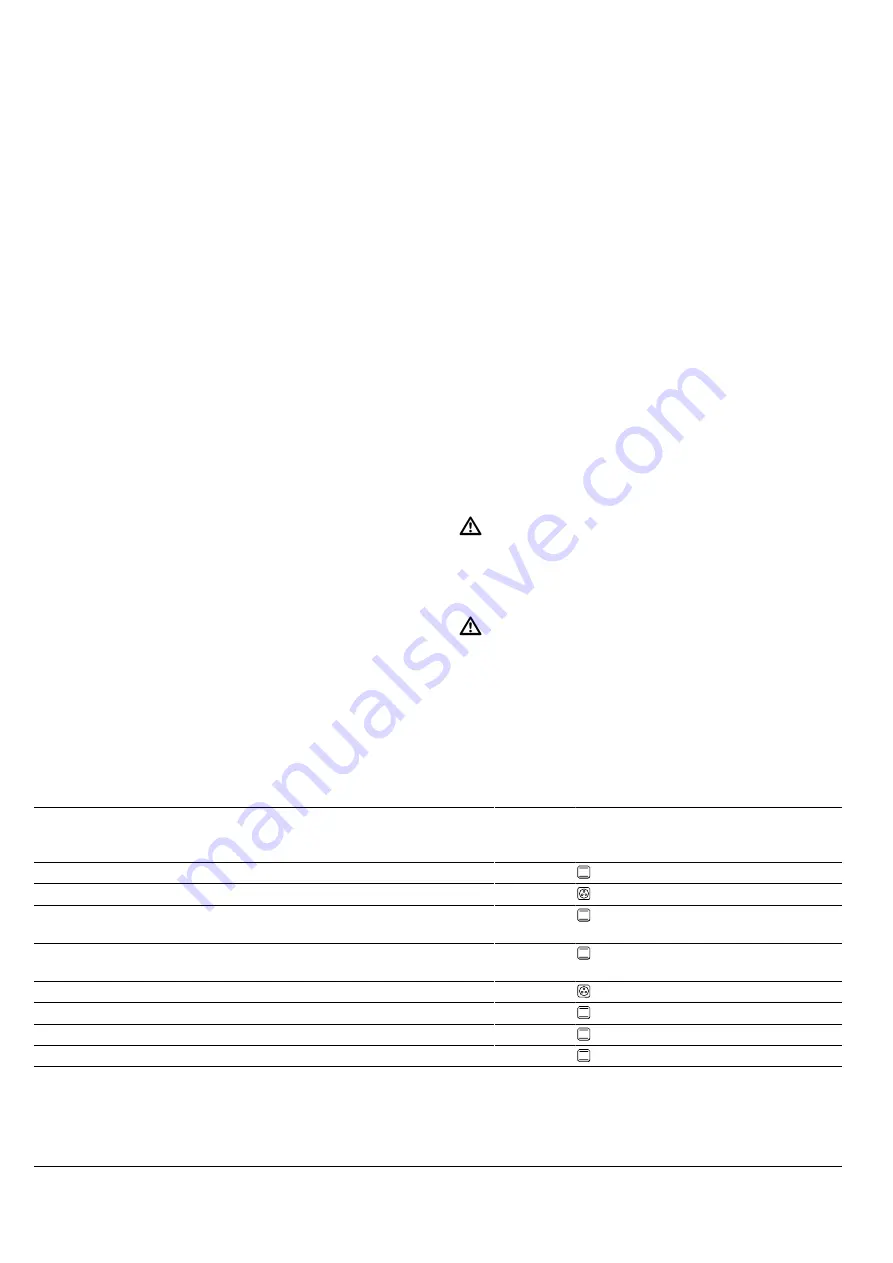
22.4 Food selection

Food

Accessories/cookware

Shelf pos-
ition

Type of
heating

Temperature
in °C/grill
setting

Cooking
time in mins

Sponge cake, delicate

Loaf tin

2

150-170

60-80

Sponge cake, on 2 levels

Loaf tin

3+1

140-150

70-85

Fruit tart or cheesecake with shortcrust
pastry base

Springform cake tin,
diameter 26 cm

2

170-190

55-80

Sponge flan, 6 eggs

Springform cake tin Ø
28 cm

2

150-160

1

30-40

Swiss roll

Baking tray

3

180-200

1

10-15

Shortcrust tart with moist topping

Universal pan

2

160-180

55-95

Yeast cake with moist topping

Universal pan

3

180-200

30-55

Muffins

Muffin tray on wire rack

2

170-190

20-40

1

Preheat the appliance.

2

Turn the dish between halfway and two-thirds through the cooking time.

3

At the start, add liquid to the cookware so that at least 2/3 of the joint is covered in liquid

4

Turn the dish 2/3 of the way through the cooking time.

5

Do not turn the food. Cover the base with water.

6

Slide the universal pan underneath the wire rack.

Summary of Contents for HRA.74B Series

Page 1: ...Register your new device on MyBosch now and get free benefits bosch home com welcome Oven HRA 74B en User manual and installation instructions ...

Page 2: ...ot covered under the warranty Only use this appliance To prepare meals and drinks In private households and in enclosed spaces in a domestic environment Up to an altitude of max 4000 m above sea level 1 3 Restriction on user group This appliance may be used by children aged 8 or over and by people who have reduced physical sensory or mental abilities or inad equate experience and or knowledge prov...

Page 3: ... oven door as they may scratch the surface The hinges on the appliance door move when the door is opened and closed which could trap your fingers Keep your hands away from the hinges Components inside the appliance door may have sharp edges Wear protective gloves WARNING Risk of electric shock Incorrect repairs are dangerous Repairs to the appliance should only be carried out by trained specialist...

Page 4: ... is in progress Before you start the cleaning function al ways remove coarse dirt from the cooking compartment Never clean accessories at the same time The outside of the appliance gets very hot when the cleaning function is in progress Never hang combustible objects e g tea towels on the door handle Leave the front of the appliance clear Keep children at a safe distance If the door seal is damage...

Page 5: ...the cooking compartment when it is still warm Remove all food remnants from the cooking com partment and the appliance door before you next heat up the appliance If the seal is very dirty the appliance door will no longer close properly during operation This may dam age the front of adjacent kitchen units Keep the seal clean at all times Never operate the appliance if the seal is damaged or missin...

Page 6: ...en Environmental protection and saving energy 6 Allow frozen food to defrost before cooking This will save the energy that would otherwise be required to defrost it ...

Page 7: ...rn the temperature selector clock wise or anti clockwise from the zero setting Depending on the appliance the temperature selector can be pushed in Press on the tem perature selector to click it into or out of the zero setting Temperature and setting levels Page 8 4 2 Buttons and display You can use the buttons to set various functions for your appliance The display shows the settings If a functio...

Page 8: ...ating Traditionally bake or roast on one level This type of heating is ideal for cakes with moist toppings The heat is emitted evenly from above and below This type of heating is used to measure the energy consumption in the conven tional mode Hot air Steam Steam assisted baking and roasting This type of heating is particularly well suited to frying meat and to baking bread and cakes The fan distr...

Page 9: ...ppliance has five shelf positions The shelf posi tions are numbered from bottom to top You can remove the shelf supports e g for cleaning Shelf supports Page 21 Lighting The oven light lights up the cooking compartment With most types of heating and functions the lighting lights up during operation When the function selector is turned to bring operation to an end the lighting goes out The Oven lig...

Page 10: ... the only way to ensure that accessor ies can be pulled out approximately halfway without tip ping 1 Turn the accessories so that the notch is at the rear and is facing downwards 2 Insert accessories between the two guide rods for the shelf position Wire rack Insert the wire rack with the open side facing the appliance door and the curved lip facing downwards Baking tray E g univer sal pan or baki...

Page 11: ...n the cooking compartment and accessories be fore using the appliance to prepare food for the first time 1 Remove any accessories and leftover packaging such as polystyrene pellets from the cooking com partment 2 Before heating the appliance wipe the smooth sur faces in the cooking compartment with a soft damp cloth 3 Keep the room ventilated while the appliance is heating 4 Set the type of heatin...

Page 12: ...n operation the water bowl reaches high temperatures Never remove the water bowl while the appliance is in operation Only remove the water bowl once it has cooled down WARNING Risk of scalding Hot steam may escape when you open the appliance door Steam may not be visible depending on the tem perature Open the appliance door carefully Keep children at a safe distance ATTENTION Only use the water bo...

Page 13: ... time Requirement is highlighted on the display Use the or button to change the timer duration a The appliance applies the change after a few seconds Cancelling the timer You can cancel the timer duration at any time Requirement is highlighted on the display Use the button to reset the timer duration to zero a After a few seconds the appliance applies the change and goes out 10 3 Setting the cooki...

Page 14: ...oking time counts down 10 5 Setting the time on the clock Once the appliance has been connected to the mains or following a power failure the time flashes on the dis play The time starts at 12 00 Set the current time Requirement The function selector must be set to the Off position 1 Use the or button to set the time 2 Press the button a The time that is set appears on the display Tip You can go t...

Page 15: ...at with liquid 2 Do not sear the meat beforehand 07 Beef roulades Stuffed with vegetables or meat Roasting dish with lid Total weight of all of the stuffed roul ades Add stock water or an other liquid to the dish until the beef olives are al most covered 2 Do not sear the meat beforehand 08 Leg of lamb well done Boned seasoned Roasting dish with lid Weight of meat Cover the bottom of the roasting ...

Page 16: ...king press the button The appliance continues to heat using the programme settings When your food is ready switch off the appli ance 12 Childproof lock You can secure your appliance to prevent children from accidentally switching it on or changing the set tings Note You can go to the basic settings Page 16 to specify whether you want the option to set the child proof lock 12 1 Activating and deact...

Page 17: ...our appliance working efficiently for a long time it is important to clean and maintain it carefully 14 1 Cleaning products In order to avoid damaging the various oven surfaces on the appliance do not use unsuitable cleaning products WARNING Risk of electric shock An ingress of moisture can cause an electric shock Do not use steam or high pressure cleaners to clean the appliance ATTENTION Unsuitab...

Page 18: ... cleaning agents Information Enamel surfaces Hot soapy water Vinegar water Oven cleaner Soak any heavily soiled areas and use a brush or steel wool Leave the appliance door open to dry the cooking compartment after cleaning it Tip It is best to use the cleaning function Pyrolytic self cleaning Page 19 Notes Enamel burns at very high temperatures causing minor discol ouration The functionality of y...

Page 19: ...sories at the same time The outside of the appliance gets very hot when the cleaning function is in progress Never hang combustible objects e g tea towels on the door handle Leave the front of the appliance clear Keep children at a safe distance If the door seal is damaged a large amount of heat is generated around the door Do not scrub or remove the seal Never operate the appliance if the seal is...

Page 20: ...er into the cooking compartment when the cooking compartment is hot Requirement The cooking compartment has cooled down completely 1 Remove the accessories from the cooking compart ment 2 Mix 0 4 litres water with a drop of washing up liquid and pour into the centre of the cooking compart ment floor Do not use distilled water 3 Use the function selector to set the Bottom heat ing type of heating 4...

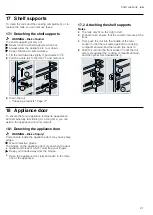
Page 21: ...at the front 1 First push the rail into the middle of the rear socket until the rail rests against the cooking compartment wall and then push this back 2 Push the rail into the front socket until the rail also rests against the cooking compartment wall and then press this downwards 18 Appliance door To ensure that your appliance retains its appearance and remains fully functioning for a long time ...

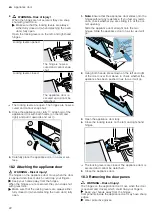
Page 22: ...nges When the hinges are not secured they can snap shut with great force Make sure that the locking levers are always either fully closed or when detaching the oven door fully open 1 Note Ensure that the appliance door slides onto the hinges without any resistance If you feel any resist ance check whether you are sliding it in at the cor rect opening Slide the appliance door straight onto the two ...

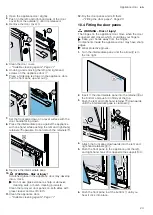
Page 23: ... harsh cleaning products Clean the removed door panes on both sides with glass cleaner and a soft cloth 11 Clean the appliance door Suitable cleaning agents Page 17 12 Dry the door panes and refit them Fitting the door panes Page 23 18 4 Fitting the door panes WARNING Risk of injury The hinges on the appliance door move when the door is opened and closed which could trap your fingers Keep your han...

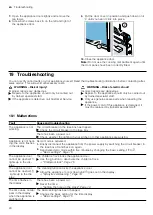
Page 24: ...tions Fault Cause and troubleshooting The appliance is not working The circuit breaker in the fuse box has tripped Check the circuit breaker in the fuse box There has been a power cut Check whether the lighting in your kitchen or other appliances are working Appliance is not heat ing the colon flashes in the display Demo mode is activated 1 Briefly disconnect the appliance from the power supply by...

Page 25: ...hange the oven light bulb Note Heat resistant 40 watt 230 V halogen bulbs are available from the after sales service or specialist retail ers Only use these bulbs Hold the new halogen bulbs only with a clean dry towel This increases the service life of the bulb WARNING Risk of burns The appliance and its parts that can be touched be come hot during use Caution should be exercised here in order to ...

Page 26: ...ory or on our website 21 1 Product number E Nr and production number FD You can find the product number E Nr and the pro duction number FD on the appliance s rating plate You will see the rating plate with these numbers if you open the appliance door Make a note of your appliance s details and the Cus tomer Service telephone number to find them again quickly 22 How it works Here you can find the i...

Page 27: ...n cookware When preparing food in cookware with a lid the cook ing compartment remains cleaner Follow the manufacturer s instructions for your roasting dishes Glass cookware is best Cookware without lid Use a deep roasting dish Place the cookware onto the wire rack If you do not have any suitable cookware use the universal pan Cookware with lid Place the cookware onto the wire rack Meat poultry an...

Page 28: ... grilled whole 300 g e g trout Wire rack 2 160 180 20 306 1 Preheat the appliance 2 Turn the dish between halfway and two thirds through the cooking time 3 At the start add liquid to the cookware so that at least 2 3 of the joint is covered in liquid 4 Turn the dish 2 3 of the way through the cooking time 5 Do not turn the food Cover the base with water 6 Slide the universal pan underneath the wir...

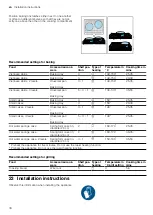
Page 29: ...epared yoghurt mixture into small containers e g into cups or small jars 3 Cover the containers with foil e g with cling film 4 Place the containers on the cooking compartment floor 5 Set the appliance according to the recommended setting 6 After making the yoghurt leave it to cool in the refri gerator Recommended settings for yoghurt Food Accessories cookware Shelf position Type of heating Temper...

Page 30: ...mall cakes Baking tray 3 1501 20 30 Small cakes 2 levels Universal pan Baking tray 3 1 1401 25 35 Small cakes 3 levels Universal pan Baking tray 5 3 1 1401 25 35 Hot water sponge cake Springform cake tin diameter 26 cm 2 160 1702 25 35 Hot water sponge cake Springform cake tin diameter 26 cm 2 160 170 30 35 Hot water sponge cake 2 levels Springform cake tin diameter 26 cm 3 1 150 1602 35 50 1 Preh...

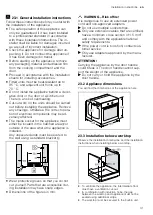
Page 31: ...t either be located in the hatched area or outside of the area where the appliance is installed Any unsecured units must be secured to the wall using a standard bracket Wear protective gloves so that you do not cut yourself Parts that are accessible dur ing installation may have sharp edges Dimensions of the figures in mm WARNING Risk of fire It is dangerous to use an extended power cord and non a...

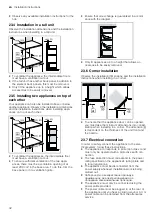
Page 32: ...eed in accord ance with the diagram Only fit appliances up to a height that allows ac cessories to be easily removed 23 6 Corner installation Observe the installation dimensions and the installation instructions when installing in a corner To ensure that the appliance door can be opened you must take the minimum dimensions into consid eration when installing in a corner The dimension is dependent ...

Page 33: ...o the permanent electrical installation according to the install ation regulations 1 Identify the phase and neutral conductors in the socket The appliance may be damaged if it is not connec ted correctly 2 Connect the hob in accordance with the connection diagram See the rating plate for the voltage 3 Connect the wires of the mains power cable accord ing to the colour coding Green yellow Protectiv...

Page 34: ......

Page 35: ......

Page 36: ...ooking for help You ll find it here Expert advice for your Bosch home appliances help with problems or a repair from Bosch experts Find out everything about the many ways Bosch can support you www bosch home com service Contact data of all countries are listed in the attached service directory 9001672506 9001672506 010916 en Robert Bosch Hausgeräte GmbH Carl Wery Straße 34 81739 München GERMANY ww...

Reviews: