background image

en

    Operating the appliance

14

Cleaning the accessories

Before using the accessories, clean them thoroughly 

using a cloth and warm soapy water.

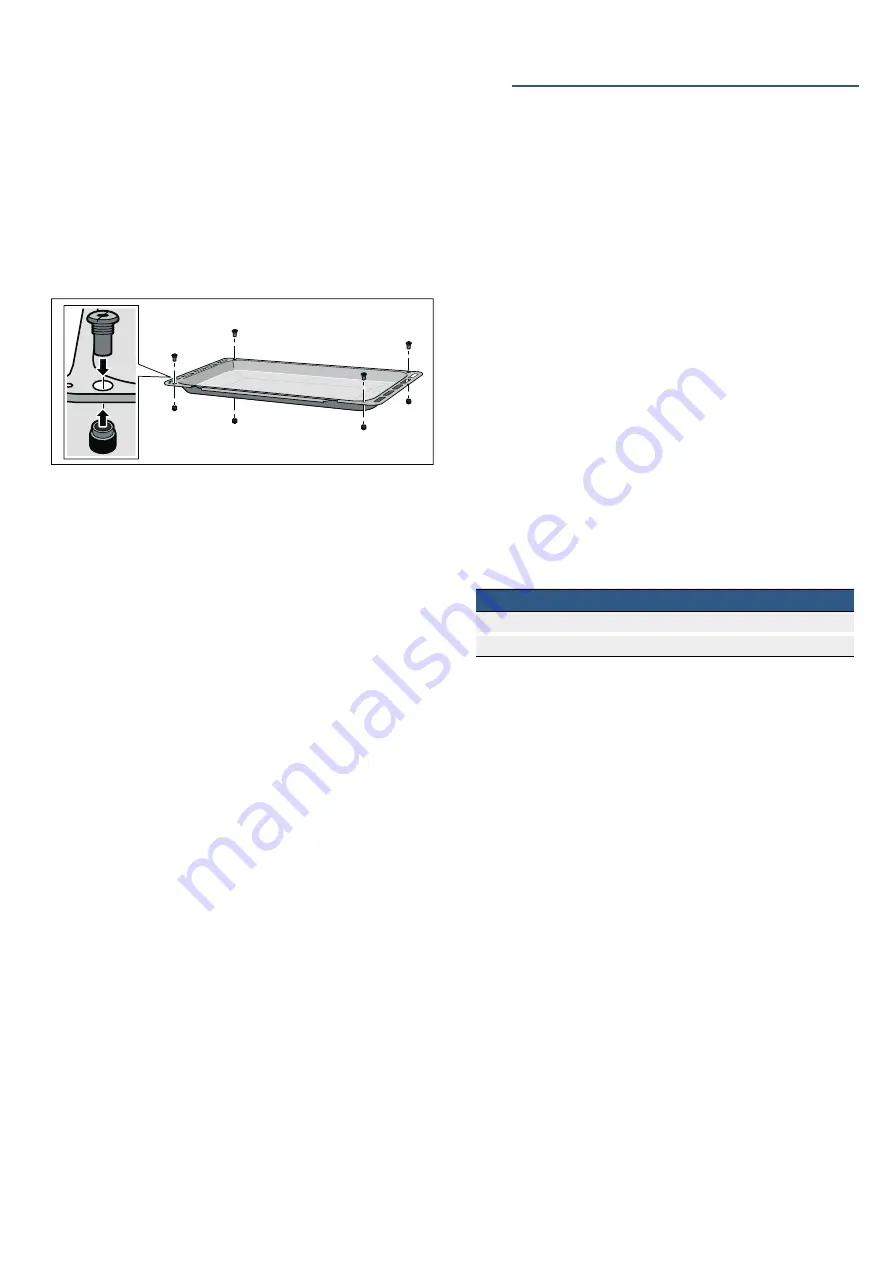
Fitting the threaded bushes for the rotary 

spit

1.

From above, place the threaded bushes into the 

holes at the four corners of the universal pan.

2.

Counter the ring nuts from below.

3.

Use a screwdriver to tighten the threaded bushes. 

1

Operating the appliance

Operating the appliance

You have already learnt about the controls and how 

they work. Now we will explain how to set your 

appliance. You will learn about what happens when you 

switch the appliance on and off, and how to select the 

operating mode.

Hob

Switching on the gas burner

Notes

Appliances with a hob cover must only be switched 

on if the hob cover is open.

The burner caps must always be positioned exactly 

on top of the burner cups. The slots on the burner 

cup must be free from obstruction. All parts must be 

dry.

Ensure that the burner is not subjected to draughts 

caused by air conditioning systems, fans or similar 

appliances.

1.

Press the control knob for the required burner and 

turn it to the 

 position.

The gas burner ignites.

2.

Keep the control knob pressed for a few seconds 

until the flame stabilises.

3.

Set the desired flame setting.

The flame is not stable between positions 

Û

 and 

Always select a position between 

 and 

˜

.

If the flame goes out

Switch off the control knob. Wait one minute and switch 

the burner on again.

:

Warning – Risk of fire! 

If the flame goes out, gas will escape. Never leave the 

gas burner unattended during operation. Ensure that 

there are no draughts.

:

Warning – Risk of deflagration! 

If the burner does not ignite after 15 seconds, switch off 

the control knob and open the door or window in the 

room. Wait at least 1


minute before igniting the burner 

again.

If the gas burner does not ignite

In the event of a power cut or damp ignition plugs, light 

the gas burner with a gas lighter or a match.

Switching off the gas burner

Turn the control knob for the required hotplate to 

position 

Û

.

Setting

Meaning

˜

Economy flame, lowest power

Large flame, highest power

Summary of Contents for HSG734357Z

Page 1: ...3FHJTUFS ZPVS OFX EFWJDF PO Z PTDI OPX BOE HFU GSFF CFOFGJUT CPTDI IPNF DPN XFMDPNF en Instruction manual Free standing cooker HSG734357Z ...

Page 2: ......

Page 3: ... the accessories 14 Fitting the threaded bushes for the rotary spit 14 1 Operating the appliance 14 Hob 14 Oven 15 Rotary spit 15 D Cleaning agent 17 Suitable cleaning agents 17 Keeping the appliance clean 18 p Rails 18 Detaching the shelf supports 18 Refitting the shelf supports 18 q Appliance door 19 Removing and installing the door panels 19 Removing and fitting the appliance door 19 3 Trouble ...

Page 4: ...se accidents This appliance may be used by children over the age of 8 years old and by persons with reduced physical sensory or mental capabilities or by persons with a lack of experience or knowledge if they are supervised or are instructed by a person responsible for their safety how to use the appliance safely and have understood the associated hazards Children must not play with on or around t...

Page 5: ... and fat can ignite very quickly Never leave hot fat or oil unattended Never use water to put out burning oil or fat Switch off the hotplate Extinguish flames carefully using a lid fire blanket or something similar Risk of fire The hotplates become very hot Never place combustible items on the hob Never place objects on the hob Risk of fire The appliance becomes very hot and flammable materials co...

Page 6: ...uit breaker in the fuse box Contact the after sales service Risk of electric shock and serious injury The cable insulation on electrical appliances may melt when touching hot parts of the appliance Never bring electrical appliance cables into contact with hot parts of the appliance Risk of electric shock Do not use any high pressure cleaners or steam cleaners which can result in an electric shock ...

Page 7: ...ance may only be installed by a LP gas installer registered with the Liquefied Petroleum Gas Association of Southern Africa The appliance must be installed in accordance with the requirements of SANS 10087 1 and any fire department regulations and or local bylaws applicable to the area If in doubt check with the relevant authority before undertaking the installation Upon completion of the installa...

Page 8: ...rt the weight of the appliance and could break Heavy accessories do not pull out heavily laden accessories too far without first unloading them sufficiently Heavy accessories will tip when pulled out This causes pressure to be exerted on the shelf supports in the cooking compartment which can damage the enamel Relieve the strain on the accessories when they are pulled out by raising them slightly ...

Page 9: ...u will find information about the control panel and hob as well as the oven types of heating and accessories Depending on the appliance model individual details may differ The control panel Explanation 1 Splatter guard 2 Hob 3 Control panel 4 Oven Explanation 1 Control knob for oven light and rotary spit 2 Control knob for oven 3 Control knob for gas hotplates ...

Page 10: ...ase of appliances with a hob cover the burners in the oven must also only be switched on if the hob cover is open Types of gas burner Explanation 1 High output burner 2 9 kW 2 Wok burner 4 kW 3 Standard burner 1 8 kW 4 Ventilation opening 5 Economy burner 1 0 kW Gas burners Pot pan diameter Economy burner 12 14 cm Standard burner 16 22 cm High output burner 18 26 cm Wok burner 18 26 cm ...

Page 11: ... large burners The flame must not touch the sides of the pan Do not use damaged pans which do not sit evenly on the hob Pans may tip over Only use pans with a thick flat base Do not cook without using a lid and make sure the lid is properly fitted This wastes energy Always centre the pan over the burner not to one side Otherwise it could tip over Do not place large pans on the burners near the con...

Page 12: ...revents the accessories from tilting when they are pulled out The accessories must be inserted into the cooking compartment correctly for the tilt protection to work properly When inserting the wire rack ensure that the lug is at the rear and is facing downwards The open side must be facing the appliance door and the outer rail must be facing downwards When inserting baking trays ensure that lug i...

Page 13: ...aximum temperature 2 Switch off the oven after 45 minutes Recleaning the oven 1 Clean the cooking compartment with hot soapy water 2 Fit the hook in racks Cleaning the burner caps and cups 1 Clean the burner caps A and cups B with water and washing up liquid 2 Dry the parts well 3 Place the burner cup B onto the burner C 4 Position the burner cap A exactly on the burner cup B Accessories Descripti...

Page 14: ...er is not subjected to draughts caused by air conditioning systems fans or similar appliances 1 Press the control knob for the required burner and turn it to the position The gas burner ignites 2 Keep the control knob pressed for a few seconds until the flame stabilises 3 Set the desired flame setting The flame is not stable between positions Û and Always select a position between and If the flame...

Page 15: ...me time Switching on the grill gas burner 1 Open the appliance door 2 Press the control knob for the oven and turn it to the position 3 Keep the control knob pressed for a few seconds until the flame stabilises 4 Close the appliance door carefully If the flame goes out Switch off the control knob Wait one minute and switch the burner on again Warning Risk of fire If the flame goes out gas will esc...

Page 16: ... using the rotary spit preheat the oven using the type of heating Only set the G type of heating once the rotary spit has been inserted 1 Turn the control knob for the oven to the G position 2 Set the temperature Note Add some water to the universal pan in order to catch any fat that drips out Removing the rotary spit Warning Risk of burns Never touch the hot surfaces of the cooking compartment or...

Page 17: ...sales service or from specialist retailers Apply a very thin layer of the cleaning product with a soft cloth Aluminium and plas tic Glass cleaner Clean with a soft cloth Gas hob and pan supports Hot soapy water Use very little water Water must not be allowed to enter the appliance through the base of the burn ers Clean boiled over liquids and spilt food immedi ately You can remove the pan supports...

Page 18: ...e worst of the food remnants from the cooking compartment heating elements and accessories Tips Clean the cooking compartment after each use This will ensure that dirt cannot be baked on Always remove flecks of limescale grease starch and albumin e g egg white immediately Use the universal pan for baking very moist cakes Use suitable ovenware for roasting e g a roasting dish pRails RailsDetaching ...

Page 19: ...scraper sharp or abrasive cleaning aids or detergents Fitting the door panels 1 Reinsert the inner panel Note All four fastening pins must engage in the holders provided for them 2 Remove the locking pins and close the oven door Removing and fitting the appliance door If the oven is very heavily soiled the oven door can be removed for easier cleaning Normally however this is not necessary Removing...

Page 20: ...to prevent damage 4 Remove the hook in racks 5 Remove the glass cover To do this open the glass cover at the front with your hand Should you experience difficulties removing the glass cover use a spoon to help 6 Remove the oven light bulb 7 Replace the oven light bulb with a bulb of the same type Voltage 230 V Power 40 W Fitting G9 Temperature resistance 300 C 8 Refit the glass cover for the oven ...

Page 21: ...uct number and FD number production number of the appliance when contacting the after sales service The rating plate and the relevant numbers can be found on the inside of the door frame You can enter the data for your appliance here now to save you having to spend a long time looking for it if a fault occurs E no FD After sales service O Dish Weight in kg Burner Shelf position Temperature in C Co...

Page 22: ...light on top and too dark underneath Bake the cake one level higher in the oven the next time The cake is too dark on top and too light underneath Bake the cake one level lower in the oven the next time Select a lower temperature and extend the baking time Cakes baked in a tray or tin are too brown at the back Place the baking tray in the middle of the accessories not directly against the back wal...

Page 23: ...a smaller roasting dish and add more liquid if necessary The roast looks good but the juices are too clear and watery Next time use a larger roasting dish and add less liquid if necessary The meat gets burned during brais ing The roasting dish and lid must fit together well and close properly Reduce the temperature and add more liquid when braising if necessary Tips for keeping acrylamide to a min...

Page 24: ...MJBODFT 4FSWJDF SFF BOE FBTZ SFHJTUSBUJPO o BMTP PO NPCJMF QIPOFT XXX CPTDI IPNF DPN XFMDPNF PPLJOH GPS IFMQ PV MM GJOE JU IFSF YQFSU BEWJDF GPS ZPVS PTDI IPNF BQQMJBODFT OFFE IFMQ XJUI QSPCMFNT PS B SFQBJS GSPN PTDI FYQFSUT JOE PVU FWFSZUIJOH BCPVU UIF NBOZ XBZT PTDI DBO TVQQPSU ZPV XXX CPTDI IPNF DPN TFSWJDF POUBDU EBUB PG BMM DPVOUSJFT BSF MJTUFE JO UIF BUUBDIFE TFSWJDF EJSFDUPSZ 3PCFSU PTDI BV...

Reviews: