


en
Instruction manual ....................
fr
Mode d’emploi ....................... 26
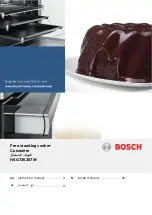
Free standing cooker
Cuisinière
HSG736257M
π≤
à°ùŸG óbƒŸG
.........
3
ar
∫
ɪ©à°S’G «dO
...........
..........
π
The Bosch HSG736257M is a cutting-edge kitchen appliance designed to revolutionize cooking. To harness its full potential, it is imperative to refer to the comprehensive Instruction Manual available for free download on our website. Maximize your culinary experience with step-by-step guidance and unleash your inner chef.
en
Instruction manual ....................
fr
Mode d’emploi ....................... 26
Free standing cooker
Cuisinière
HSG736257M
π≤
à°ùŸG óbƒŸG
.........
3
ar
∫
ɪ©à°S’G «dO
...........
..........
π


