


en
How it works
38
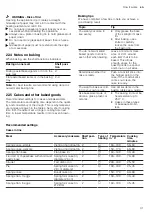
22.10 Vegetables and side dishes
This is where you can find information about preparing vegetable products that you can use as a side dish for your
meals.
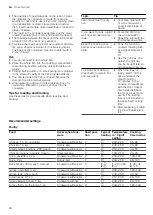
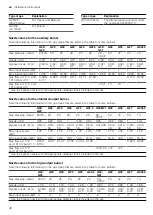
Recommended settings
Vegetables and side dishes
Use the settings listed in the table.
Food
Accessories/cook-
ware
Shelf posi-
tion
Type of
heating
Temperature
in °C/grill
setting
Cooking
time in mins
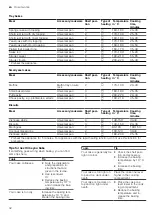
Grilled vegetables
Universal pan
5
3
10–20
Baked potatoes, halved
Universal pan
3
170–190
55–65
Potato products, frozen, e.g. chips, cro-
quettes, potato pockets, rösti
Universal pan
3
200–220
25–35
22.11 Yoghurt
You can also use your appliance to make your own
yoghurt.
Making yoghurt
1.
Remove the accessories and shelves from the
cooking compartment.
2.
Heat 1 litre of milk (3.5% fat) to 90 °C on the hob
and then leave it to cool down to 40 °C. Only heat
UHT milk to 40 °C.
3.
Stir 30 g yoghurt into the milk.
4.
Pour the mixture into small containers, e.g. small
jars with lids.
5.
Cover the containers with film, e.g. cling film.
6.
Place the containers on the cooking compartment
floor.
7.
Use the recommended settings when configuring
the appliance settings.
8.
After making the yoghurt, leave it to cool in the refri-
gerator.
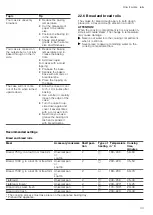
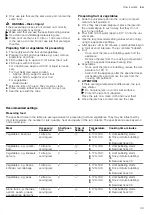
Recommended settings
Yoghurt
Meal
Accessory/cookware
Shelf position
Type of
heating/
function
Temperature
in °C
Cooking
time,
minutes
Yoghurt
Cup/jar
Cooking compartment
floor
-
4–5 hours
22.12 Tips for keeping acrylamide levels
to a minimum when cooking
Acrylamide is harmful to your health and is produced
when you cook cereal and potato products at very high
temperatures.
Meal
Tip
General
informa-
tion
¡
Keep cooking times as short as pos-
sible.
¡
Cook food until it is golden brown, but
not too dark.
¡
Use large, thick pieces of food. These
contain less acrylamide.
Baking
Set max. top/bottom heating to 200 °C.
Meal
Tip
Biscuits
¡
Set the max. top/bottom heating to
190 °C.
¡
Brush baked items and biscuits with
egg or egg yolk. This reduces the pro-
duction of acrylamide.
Oven
chips
¡
Spread the chips out evenly and in a
single layer on the baking tray.
¡
Cook at least 400 g at once on a bak-
ing tray so that the chips do not dry
out.
22.13 Preserving food
You can preserve fruit and vegetables by heating them
and sealing them in air-tight jars.
¡
Only use heat-resistant, clean, undamaged pre-
serving jars, rubber seals and clips.
¡
Only use fruit and vegetables which are in perfect
condition.


