


en
Installation instructions
52
G20/
G25
G20
G20
G25
G25
G25.3
G30/
G31
G30
G30
G27
G2.350
Gas pressure (mbar)
20/25
20
25
20
25
25
28–
30/37
50
37
20
13
Nozzle (mm)
0.72
0.72
0.68
0.77
0.72
0.72
0.50
0.43
0.47
0.77
1.00
Bypass nozzle
1
(mm)
0.52/0.
5
0.52/
0.5
0.52/
0.5
0.52/
0.5
0.52/
05
0.52/
0.5
0.32/
0.3
0.32/
0.3
0.32/
0.3
0.52/
0.5
0.52/
0.5
Max. input power (kW)
1
1
1
1
1
1
1
1
1
1
1
Min. input power (kW)
≤0.55
≤0.55
≤0.55
≤0.55
≤0.55
≤0.55
≤0.55
≤0.55
≤0.55
≤0.55
≤0.55
Gas flow at 15 °C and
1013 mbar m
3
/h
0.095/
0.111
0.095
0.095
0.111
0.111
0.108
-
-
-
0.116
0.132
Gas flow at 15 °C and
1013 mbar g/h
-
-
-
-
-
-
73/71 73
73
-
-
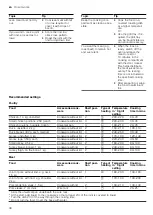
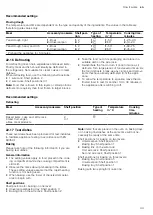
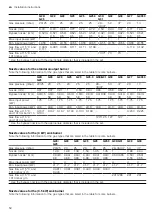
1
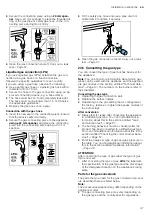
Use the bypass nozzle with the appropriate diameter that is included in the set.
Nozzle values for the standard-output burner
Note the following information for the gas types that are listed in the table for some burners.
G20/
G25
G20
G20
G25
G25
G25.3
G30/G31 G30
G30
G27
G2.350
Gas pressure (mbar)
20/25
20
25
20
25
25
28–
30/37
50
37
20
13
Nozzle (mm)
0.97
0.97
0.91
1
0.94
0.94
0.65
0.58
0.62
1
1.31
Bypass nozzle
1
(mm)
0.6/0.5
8
0.6/0.
58
0.6/0.
58
0.6/0.
58
0.6/0.
58
0.6/0.
58
0.4/0.38 0.4/0.
38
0.4/0.
38
0.6/0.
58
0.6/0.
58
Max. input power
(kW)
1.75
1.75
1.75
1.75
1.75
1.75
1.75
1.75
1.75
1.75
1.75
Min. input power (kW) ≤0.9
≤0.9
≤0.9
≤0.9
≤0.9
≤0.9
≤0.9
≤0.9
≤0.9
≤0.9
≤0.9
Gas flow at 15 °C
and 1013 mbar m
3
/h
0.167/
0.194
0.167
0.167
0.194
0.194
0.190
-
-
-
0.203
0.225
Gas flow at 15 °C
and 1013 mbar g/h
-
-
-
-
-
-
127/125 127
127
-
-
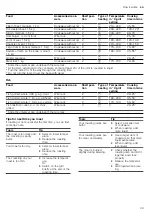
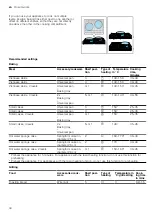
1
Use the bypass nozzle with the appropriate diameter that is included in the set.
Nozzle values for the (4 kW) wok burner
Note the following information for the gas types that are listed in the table for some burners.
G20/
G25
G20
G20
G25
G25
G25.3
G30/G31
G30
G30
Gas pressure (mbar)
20/25
20
25
20
25
25
28–30/37
50
37
Nozzle (mm)
1.48
1.48
1.38
1.50
1.45
1.45
1
0.88
0.94
Bypass nozzle
1
(mm)
0.94/0.
88
0.94/
0.88
0.94/
0.88
0.94/
0.88
0.94/
0.88
0.94/
0.88
0.59/0.55
0.59/
0.55
0.59/
0.55
Max. input power (kW)
4
4
4
4
4
4
4
4
4
Min. input power (kW)
≤1.7
≤1.7
≤1.7
≤1.7
≤1.7
≤1.7
≤1.7
≤1.7
≤1.7
Gas flow at 15 °C and
1013 mbar m
3
/h
0.381/
0.443
0.381
0.381
0.443
0.443
0.433
-
-
-
Gas flow at 15 °C and
1013 mbar g/h
-
-
-
-
-
-
291/286
291
291
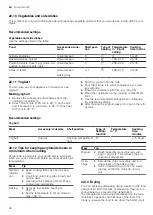
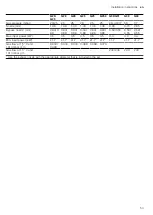
1
Use the bypass nozzle with the appropriate diameter that is included in the set.
Nozzle values for the (3.5 kW) wok burner
Note the following information for the gas types that are listed in the table for some burners.


