-10-
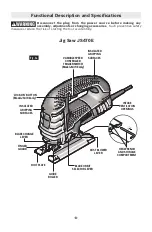
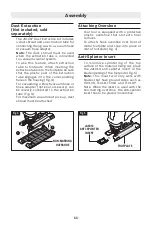
EXTRACTION TUBE
(Not included, available
as accessory)
VACUUM HOSE
(Not included,
available as
accessory)
DUST SHROUD
(Not included,
available as
accessory)
Fig. 3
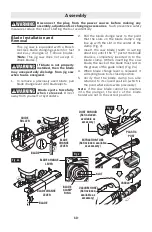
1
2
BLADE
GUIDE
ROLLER
BLADE
CHANGE
LEVER
BLADE
BLADE CHANGE
LEVER
Fig. 2a
PLASTIC
POST
BLADE CHANGE
LEVER
BLADE
CLAMP
RING
SLOT
Fig. 2
VAC024
Blade Installation and
Removal
This jig saw is equipped with a Bosch
tool-less blade changing system for fast
and easy changes of T-shank blades.
(
Note:
This jig saw does not accept U-
shank blades.)
If blade is not properly
installed, then the blade
may unexpectedly dislodge from jig saw
when tool is energized.
1.
To remove a previously-used blade, pull
blade change lever until blade ejects.
Blade ejects forcefully
w h e n r e l e a s e d .
D i r e c t
away from yourself or bystanders.
2.
Pull the blade change lever to the point
that the slots on the blade clamp's ring
line up with the slot in the center of the
clamp (Fig. 2).
3.
Insert the saw blade (teeth in cutting
direction) until it the “T” part of the blade
shank is completely inserted in to the
blade clamp. (When inserting the saw
blade, the back of the blade must rest in
the groove of the guide roller) (Fig. 2a.)
4.
When blade change lever is released, it
will spring back to its closed position.
5.
Verify that the blade clamp has also
returned to its closed position (which is
the point where slots were previously).
Note:
If the saw blade cannot be inserted
into the plunger, the slots of the blade
holder are not in the correct position.
Assembly
Disconnect the plug from the power source before making any
assembly, adjustments or changing accessories
. Such preventive safety
measures reduce the risk of starting the tool accidentally.

