VARI-directional array
Installation | en
11
Bosch Security Systems B.V.
Installation manual
2018.06 | V1.3 |
4
Installation
This chapter of the manual takes you through the steps necessary to install a VARI line array
loudspeaker in the order in which they should be carried out. In summary, the steps are:
Preparation
Making sure that you know where the unit is to be mounted.
Cabling
Understanding which connections need to be made.
Assembly
Adding any VARI-E extension units to the VARI base unit.
Connections
Terminating all necessary cables correctly and connecting up.
Configuration
Using the VariControl software to create the unit’s configuration file and
uploading it to the line array.
Mounting
Mechanical installation of the unit.
4.1
Preparing for installation
Before starting to install the VARI loudspeaker, a number of points should be considered.
Mounting location:
VARI loudspeakers are designed to be mounted on a vertical surface – e.g., a wall or column. If
the vertical axis is tilted such that the loudspeaker is pointing “up” or “down” even a few
degrees, the effective sound coverage will be considerably impaired. Thus when choosing a
location, it is important that the positions which each of the mounting brackets will occupy
are in the same vertical plane. Similarly, the vertical axis should be perpendicular to the floor,
so that the loudspeaker is “upright”.
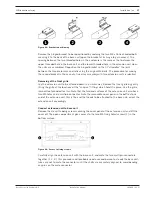
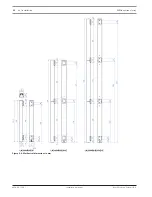
Figure
4.1: Upright loudspeaker mounting
The mounting location should be chosen so that there is an unobstructed line-of-sight path
between the loudspeaker and the intended area of coverage - i.e., avoid mounting near
columns, external room corners or ceiling infrastructure items such as air conditioning,
lighting units, and the like.


