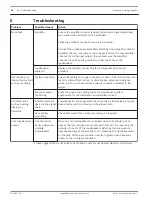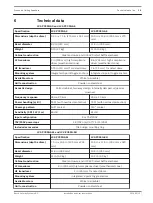
!
Caution!
Ceiling mount speaker’s safety cable
The safety cable should be installed with a minimum of 3-inches (76.2 mm) of slack.
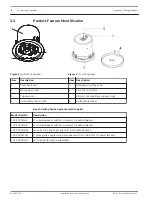
Figure 11: Attach auxiliary support
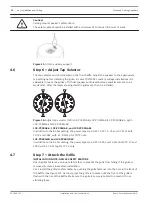
Step 6 — Adjust Tap Selector
The tap selector switch is located on the front baffle. Adjust the speaker to the appropriate
tap setting before installing the grille. In some 70V/100V constant voltage installations it is
advisable to leave the grilles off if final speaker audio level balance adjustments are to be
made later. After the levels are adjusted the grilles can then be installed.
Figure 12: Adjust tap selector (left: LC2-PC30G6-4/LC2-PC30G6-8/LC2-PC30G6-8L; right:
LC2-PC60G6-10/LC2-PC60G-8H
LC2-PC30G6-4, LC2-PC30G6-8, and LC2-PC30G6-8L
In addition to the 8-ohm setting, the power taps are 30 W, 15 W, 7.5 W, and 3.7 W at both
70.7V and 100V, with a 1.8 W tap for 70.7V only.
LC2-PC60G-8H and LC2-PC60G6-10
In addition to the 8-ohm setting, the power taps are 60 W, 30 W, and 15 W at both 70.7V and
100V, with a 7.5 W tap for 70.7V only.
Step 7 — Attach the Grille
INSTALLATION NOTE: GRILLE SAFETY FEATURE
Bosch grilles features a unique safety tether to prevent the grille from falling if the grille is
removed or comes loose after installation.
First, install the grille’s safety tether by pushing the grille fastener into the hole in the front of
the baffle (see Figure 13). Second, press the grille into place until the front of the grille is
flush with the rim of the baffle. Make sure the grille is securely seated to prevent it from
vibrating loose.
4.6
4.7
12
en | Installation and Wiring
Prosound Ceiling Speakers
2016.05 | 12 |
Installation and User Instructions
Bosch Security Systems B.V.


