10
Robert Bosch Hausgeräte GmbH
cçê=êÉ~ëçåë=çÑ=ë~ÑÉíó=íÜÉ=~ééäá~åÅÉ=ã~ó=çåäó=ÄÉ=
çéÉê~íÉÇ=ïÜÉå=ìåìëÉÇ=ÇêáîÉë=Ü~îÉ=ÄÉÉå=
ÅçîÉêÉÇ=ïáíÜ=ÇêáîÉ=Öì~êÇë=ENNI=NOI=NPFK
qÜÉ=ëïáîÉä=~êã=ãìëí=ÄÉ=ÉåÖ~ÖÉÇ=áå=ÉîÉêó=
çéÉê~íáåÖ=éçëáíáçåK
Safety systems
Start lock-out
See “Operating positions” table
The appliance can be switched on in
pos. 1–4
only:
–
when the bowl has been inserted and
rotated as far as possible or
–
the tool drive cover (
11
) has been attached.
In
pos. 5
the appliance cannot be switched
on unless the mincer and adapter have been
attached correctly (see mincer operating
instructions).
In
pos. 6
the appliance cannot be switched on if
a tool has been inserted.
Restart lock-out
If the power is interrupted, the appliance
remains switched on but the motor does not
start running again when the power is restored.
Overload protection
If the motor switches itself off while the
appliance is being used, the overload protection
feature has been activated. Possible causes:
–
very large amounts of ingredients,
–
appliance operated too long.
If a safety system is activated, see
“Troubleshooting”.
Operating the appliance
^ííÉåíáçå>
aç=åçí=çéÉê~íÉ=íÜÉ=~ééäá~åÅÉ=ïáíÜçìí=~å=
~ÅÅÉëëçêóLíççä=áå=íÜÉ=çéÉê~íáåÖ=éçëáíáçåK
cçê=êÉ~ëçåë=çÑ=ë~ÑÉíó=íÜÉ=~ééäá~åÅÉ=ã~ó=çåäó=
ÄÉ çéÉê~íÉÇ=ïÜÉå=ìåìëÉÇ=ÇêáîÉë=Ü~îÉ=ÄÉÉå=
ÅçîÉêÉÇ=ïáíÜ=ÇêáîÉ=Öì~êÇë=ENNI=NOI=NPFK
aç=åçí=çéÉê~íÉ=íÜÉ=~ééäá~åÅÉ=ÉãéíóK=
aç åçí ÉñéçëÉ=~ééäá~åÅÉ=çê=~ÅÅÉëëçêáÉë=íç=ÜÉ~í=
ëçìêÅÉëK
Before operating the appliance and
accessories for the first time, clean
thoroughly; see “Cleaning and servicing”.
Preparation
Place the base unit on a smooth, clean
surface
Pull out the power cord (
Fig. 3
).
If the appliance features an automatic cord
winder:
Pull out the cord in one go to the required
length (max. 110 cm) and slowly release;
the cord is locked.
Reducing the cord length: Pull gently
on the cord and allow it to roll up to the
required length. Then gently pull the cord
again and slowly release; the cable
is locked.
Insert the mains plug.
^ííÉåíáçå>
aç=åçí=íïáëí=íÜÉ=ÅçêÇ=ïÜÉå=áåëÉêíáåÖ=áíK=
fÑ=íÜÉ=~ééäá~åÅÉ=ÑÉ~íìêÉë=~å=~ìíçã~íáÅ=ÅçêÇ=
ïáåÇÉêI=Çç=åçí=áåëÉêí=íÜÉ=ÅçêÇ=ã~åì~ääóK=
fÑ=íÜÉ=ÅçêÇ=à~ãëI=éìää=çìí=íÜÉ=ÅçêÇ=~ää=íÜÉ=ï~ó=~åÇ=
íÜÉå=~ääçï=áí=íç=ïáåÇ=ìéK
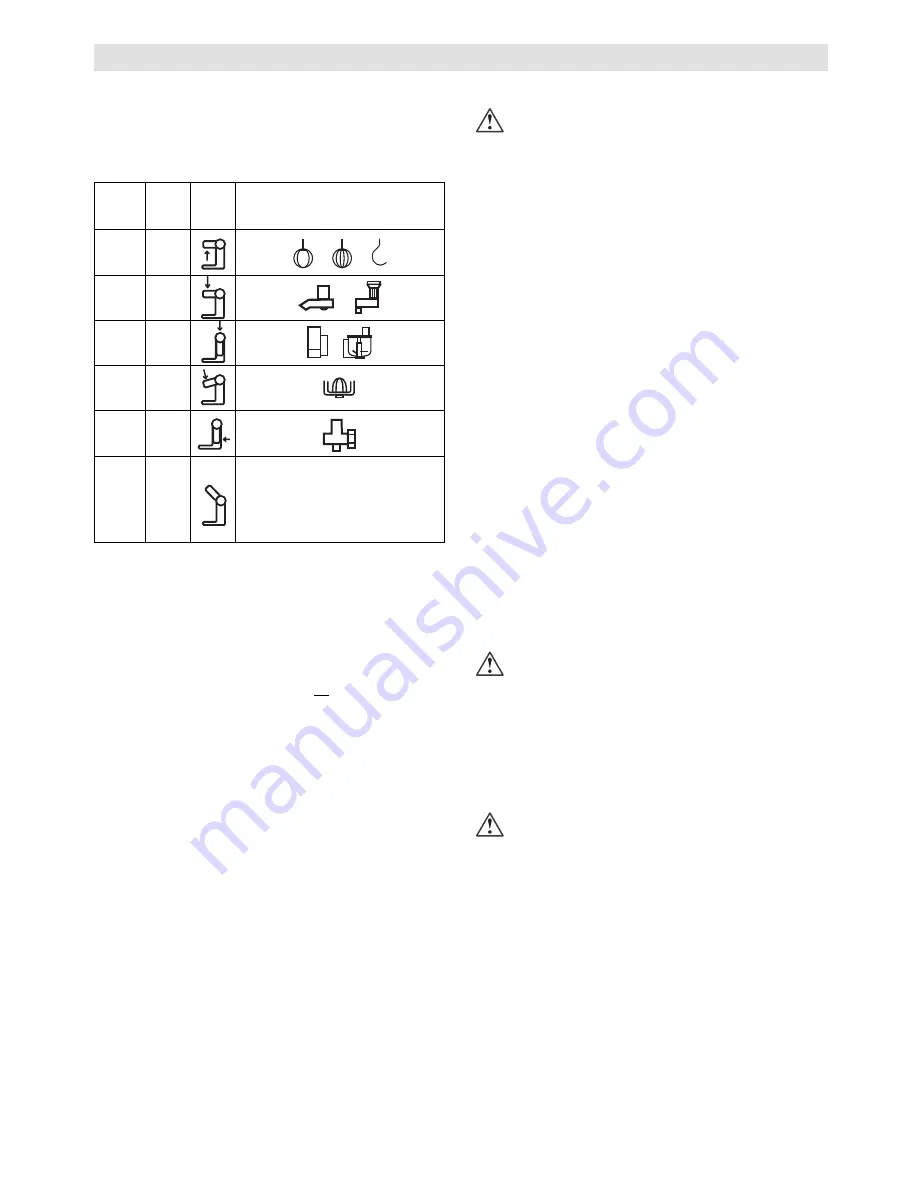
Setting the operating position
Fig. 4
^ííÉåíáçå>
^äï~óë=Öêáé=íÜÉ=ëïáîÉä=~êã=ïáíÜ=çåÉ=Ü~åÇ=ïÜÉå=
éêÉëëáåÖ=íÜÉ=êÉäÉ~ëÉ=ÄìííçåK
Press the Release button (
1
) and move
the swivel arm. In doing so, grip the swivel
arm with one hand.
Move the swivel arm until it engages
in the required position.
en
Posi-
tion
Drive
1
2b
2
2c
3
2a
4
2c
5
2b
6
2b
– Insert/remove whisk,
stirrer or kneading hook
– Add large quantities of
ingredients
Summary of Contents for MUM8
Page 96: ......
Page 97: ......
Page 130: ...NPM oçÄÉêí _çëÅÜ e ìëÖÉê íÉ dãÄe êJU ...
Page 131: ...oçÄÉêí _çëÅÜ e ìëÖÉê íÉ dãÄe NPN êJT ...
Page 132: ...NPO oçÄÉêí _çëÅÜ e ìëÖÉê íÉ dãÄe êJS ...
Page 133: ...oçÄÉêí _çëÅÜ e ìëÖÉê íÉ dãÄe NPP êJR ...
Page 134: ...NPQ oçÄÉêí _çëÅÜ e ìëÖÉê íÉ dãÄe êJQ ...
Page 135: ...oçÄÉêí _çëÅÜ e ìëÖÉê íÉ dãÄe NPR êJP ...
Page 136: ...NPS oçÄÉêí _çëÅÜ e ìëÖÉê íÉ dãÄe êJO ...
Page 137: ...oçÄÉêí _çëÅÜ e ìëÖÉê íÉ dãÄe NPT êJN ...
Page 142: ......
Page 143: ......
Page 144: ......
Page 145: ......
Page 146: ......


