8
| English
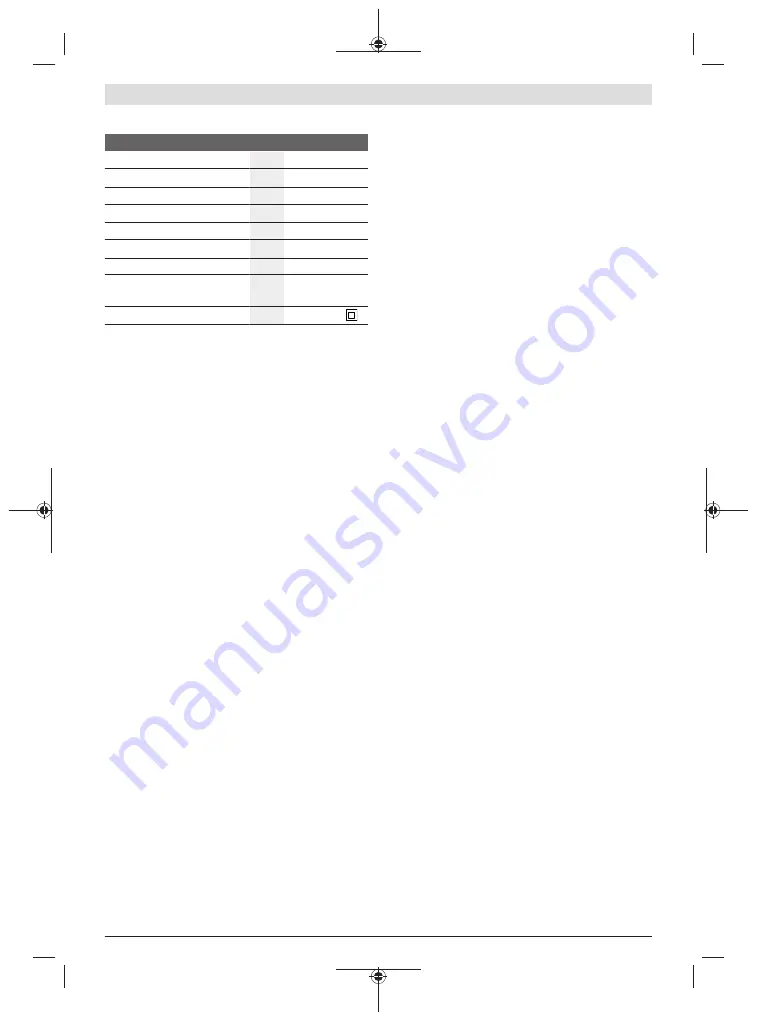
Technical data
Planer
PHO 2-82
Article number
3 603 B10 0..
Rated power input
W
710
Power output
W
400
No-load speed
min
-1
16000
Cutting depth
mm
0–2.0
Rebate depth
mm
0–7
Max. planing width
mm
82
Weight according to EPTA-Pro-
cedure 01:2014
kg
2.9
Protection class
/II
The specifications apply to a rated voltage [U] of 230 V. These spe-
cifications may vary at different voltages and in country-specific mod-
els.
Fitting
u
Pull the plug out of the socket before carrying out any
work on the power tool.
Choosing the Planer Blade
Always change both planer blades – replacing just one blade
will create an imbalance that could cause vibrations and
shorten the service life of the power tool.
Changing the HSS Planer Blades
u
Take care when changing the planer blade. Do not pick
up the planer blade by the cutting edges.
You may be
injured by the sharp cutting edges.
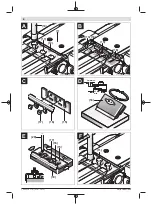
Removing the Planer Blades (see figures A–C)
– To replace the planer blades, turn the blade head
(13)
until the clamping jaw
(12)
is parallel with the planer base
plate
(1)
.
– Unscrew the three fastening screws
(11)
with the T-
handle socket spanner
(10)
and remove the clamping jaw
(12)
.
– Push the retaining clip
(16)
together with the planer
blade
(15)
out of the blade head
(13)
and/or the guide
groove
(14)
.
– Turn the blade head 180° and remove the second planer
blade.
Note:
Before changing or resharpening the planer blades,
remove the retaining clip
(16)
by undoing the fastening
screw
(17)
.
Resharpening HSS Planer Blades (see figure D)
Worn or blunt
HSS
planer blades can be resharpened using
the sharpening aid
(18)
(accessory) and a commercially
available grinding stone.
Place both planer blades in the sharpening aid and clamp
them firmly with the wing bolt. Make sure that both planer
blades are pushed in fully.
Move the planer blades placed in the sharpening aid steadily
across the grinding stone, applying light pressure.
Note:
The planer blades must not be resharpened by more
than 6 mm (i.e. to a minimum width of 23 mm). Both planer
blades must be replaced when they reach this size.
Fitting the Planer Blades (see figures E–F)
Before (re)inserting new or resharpened planer blades,
clean the blade head
(13)
and, if necessary, the planer
blade
(15)
and the retaining clip
(16)
. Clean heavily
gummed planer blades with spirits or petroleum.
Note:
New and resharpened planer blades must always be
set to the correct height before fitting.
The setting gauge
(19)
(accessory) is used to adjust the
height of the planer blades. Place the planer blade
(15)
and
the retaining clip
(16)
on the setting gauge. Make sure that
the blade retainer
(16)
engages in the groove intended for
this purpose. Press the planer blade
(15)
against the guide
and fix the retaining clip
(16)
in this position with the fasten-
ing screw
(17)
. This will automatically adjust the correct
height.
The planer blade must be fitted and aligned with the
centre
of the planer base plate
(1)
. Afterwards, tighten the three
fastening screws
(11)
with the T-handle socket spanner
(10)
.
Note:
Check that the fastening screws
(11)
are firmly
tightened before start-up. Turn the blade head
(13)
by hand
and ensure that the planer blades are not brushing against
anything.
Dust/Chip Extraction
The dust from materials such as lead paint, some types of
wood, minerals and metal can be harmful to human health.
Touching or breathing in this dust can trigger allergic reac-
tions and/or cause respiratory illnesses in the user or in
people in the near vicinity.
Certain dusts, such as oak or beech dust, are classified as
carcinogenic, especially in conjunction with wood treatment
additives (chromate, wood preservative). Materials contain-
ing asbestos may only be machined by specialists.
– Use a dust extraction system that is suitable for the ma-
terial wherever possible.
– Provide good ventilation at the workplace.
– It is advisable to wear a P2 filter class breathing mask.
The regulations on the material being machined that apply in
the country of use must be observed.
u
Avoid dust accumulation at the workplace.
Dust can
easily ignite.
Clean the chip ejector
(5)
regularly. Clean a clogged chip
ejector using a suitable tool, e.g. a piece of wood, com-
pressed air, etc.
u
Do not allow the chip ejector to come into contact with
your hands.
You may be injured by rotating parts.
1 609 92A 57B | (02.07.2019)
Bosch Power Tools
Summary of Contents for PHO 2-82
Page 2: ...2 English Page 6 1 609 92A 57B 02 07 2019 Bosch Power Tools ...
Page 3: ... 3 PHO 2 82 1 2 3 4 5 6 7 3 9 8 Bosch Power Tools 1 609 92A 57B 02 07 2019 ...
Page 5: ... 5 45 8 2 m m m a x 9 mm max 1 G H I 21 22 2 8 Bosch Power Tools 1 609 92A 57B 02 07 2019 ...
Page 11: ... 11 1 619 PA2 313 Bosch Power Tools 1 609 92A 57B 02 07 2019 ...


