English |
9
A
B
180°
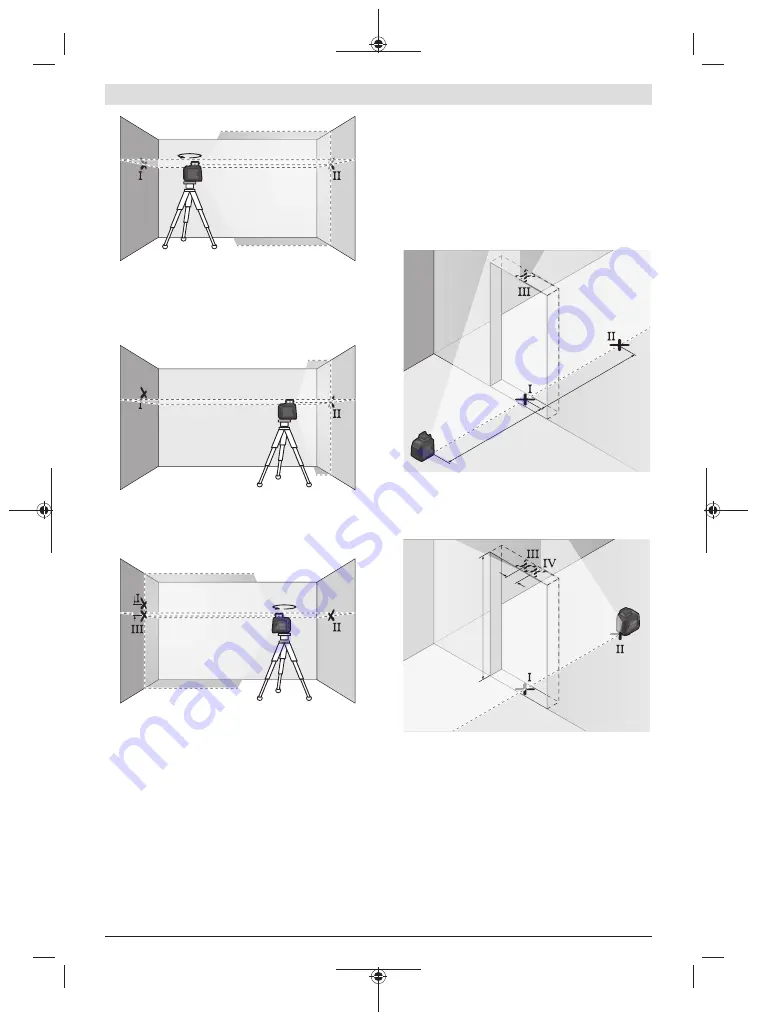
– Turn the measuring tool 180°, allow it to level in and mark
the point where the laser lines cross on the opposite wall
B (point
Ⅱ
).
– Position the measuring tool – without rotating it – close to
wall B, switch it on and allow it to level in.
A
B
– Align the height of the measuring tool (using the tripod or
by placing objects underneath as required) so that the
point where the laser lines cross exactly hits the previ-
ously marked point
Ⅱ
on wall B.
A
B
d
180°
– Turn the measuring tool 180° without adjusting the
height. Aim it at wall A such that the vertical laser line runs
through the already marked point
Ⅰ
. Allow the measuring
tool to level in and mark the point where the laser lines
cross on wall A (point
Ⅲ
).
– The discrepancy
d
between the two marked points
Ⅰ
and
Ⅲ
on wall A reveals the actual height deviation of the
measuring tool.
The maximum permitted deviation on the measuring dis-
tance of 2 ×
5
m =
10
m is as follows:
10
m × ±
0.4
mm/m = ±
4
mm. The discrepancy
d
between
points
Ⅰ
and
Ⅲ
must therefore amount to no more than
4
mm.
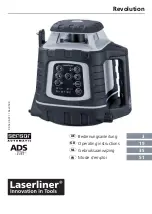
Checking the Level Accuracy of the Vertical Line
For this check, you will need a door opening (on solid
ground) which has at least 2.5 m of space either side of the
door.
– Place the measuring tool 2.5 m away from the door open-
ing on a firm, flat surface (not on a tripod). Switch on the
measuring tool and select vertical operation. Aim the
laser line at the door opening and allow the measuring
tool to level in.
2,5 m
2,5 m
– Mark the centre of the vertical laser line on the floor of the
door opening (point
Ⅰ
), 5 m away on the other side of the
door opening (point
Ⅱ
) and on the upper edge of the door
opening (point
Ⅲ
).
2 m
d
– Rotate the measuring tool 180° and position it on the
other side of the door opening, directly behind point
Ⅱ
.
Allow the measuring tool to level in and align the vertical
laser line in such a way that its centre passes through
points
Ⅰ
and
Ⅱ
exactly.
– Mark the centre of the laser line on the upper edge of the
door opening as point
Ⅳ
.
– The discrepancy
d
between the two marked points
Ⅲ
and
Ⅳ
reveals the actual vertical deviation of the measuring
tool.
– Measure the height of the door opening.
You can calculate the maximum permitted deviation as fol-
lows:
Bosch Power Tools
1 609 92A 607 | (14.01.2021)


