background image

6 720 606 990 (2014/06)

Remote Control

Remote control installation for: GWH 635 ES/GWH 635 ESO/250SX/250SXO/

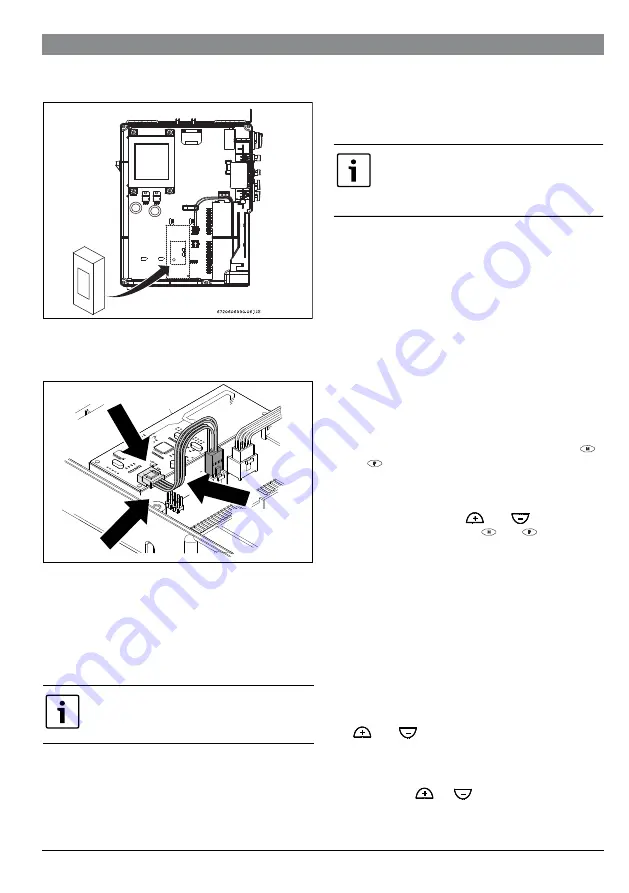
▶ Remove the other protective paper and attach the remote 

control PCB as shown in Fig. 6.

Fig. 5


 Support correct position

▶ Use the supplied cable to connect between the main PCB 

and the remote control PCB as shown in Fig. 6.

6720606990-05.2JS

Remote PCB

Support

Cable
connections

Fig. 6


▶ Replace the control unit cover with the 4 Phillips head 

screws (Fig. 4, [1]).

▶ Slide control unit back into heater.
▶ Plug 2 yellow electrode wires from the top of the control 

unit back onto the ignition electrodes. Ensure all 
connections are secure and tight (Fig. 2, [3]).

Wire polarity does not matter on the electrode 
wires.

▶ Pull end of power cord to take up excess slack and tighten 

retaining nut on the bottom of the heater.

▶ Reinstall the two electrical strip connectors onto the PCB. 

The larger connector connects to the lower connection on 
the PCB. Reseat the rubber seals for both connectors.

▶ Replace the control unit auxiliary cover (Fig. 2, [4]).
▶ Replace front retaining bar using 5 Phillips head screws. 

(Fig. 2, [1]).

4.2

Remote control activation

Before the remote control will work, it must be 
activated using the procedure described 
below with the operator standing in front of the 
appliance.

The remote control activation instructions vary based on the 
version of control board installed in your heater.

To determine the control board version in the water heater:

▶ Turn power switch on the water heater to the off position 

(O).

▶ When turning power switch to the on position, note the first 

two letters that appear on the display (should be AF or SU).

▶ If the letters are AF, follow section 4.2.1

For SU, follow section 4.2.2.

4.2.1 AF board

▶ Connect power to heater.
▶ Move the power switch on the appliance to the off position 

(0).

▶ On heater control panel press and hold Program key 


or 

 while turning on the power switch (I). 

Release program key when LCD displays “188”.

LCD shows “P2”. If not, repeat previous step.

▶ Select “P3” using buttons 

 and 

 on heater.

▶ Press and hold Program key 

 or 

 again for 1 

sec.

LCD shows one number and one rotating digit. If not, repeat 
previous step. 
The number represents the remote control which is to be 
registered, the first remote control will be registered with 
number “0”, the second with number “1” and so on. 
The rotating digit shows that the electronics is expecting a 
registration. If the LCD fails to show a number and rotating digit 
after repeated attempts, double check the wire connections 
made in section 4.1.

▶ Hold remote control in front of the control panel on the 

heater and simultaneously press remote control buttons 

 and 

 until the temperature indication is shown 

on the remote control LCD.

▶ Switch power switch on the appliance to the "OFF" (0) 

position and then back "ON" (I).

▶ Press buttons 

 or 

 in order to reach desired 

temperature.

New remote control is programmed.

Summary of Contents for Remote Control

Page 1: ...635 ESO 250SX 250SXO 2400E 2400EO 2400ES 2700ES 715ES C800ES C920ES C920ESC EVOLUTION 500 INTEGRA 500 C1210ES C1210ESC C1050ES C950ES 940ES 940ESO 830ES Bosch Remote Control 6720606990 00 1JS 6 720 606 990 2014 06 US ...

Page 2: ...emote control installation for GWHC920ES GWH C920ESC GWH C800 ES GWH 715 ES GWH 2700 ES GWH2400ES EVOLUTION500 INTEGRA500 C1210ES C1210ESC C1050ES C950ES 940ES 940ESO 830ES 7 5 1 Remote control transceiver PCB installation 7 5 2 Remote control activation 8 6 Remote control 8 6 1 Description of the LCD 8 6 2 Hot water temperature adjustment by remote control 9 6 3 Program button on the remote contr...

Page 3: ...ollowingcountries UnitedStates of America and Canada This device complies with Part 15 of the FCC rules Operation is subject to the following two conditions 1 This device may not cause harmful interference and 2 this device must accept any interference received including interference that may cause undesired operation 2 Remote control data Remote control for temperature adjustment of Bosch water h...

Page 4: ...ycover Fig 4 seediagrambelow andthenloosen the 110V power supply cord retaining nut located underneaththeheater Onceloosened thepowercordcan be pulled up through the heater to provide sufficient slack Once auxiliary cover isoff pulloffthetwo electrical strip con nectors from the board Once off the wiring harness can beremovedfromthe case by pulling their rubber seals out ward Fig 3 Electrical stri...

Page 5: ...ctions vary based on the version of control board installed in your heater Todeterminethecontrolboardversioninthewaterheater Turn power switch on the water heater to the off position O Whenturningpowerswitchtotheonposition notethefirst twolettersthatappearonthedisplay shouldbeAForSU If the letters are AF follow section 4 2 1 For SU follow section 4 2 2 4 2 1 AF board Connect power to heater Move t...

Page 6: ...d the first remote control will be registered with number 0 the second with number 1 and so on The rotating digit shows that the electronics is expecting a registration If the LCD fails to show a number and rotating digit after repeatedattempts doublecheckthewireconnectionsmadein section 4 1 Hold remote control in front of the control panel on the heater and simultaneously press remote control but...

Page 7: ...performing installation Pre installation preparation LoosenthetwoPhilipsheadscrewslocatedonbottomrear of cover Lift front cover upward and remove Remove the three screws from the control unit Fig 8 1 Fig 7 Remove the 6 screws from the back cover of the control unit to access the electronic board PCB Fig 8 2 6720606990 10 1AL Fig 8 Remote control transceiver PCB installation Place the remote contro...

Page 8: ...he rotating digit shows that the electronics is expecting a registration IftheLCDfailstoshowanumberandrotatingdigit after repeated attempts double check the wire connections made in section 5 1 Hold remote control in front of the control panel on the heater and simultaneously press remote control buttons and until the temperature indication is shown on the remote control LCD PressON OFFbuttononthe...

Page 9: ...e remote control Fig 13 3 for 3 seconds Note Previously saved temperature may show on the display when first pushing the program button Once PR shows on the display the desired setting will be saved Fig 13 Memorizing water temperature Only one temperature per remote control can be memorized using the Program button on the remote control At this point the remote control will display the memorized t...

Page 10: ...on the remote control display Use the hot water within two minutes of acquiring priority Priority cannot be acquired while the hot water tap is open 6 5 Error messages This device has an error message system Any errors that the heater generates will be indicated by an error code that will appear on the display Fig 11 1 and by a symbol indicating a safety block Fig 11 7 The remote control will be o...

Page 11: ...m for further troubleshooting on error codes 5 Remote will not memorize desired temperature setting Verify that the remote control program button is depressed until the remote display reads Pr Memorization of a selected temperature only saves to the device on which it was originally programmed To retrieve a memorized temperature setting you must use the device with which it was programmed 6 Priori...

Page 12: ......

Reviews: