background image


VFD (Variable frequency drive) 

59/80

Hägglunds DOb, RE 15327-WA/05.2017, Installation and maintenance manual, 

Bosch Rexroth AB

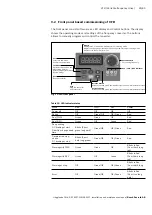
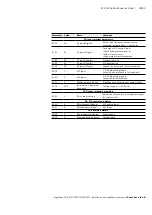
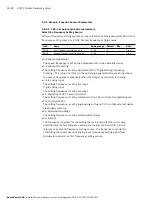
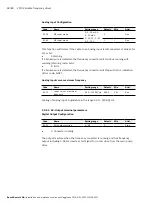
9.3.5.4  E4: PID control parameters (optional)

In PID control, a negative feedback system is formed with proportional, integral and 
derivative operations based on the differences between reference values and their 
feedback.
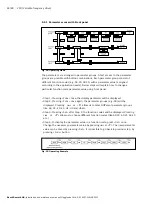
Take the following steps to configure the PID reference:

Step1: Select the PID reference channel

Code

Name

Setting range

Default

Min

Attri.

E4.00

PID reference channel

0…9

0

-

Stop

• 

[E4.00] = 0: Inactive


The PID control function is inactive.

• 

[E4.00] = 1: Panel potentiometer


The reference value is set by adjusting the potentiometer on the operating panel.

• 

[E4.00] = 2: Panel button


The reference value is set by E0.07 'Digital setting frequency', which can be 
decreased or increased by pressing the <▼> or <▲> buttons on the operating panel 
respectively when the frequency converter is running.

• 

[E4.00] = 3: AI1 analog input


The reference value is set by AI1 analog input.

• 

[E4.00] = 4: AI2 analog input


The reference value is set by AI2 analog input.

• 

[E4.00] = 5: X5 pulse input


The reference value is set by pulse signal via X5 input.

• 

[E4.00] = 7: Communication


The reference value is set by engineering software, PLC or other external devices 
via Modbus or other communication.

• 

[E4.00] = 8: Analog reference E4.03


The reference value is set by parameter E4.03.

• 

[E4.00] = 9: Speed reference E4.04


The reference value is set by parameter E4.04.

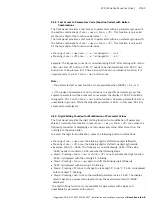
Frequency converter for pump drive uses AI 2 analog input (E4.00=4) as the PID 
reference channel.

Summary of Contents for Rexroth Hagglunds DOb

Page 1: ...Installation and maintenance manual RE 15327 WA 05 2017 Supersedes 12 2016 English Hägglunds DOb Drive unit ...

Page 2: ...ocess of wear and aging This document as well as the data specifica tions and other information set forth in it are the exclusive property of Bosch Rexroth AG It may not be reproduced or given to third parties without its consent Changes in the equipment may occur We there fore reserve the right to introduce amendments in the manual as we deem necessary without notice or obligations The cover show...

Page 3: ... product 15 5 1 Product description 15 5 2 Product identification 15 5 3 Main components 16 5 4 Hydraulic fluids 17 5 5 Requirements for hydraulic fluid cleanliness 18 5 6 Control cabinet function 19 5 7 Control cabinet interface 20 6 Transport and storage 21 6 1 Storage of the packed drive unit 21 6 2 Lifting the packed drive unit 22 7 Installation 23 7 1 Installation directives 23 7 2 Lifting me...

Page 4: ...e and repair 62 10 1 Maintenance log 62 10 2 Preventive maintenance 62 10 3 Filter change 64 10 4 Inspection of hydraulic fluid 64 10 5 Electric motor 66 10 6 Cooler 68 10 7 Drive unit out of service 68 10 8 Repair 69 10 9 Spare parts 69 11 Removal and replacement 70 11 1 Common 70 12 Disposal 71 12 1 Environmental protection 71 13 Extension and conversion 71 14 Troubleshooting 72 15 Technical dat...

Page 5: ...firmation Contains the order related technical data for your Hägglunds DOb Order confirmation Order documentation Order specific E g hydraulic and electric diagrams bill of material specifications Hydraulic fluid quick reference RE 15414 Data sheet Float switch Type ABZMS 41 RE 50222 B Operation manual 1 3 Display of information Standardized safety instructions symbols terms and abbreviations are ...

Page 6: ...unless averted WARNING Indicates a dangerous situation which could result in death or serious physical injury unless averted CAUTION Indicates a dangerous situation which could result in minor to moderate physical injury unless it is averted NOTice Material damage the product or its environment could be damaged 1 3 2 Symbols The symbols below indicate instructions which are not safety relevant but...

Page 7: ...ty of the entire system has been established in accordance with the machine directive Intended use includes having read and understood the complete documentation especially the chapter 2 Safety instructions The product is intended for the following use Create hydraulic flow in a open loop hydraulic system Standard drive units are not allowed to be used outside an ambient temperature of 0 C to 40 C...

Page 8: ... under the direction and supervision of qualified personnel Qualified personnel are those who can recognize possible hazards and institute the appropriate safety measures due to their professional training knowledge and experience as well as their understanding of the relevant regulations pertaining to the work to be done Qualified personnel must observe the rules relevant to the subject area and ...

Page 9: ...ata and ambient conditions stated in the product documentation If unsuitable products are fitted or used in safety critical applications unintended operating conditions may arise which could cause personal injury and damage to property So do not use a product for safety critical applications unless that use is specifically stated and allowed in the product documentation e g in explosion risk areas...

Page 10: ...ion Use your personal protective equipment e g safety glasses safety gloves suitable working clothes safety shoes Use suitable lifting device for transport and storage For removal and repair make sure the electric motor is well mounted or anchored when the lifting device is disconnected Observe the prescribed position of the lifting strap Observe the national laws and regulations on work and healt...

Page 11: ...d to work on or with electrical equipment Prior to switching the equipment on always check the protective earth conductor for reliable connection to all electrical equipment according to the connection diagram Exclusively run the component device even for short time measurements or tests with the protective earth conductor reliably connected to the dedicated connection points Always wait 5 minutes...

Page 12: ...nt manufacturer Use your personal protective equipment e g safety glasses safety gloves suitable working clothes safety shoes If hydraulic fluid should nevertheless come into contact with your eyes or bloodstream or is swallowed consult a doctor immediately Escaping hydraulic fluid due to machine system leakage Risk of burns and risk of injury due to escaping oil jet Depressurize the machine syste...

Page 13: ...al assembly to avoid dirt in the system Do not perform electro welding on the Hägglunds drive unit Damage to equipment due to improper lubrication Product can be damaged or destroyed Never operate the Hägglunds drive unit with insufficient hydraulic fluid When commissioning a machine system make sure that the case interior and the service lines of the Hägglunds motor are filled with hydraulic flui...

Page 14: ...stem Improper cleaning Product can be damaged Plug all openings with the appropriate protective equipment in order to prevent detergents from entering the hydraulic system Never use solvents or aggressive detergents Use only water and if necessary a mild detergent to clean the Hägglunds drive unit Never use a high pressure washing system to clean inside the drive unit Do not point the power washer...

Page 15: ...he pump DOb is equipped with an air cooler for the hydraulic oil the fan of the cooler is speed controlled to minimize the sound level The unit has a maximum power of 7 5 kW maximum flow of 30 lpm and maximum working pressure of 315 bar The max flow and max pressure cannot be achieved simultaneous The control cabinet contains two VFD units Variable Frequency Drive for speed control of main pump an...

Page 16: ...lectrical motor 2 Hydraulic pump 3 Pump safety block Fig 22 4 Shaft coupling bellhousing 5 Frame not shown 6 Panels not shown 7 Control cabinet Fig 5 8 Air oil cooler 9 Cooler fan motor 10 Oil tank Fig 19 11 Filter 12 Pressure sensor 13 Oil level temperature sensor Fig 19 14 Air breather Fig 19 15 Oil drain valve Fig 19 16 Main power switch Fig 5 17 Emergency stop actuator Fig 5 8 1 2 2 4 5 7 9 10...

Page 17: ...ic fluid The hydraulic fluid should be selected such that the operating viscosity in the temperature range as measured in the motor housing is within optimum operation range see Fig 3 Selection diagram for viscosity ranges with straight fluids i e viscosity index 100 General recommendation is to have a system temperature of 50 C see dotted line in Fig 3 Selection diagram for viscosity ranges with ...

Page 18: ...h hydraulic fluid it is important to fill through the special oil filler connection see 8 2 Filling up the system with hydraulic fluid For industrial applications the contamination level should not exceed ISO 4406 1999 18 16 13 Have a water content of 200 ppm 0 02 Always use filter elements recommended and supplied by Bosch Rexroth The hydraulic fluid should be analysed according to the special ma...

Page 19: ... dry contact connected to terminals for start stop in remote mode The command for setting of speed or pressure is via a front panel potentiometer in local mode and via terminals for a 4 20mA signal in remote mode Selection of local or remote mode is done with a front panel switch Indicators of speed and pressure are available on the front panel The second VFD controls the speed of the electrical m...

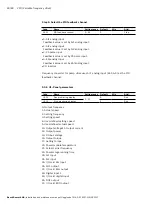
Page 20: ...2 11 10 9 8 7 Pos Description 1 Emergency stop 2 System alarm 3 System running 4 Alarm oil temperature 5 Alarm oil level 6 Control panel frequency converter 7 Actual pressure 8 Actual speed 9 Warning cooler 10 Warning filter 11 Regulator on off 12 Command local remote 13 Main power switch 14 Warning sign electricity Fig 5 Front control cabinet DD00082773 14 ...

Page 21: ...t bags to absorbe moisture This provides sufficient corrosion protection for indoor storage in air conditioned premises for about 12 months The drive unit and belonging parts should be stored indoors in dry vibration free and dust free conditions It should not be stored for more than three months in non air conditioned premises The drive unit must be placed where not exposed to strong sunlight or ...

Page 22: ... risk of injury damage to equipment Centre of gravity is high see label on the crate Avoid rapid acceleration deceleration and turns while moving the goods Position the forks according to the instructions in 6 2 Lifting the packed drive unit section Lifting with fork lift Fig 6 Maximum width of forks lifting packed drive unit Lifting with fork lift The lifting of drive unit must be done from long ...

Page 23: ...autions in this manual always are followed Position the drive unit on a firm level foundation to avoid vibrations to ease maintenance and service see 7 3 Positioning the drive unit protected from weather airborne sprays heavy contaminations and radiated heat to ensure free ventilation for cooling purposes for the electric motor and the air oil cooler to minimize pipe runs Clamp each pipe in the pi...

Page 24: ...ree lifting points when lifting the drive unit 7 3 Positioning the drive unit The following minimum space must be left around the drive unit to ensure free ventilation and provide sufficient working space for easier maintenance Heavier maintenance e g change of motor pump will demand more working space It is important that all pipes are mounted to give sufficient working space for maintenance warn...

Page 25: ...87 C min 600 15 75 D min 600 15 75 Anchoring If the unit is mounted on an inclined plane or if it is exposed to external influences such as wind or vibration the unit should be mounted to the ground with bolts trough the supporting base of the frame according to Fig 10 Max inclination of drive unit is 14 Fig 9 Recommended space around DOb DD00081611 D C A B Fig 10 Anchoring DOb DD00083915 ...

Page 26: ...ways use hoses to connect with piping All measures in the hydraulic system must be performed by professional service personnel with knowledge of risks involved Be especially accurate when connecting the A connection high pressure DANGER Pressurized oil leakage Danger to life or risk of injury Do not open any connections if the hydraulic system is pressurized Table 6 Hydraulic connections Fig 11 Hy...

Page 27: ...ge connections Torque mm in mm in Nm 10 0 A10FZO 008 A10FZO 010 1 SAE M12 x 1 75 17 0 6 22 4 0 9 92 Torque acc to SAE J518 2 with class 10 9 or grade 8 screws Table 7 Dimensions pump connections Fig 12 High pressure connection DD00082671 Fig 13 Dimensions external connections points 125 mm 4 92 in 652 mm 13 98 in DD00081611 DD00082672 190 mm 7 48 in 355 mm 13 98 in 115mm 4 53 in 883 mm 34 76 in ...

Page 28: ...al assembly Flange fittings The flange screws must be tightened crosswise Ermeto type tube fittnings 24o cone soft seal DIN 3861 ISO 8434 4 Tighten the fittning nut with wrench until it stops Tighten additional 1 6 turn to 1 4 turn Use correct size of tool to avoid fitting to be damaged and difficult to remove BSPP G fittings 1 For dimension 1 and larger if necessary spray nut abutment with a vola...

Page 29: ...of hoses Cleaning The pipes and hoses should be pre cleaned inspected and sealed by the supplier If the pipes are field bent and installed the overall system must be carefully oil flushed to reach the required cleanliness level Mounting of hoses Ensure that hoses not are stressed or twisted on installation to avoid premature failure Bend radius should conform to manufacturers recommendations ...

Page 30: ...essary for the prevention of accidents at the mounting and operating site shall be provided in accordance with the regulations prevailing in the local country Grounding shall be carried out according to local regulations before the electric equipment is connected to the main voltage Grounding point on the side of the frame All electrical supply levels must be within the limits that the equipment i...

Page 31: ...nstallation 31 80 Hägglunds DOb RE 15327 WA 05 2017 Installation and maintenance manual Bosch Rexroth AB DD00081605 DD00081624 Fig 17 Simplified terminals view inside cabinet Fig 16 External connections ...

Page 32: ...DC 8 24 VDC 9 Pulse train 10 Not used 11 Pressure sensor 24 VDC 12 4 20 mA 13 14 15 16 Jumpers for pressure feedback Jumpers for speed feedback Pressure signal 0 VDC Speed signal Signal input to regulator 17 Remote drive start 24 VDC 18 Start input 19 Remote speed pressure setpoint 4 20 mA 20 4 20 mA return X5 1 Sum alarm indication Dry contact A 2 Dry contact B 3 Emergency stop indication Dry con...

Page 33: ...t voltages Check the function of electrical components and monitoring system manually Instruments that cannot be actuated can be checked for correct wiring and possibly operated manually Level switch and indication should be checked when filling up the tank Check interlock of electric motor Check the stop sequence of the system at alarm Check grounding of frame grounding point on side of frame see...

Page 34: ... power switch in on position This will also power on the level and temperature sensor Make sure that the display on the level and temperature sensor is showing the oil level Use the key to change between showing the oil temperature or the oil level in the measured value display mode For more info regarding operation of the level and temperature sensor see chapter 4 operation in operation manual RE...

Page 35: ...measure max Fig 19 Tank with level sensor DD00082676 Table 9 Volumes for threshold levels Max level measure max Nominal level Alarm stop level Volume Distance from top Volume Distance from top Volume Distance from top L gal mm inch L gal mm inch L gal mm inch 121 72 19 25 0 98 100 60 16 108 4 25 70 42 11 168 6 61 Fig 20 Point of measure DD00082938 ...

Page 36: ...g line to the hydraulic motor the drain line from the motor has to be plugged If the system is fitted with a flushing line to the hydraulic motor the flushing line shall be connected to the drain line of the motor to enable cleaning of the flushing line Fig 21 Hydraulic circuit flushing Caution Rotating parts Risk of injury Do not touch rotating parts The maximum flow from the drive unit should be...

Page 37: ...commissioning have been carried out Check fluid level in the tank and refill to the nominal level see 8 2 Filling up the system with hydraulic fluid Check if any components need filling with clean hydraulic fluid i e motor case Check safety equipment Make sure that all valves in the pressure return and drainage lines are open Set front panel regulator switch off see Fig 5 switch pos 11 Set front p...

Page 38: ... Gradually increase load until satisfactory operation is obtained It may be necessary at this point to make adjustments to flow ramp rates etc Cycle the system until normal operating temperature is reached If system will run with speed feedback check and adjust feedback regulator parameters STEP 5 Check Unusual noises or vibrations Function of safety equipment Temp in tank and hydraulic loop Check...

Page 39: ...or As default the cooling fan will start when the temperature in the oil tank is 40 C 104 F and at 50 C 122 F the maximum speed of the cooling fan will be reached Depending on the application and oil type in the system a change of the default values can be needed Contact your Bosch Rexroth representative for advice How to change the values for when the cooling fan will start and when the maximum s...

Page 40: ...tely with the free PC software ConverterWorks The supporting package is available for download from the webpage www boschrexroth com efcx610 product catalogue EFC 3610 section The software makes it easy to specify and adjust the parameters Parameters can be saved and stored to ensure reliable archiving Minimum system requirements for using the software on a PC Processor Intel Pentium or higher cap...

Page 41: ...ers the device must be online Click on Parameterization Save Choose a file name and a destination To save all available parameters switch the parameter selection to all parameters Click on save 9 1 3 How to load a new parameter file using ConverterWorks software In order to load a parameter file the device must be online Click on Parameterization Load Choose a parameter file Click on Load ...

Page 42: ...e In order to change the value of a parameter Click Parameterization Edit parameter File Load a parameter file or choose Axis as parameter source Parameters loaded from the connected circuit Double click on the parameter value Change the parameter value Press enter to save the parameter value Close the parameter box It is possible to compare two parameter files with the option Compare ...

Page 43: ... parameter d0 99 Select a new Firmware file for update of the device The existing Firmware on the device is stopped After loading the new file the internal name of the new firmware is shown at the right side of the window Select Update to perform the update If the parameter settings of the old version not are compatible with the new Firmware version there will be a warning Firmware Update is not c...

Page 44: ...e manual Hägglunds DOb RE 15327 WA 05 2017 The module loading message appears three times The device will boot automatically after the update has been finished Firmware updated successfully is displayed and the update window can be closed The device has to be rebooted after update ...

Page 45: ...een Off Off Green Red Warning with FWD Green Green Off Blinks in Red Short dark long red Warning with REV Green Off Green Blinks in Red Short dark long red Warning at stop Off Green Off Off Green Blinks in Red Short dark long red Error Off Green Off Off Green Blinks in Red Short red long dark Table 10 LED indicator status Set Enter into sub menu Confrim set parameters Fundtion Switch between menu ...

Page 46: ...value using front panel Step 1 Pressing Func once the display parameter will be displayed Step 2 Pressing Func once again the parameter groups e g b0 will be displayed Pressing or allow us to select different parameter groups like b0 C2 E0 E9 H1 U0 and d0 etc Step 3 Pressing Set after Step 2 the function codes will be displayed Pressing or allow us to choose different function codes like b0 20 b0 ...

Page 47: ... However parameter E0 11 is unavailable in group E While the adjacent parameter is E0 15 In this case E0 15 is accessed and displayed 9 2 3 Digit Shifting Function for Modification of Parameter Values The front panel provides the digit shifting function for modification of parameter values To activate this function press Func or Func once when the frequency converter is displaying a certain parame...

Page 48: ...ting frequency f n 30 n speed rpm f frequency Hz n 600 rpm C2 V F control parameters C2 07 100 Slip compensation factor 1 100 full slip compensation E0 Set point and control parameters E0 00 0 First frequency setting source 0 Potentiometer E0 02 3 Second frequency setting source 3 AI 2 analog input E0 08 120 Maximum output frequency Allowed maximum output frequency f n 30 n 3600 rpm Max speed of p...

Page 49: ...n E1 04 31 X5 input Digital Second run command source activation E1 35 1 AI 1 input 1 4 20 mA setting range Actual Speed or pressure for feedback E1 40 1 AI 2 input 1 4 20 mA setting range Set speed in remote mode E1 61 2 Broken wire protection 2 Broken wire detection for analog inputs E1 73 100 Input curve 1 maximum frequency Setting range is 0 E0 09 Hz E2 Output terminal parameters E2 01 1 DO1 o...

Page 50: ...n 30 n speed in rpm n 1640 rpm E0 26 1 0 Acceleration time Ramp rise time E0 27 1 0 Deceleration time Ramp fall time E0 50 1 Stop mode 1 Freewheeling stop E1 Input terminal parameters E1 00 35 X1 input 35 Forward running Start signal from pump drive E1 35 1 AI 1 input mode 1 4 20 mA Frequency setting signal from temperature sensor E1 61 2 Broken wire protection 2 Error E1 73 54 67 Input curve 1 ma...

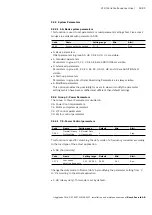
Page 51: ...isible 4 Modified parameters This option provides the possibility for users to view or modify the parameter settings which have been modified and different than default settings 9 3 4 Group C Power Parameters The Group C Power Parameters is divided in C0 Power Control parameters C1 Motor and system parameters C2 V F control parameters C3 Vector control parameters 9 3 4 1 C0 Power Control parameter...

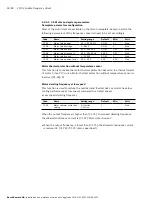
Page 52: ...otor rated power factor 0 00 0 99 0 00 0 00 Stop Motor thermal protection without temperature sensor This function is to realize the motor thermal protection based on the thermal model of motor Since PTC in use Motor thermal protection without temperature sensor is inactive C1 69 0 Motor derating frequency at low speed This function is used to reduce the overload and thermal risks as motors have l...

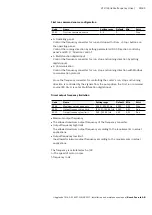
Page 53: ...refers to square voltage frequency control which is used for variable torque loads of fans pumps etc The frequency converter for controlling the cooler fan of electric motor used this control mode Slip compensation factor configuration Slip is defined as the relative difference between synchronous speed speed of the rotating magnetic field and rated speed rotor speed Slip compensation factor is us...

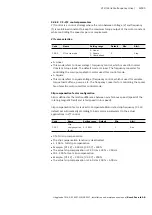
Page 54: ...ressing and buttons on the operating panel will decrease and increase the output frequency respectively when the frequency converter is running 2 AI1 analog input The setting frequency is set by AI1 input 3 AI2 analog input The setting frequency is set by AI2 input 11 Digital input Up Down command The setting frequency is set by command of Up Down Reset via digital inputs 20 Communication The sett...

Page 55: ...tion protocol Since the frequency converter for controlling the cooler s run stop and running direction is controlled by the signals from the pump drive the First run command source E0 01 1 is set as Multifunction digital input Direct output frequency limitation Code Name Setting range Default Min Attri E0 08 Maximum output frequency 50 00 400 00 Hz 50 00 0 01 Stop E0 09 Output frequency high limi...

Page 56: ... Deceleration time configuration Code Name Setting range Default Min Attri E0 26 Acceleration time 0 1 6 000 0 s 0 1 DOM Run E0 27 Deceleration time 0 1 6 000 0 s 0 1 DOM Run Acceleration deceleration time setting is the time for frequency increase from 0 00 Hz to E0 08 Maximum output frequency the time for frequency decrease from E0 08 to 0 00 Hz respectively Stop mode setting Code Name Setting r...

Page 57: ... electric motor the second frequency setting source is set to AI2 analog input by setting parameter E0 02 When X1 input is active the actual setting frequency is set by the second frequency setting source AI2 analog input 31 Second run command source activation Used for switching to the second run command source X5 enables remote drive start 33 Error signal N C contact input If the defined input i...

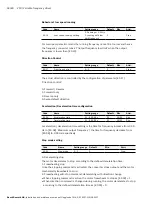
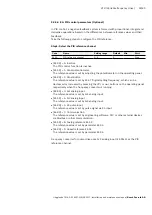
Page 58: ...ith warning Warning code Aib 2 Error If a broken wire is detected the frequency converter will stop with error indication Error code AibE Analog input curve maximum frequency Code Name Setting range Default Min Attri E1 73 Input curve 1 maximum frequency 0 00 E0 09 Hz 50 00 0 01 Run Scaling of analog input Adjustable in the range 0 00 E0 09 Hz 9 3 5 3 E2 Output terminal parameters Digital Output C...

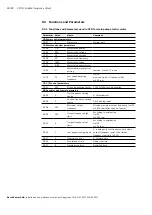
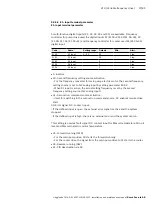
Page 59: ...r on the operating panel E4 00 2 Panel button The reference value is set by E0 07 Digital setting frequency which can be decreased or increased by pressing the or buttons on the operating panel respectively when the frequency converter is running E4 00 3 AI1 analog input The reference value is set by AI1 analog input E4 00 4 AI2 analog input The reference value is set by AI2 analog input E4 00 5 X...

Page 60: ...nverter for pump drive uses AI 1 analog input E4 01 0 as the PID feedback channel 9 3 6 U1 Panel parameters Code Name Setting range Default Min Attri U1 00 Run monitoring display 0 99 0 Run U1 10 Stop monitoring display 2 Run 0 Output frequency 1 Actual speed 2 Setting frequency 3 Setting speed 4 User defined setting speed 5 User defined actual speed 10 Output voltage11 Output current 12 Output po...

Page 61: ...d only at power down drop in stop state S Err Parameter change blocked C dr Communication disconnection PrSE Parameter setting contradiction noCP No modified parameter AibE Analog input broken wire protection C dr If the interval between the current and next communication commands exceeds the time defined in Communication error detection time E8 01 the frequency converter will reports a communicat...

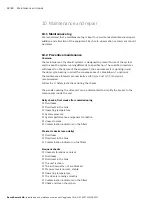
Page 62: ... breakdown To optimise the maintenance intervals economically a Life Cycle Cost LCC analysis is recommended Follow the 2 Safety instructions during the checks The panels covering the drive unit can be dismounted to simplify the access to the components inside the unit Daily checks first week after commissioning Fluid leaks Fluid level in the tank Operating temperature System pressure System perfor...

Page 63: ...it Check the cables Check drain line flows and drain line oil condition Check the hoses couplings and pump s with respect to cracks leakages and condition Check the shaft coupling through the inspection hole Check the air filter in the control unit CAUTION Rotating parts Risk of injury Do not touch rotating parts Check that the panels of the drive unit not are damaged Table 11 Maintenace chart Abs...

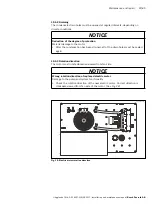
Page 64: ...e NOTICE Danger associated to Hydraulic fluid Risk of environmental damage Store up used hydraulic fluid and contamined filter elements for destruction Filter 1 Screw off the filter bowl 2 Remove the filter element from the spigot by rotating it slightly 3 Clean the filter components if necessary 4 Check the seals at the filter bowl for damage and renew them if necessary For suitable seal kits ref...

Page 65: ...he intention is to verify the condition of the oil during operation The motors should be running at normal operation while the sample is taken The cleanliness is extremely important during sampling Always use bottles adapted to oil samples they can be ordered from any fluid analysis laboratory Never try to clean your own bottle if you want a true value of the result Use a measuring coupling can be...

Page 66: ...l are needed for a good analysis When the bottle is filled close the cap as soon as possible to prevent contamination from the air to enter the bottle and give wrong result Air filter breather change 1 Clean the area around the air filter breather See Fig 2 Main components DOb 2 Remove the existing filter and dispose according to environmental regulations 3 Mount a new filter and make sure no fore...

Page 67: ...terial damage to the motor After the condensation has been drained all of the drain holes must be sealed again 10 5 3 Rotation direction The motor must rotate clockwise viewed from fan side Notice Wrong rotation direction of replaced electric motor Damage to the pump and system functionality Check the rotation direction of the new electric motor Correct direction is clockwise viewed from fan side ...

Page 68: ...onths the hydraulic system must be protected internally against rust The period must be shorter if the equipment is placed in a humid or aggresive environment Execution Use hydraulic fluid with rust preventing additives according to ASTM D665 class A or hydraulic fluid similar to Shell corr hydraul 2 VSI improver This additive gives protection against rust maximum one year For storage more than on...

Page 69: ...responsible Bosch Rexroth service partner or the service department of the manufacture s plant for the Hägglunds product see chapter 10 9 Spare parts 10 9 Spare parts Address all questions regarding spare parts to your responsible Bosch Rexroth Service partner or the service department of the manufacturer s plant for the Hägglunds products Details can be found on the name plate of the Hägglunds pr...

Page 70: ...y to prevent dirt entering the system Disassembly shall only be done by professional service personnel Disassembly Label the parts Protect easily damaged parts and machined surfaces Inspect all parts during disassembly for wear or damage If hydraulic fluid will be drained and reused make sure that drain containers are clean and covered when not in use Clean all metal parts with a suitable solvent ...

Page 71: ...serve the following points when disposing of the Hägglunds DOb 1 Completely empty tank and system 2 Dispose the hydraulic fluid according to the national regulations of your country Also observe the applicable safety data sheet for the hydraulic fluid 3 Remove the DOb into its individual parts and properly recycle these parts separate according to material type Dispose material in accordance with ...

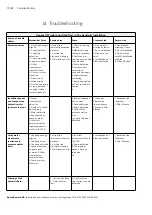
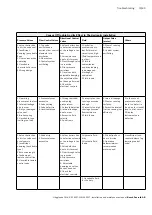
Page 72: ...oose 2 Poor installation 3 Pipe bore too small 4 Installation not bled 5 Filter blocked Insufficient power and torque at the hydraulic motor pressure too low 1 Power transmission defective 2 V belt or Toothed belt slipping 3 Motor defective 4 Key sheared at pump or motor 5 Incorrect parameter values regarding electric motor in the VFD 1 Internal leakages due to wear 2 Unsuitable type 3 Pump defect...

Page 73: ...ty or damaged valve seat 4 Broken spring 5 Unsuitable type setting too low 1 Pressure losses excessive 2 False setting 3 Valve defective 4 Unsuitable type 1 Wrong switched position eg pressureless 2 Solenoid defective 3 Internal leakage due to wear 4 Excessive fluid velocity 5 Spool jams 1 Viscosity too low causing excessive leakage 2 Viscosity too high causing excessive flow resistance 3 Fluid fo...

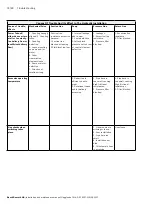
Page 74: ...esistance excessive because 1 Suction line blocked or leaking 2 Fluid level too low 1 Internal leakage due to wear 2 Pump defective 3 Saftey block pressure set too low or control element defective 1 Leakages 2 Excessive line resistance 3 Pressure filter blocked 1 Excessive line resistance 2 Filter blocked Excessive operating temperature 1 Reduction in efficiency due to wear 2 Rotational speed and ...

Page 75: ...lines opencircuit 3 Signalling elements such as pressure or limit switches are defective wrongly set or not connected 1 Constant delivery flow is too high 2 Undersized valve 3 Pressure setting too high 4 Response time too long 1 Flow rate set too low excessive pump delivery through pressure reliefvalve 2 Valve defective 1 Leakage losses too high 2 Pressureless circulation if used fails to switch o...

Page 76: ...ghts Total weight of the drive unit The total weight of the drive unit is marked on the product identification plate located on the cabinet frame see Fig 29 Table 12 Weights Part Weight kg lb Electric motor 7 5 kW 62 137 Pump 8 1 cc 6 4 14 1 10 6 cc 6 4 14 1 Air cooler 16 35 Fig 29 Placement of product identification plate DD00082691 ...

Page 77: ...nd configuration documents are implemented by the product user The requirements of Appendix I to Machinery Directive 2006 42 EC not mentioned here are not applied and have no relevance for the product It is also declared that the special technical documents for this partly completed machinery have been compiled in accordance with Appendix VII Part B These are transferred on request to the market s...

Page 78: ...78 80 Declaration of Incorporation Bosch Rexroth AB Installation and maintenance manual Hägglunds DOb RE 15327 WA 05 2017 NOTES ...

Page 79: ...Declaration of Incorporation 79 80 Hägglunds DOb RE 15327 WA 05 2017 Installation and maintenance manual Bosch Rexroth AB NOTES ...

Page 80: ... Tel 46 0 660 870 00 Fax 46 0 660 871 60 documentation mll boschrexroth se www boschrexroth com hagglunds We reserve the right to make changes Printed in Sweden RE 15327 WA 05 2017 Your local contact can be found at www boschrexroth com adresses ...

Reviews: