background image

of 

1

2

ISSUED: 06-25-99  SHEET #:  039-9003-8  02-08-05

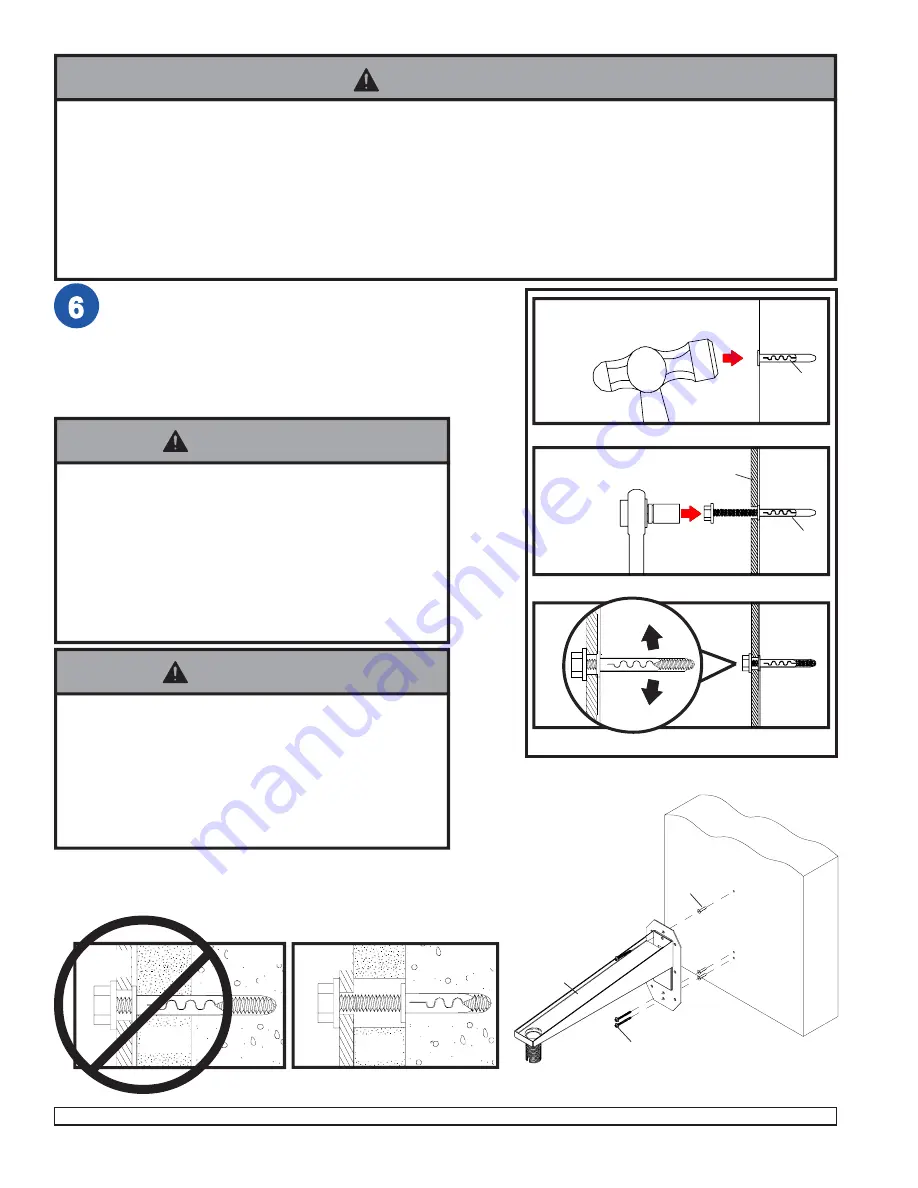
Drill hole(s) and insert anchor(s)

CUTAWAY VIEW

INCORRECT

concrete

plaster/
dry wall

wall

arm

concrete
wall

1

3

2

wall arm

CORRECT

concrete

plaster/
dry wall

For Concrete Walls


use wall arm (

W

), making sure

that it is level, as a template to mark holes. Drill 1/
4" (6 mm) dia. holes to a minimum depth of 2.5" (64
mm). Insert concrete anchors in holes flush with
wall as shown (right). Place wall arm (

W

) over

anchors and secure with #14 x 2.5" (6 mm x 65
mm) wood screws (

V

). Tighten all fasteners.

wall

arm

ACC 204

ACC 204

WARNING

• When installing BOSCH wall mounts on cinder block, verify that you have a minimum of 1-3/8" of actual concrete

surface in the hole to be used for the concrete anchors. Do not drill into mortar joints! Be sure to mount in a solid
part of the block, generally 1" minimum from the side of the block. Cinder block must meet ASTM C-90 specifica-
tions. It is suggested that a standard electric drill on slow setting is used to drill the hole instead of a hammer drill
to avoid breaking out the back of the hole when entering a void or cavity.

• Concrete must be 2000 psi density minimum. Lighter density concrete may not hold concrete anchor.

• Make sure that the wall will safely support four times the combined load of the equipment and all attached hard-

ware and components.

CONCRETE
WALL

V

ACC 204

W

Place arm over anchor(s) and secure with screw(s)

Tighten all fasteners

• Tighten wood screws so that wall plate is firmly

attached, but do not overtighten. Overtightening can
damage the screws, greatly reducing their holding
power.

• Never tighten in excess of 80 in • lb (9 N.M.).

• Make sure that mounting screws are anchored into the

center of the studs. The use of an "edge to edge" stud
finder is highly recommended.

WARNING

• Concrete anchors are 

not 

intended for attachment to

concrete wall covered with a layer of plaster, drywall,
or other finishing material. If mounting to concrete wall
covered with plaster/drywall is unavoidable, plaster/
drywall (up to 5/8" thick) must be counterbored as
shown below. If plaster/drywall is thicker than 5/8",
custom fasteners must be supplied by installer.

WARNING

Summary of Contents for Security Systems TC9217MM-W

Page 1: ...1 of 11 ISSUED 06 25 99 SHEET 039 9003 8 02 08 05 Instruction Manual EN Monitor Mounts TC9217MM W TC9220MM W TC9227MM W ...

Page 2: ... 2919 90 TC9220MM C TC9220MM W 27ST220L TC9227MM C TC9227MM W Installation Hint for TC9217MM TC9220MM and TC9227MM Series Monitor Mounts RE Step 4 For proper center of gravity alignment of Bosch monitors on the bottom support tray a recommended starting point is to use the third 3rd square hole from the front edge of the tray to mount the vertical support arm using pin E SERVICE If the unit needs ...

Page 3: ...s list page 9 are included with your bracket SIDE VIEW TV FLOOR Place TV onto a piece of pipe as shown Pipe should be a few inches wider than the TV Roll TV back and forth to find the balance point This is the center of gravity Mark the center of gravity on the side of the TV CENTEROF GRAVITY A Adjust support tray A three pieces to match width of TV Lock support tray using four carriage bolts B wa...

Page 4: ... anti rollout hooks R see step 7 will provide more than adequate support for the TV some installers may wish to also attach the support tray to the TV bottom Using uni clips G and M5 screws F see instruction card in fastener pack or 10 x 3 4 particle board screws H and washers I for attachment to mounting bosses if present or a combination of both attach support tray A to TV bottom To do this plac...

Page 5: ... into stud center Attach wall arm W using three 14 x 2 5 6 mm x 65 mm wood screws V WOOD STUD WALL W V Tighten wood screws so wall arm is firmly attached but do not tighten with excessive force Overtightening can cause stress damage to wood screws greatly reducing their holding power Tighten to 80 in lb 9 N M maxi mum torque WARNING ...

Page 6: ...s used to drill the hole instead of a hammer drill to avoid breaking out the back of the hole when entering a void or cavity Concrete must be 2000 psi density minimum Lighter density concrete may not hold concrete anchor Make sure that the wall will safely support four times the combined load of the equipment and all attached hard ware and components CONCRETE WALL V ACC 204 W Place arm over anchor...

Page 7: ... available CMJ 470 CMJ 480 CMJ 490 WMJ 018 WMJ 022 P M O U N T T S Included with models TC9217MM and TC9220MM only Note Slots in corners of top clamps Q and corners of vertical support arms P allow for the installation of safety belt model ACC 666 sold separately If using this belt install it now WMJ 025H J WARNING Each anti rollout hook R should have at least 1 4 of surface contact with the front...

Page 8: ...ded holes aligned with slot in the end of flush mount tube T or extension column Insert and tighten one M5 screw F T S F O DETAIL 3 BOTTOM VIEW S TILTCLEARANCE Adjust TV to desired tilt then tighten screws Maximum tilt is 30 If tilt clearance is a problem revisit step 7 DETAIL 2 Set screw F is self tapping and may be hard to get started but is essential to this installation Failure to install this...

Page 9: ...asher combo screw 8 520 1041 520 1041 520 1041 K M10 serrated flange head screw 2 520 1105 520 1105 520 1105 M fiber washer large inside dia 1 540 9432 540 9432 540 9432 N fiber washer small inside dia 1 540 9431 540 9431 540 9431 O retaining collar 1 1800 375 1800 375 1800 375 P vertical support arm 2 128 1107 128 1109 128 1111 Q top clamp 2 128 1138 128 1138 128 1138 R anti rollout hook 2 128 11...

Page 10: ...en Size 13 17 19 21 19 21 25 27 25 28 25 27 wood stud 125 lb 125 lb 125 lb 125 lb 125 lb 125 lb 300 lb 300 lb 300 lb 300 lb 300 lb 150 lb 150 lb 150 lb 150 lb 150 lb 150 lb 300 lb 300 lb 300 lb 300 lb 300 lb concrete cinder block or brick 57 kg 57 kg 57 kg 57 kg 57 kg 65 kg 65 kg 65 kg 65 kg 65 kg 254 mm 254 mm 356 mm 254 mm 356 mm TC9217MM W TC9220MM W TC9227MM W Reach R 18 457 mm for models TC92...

Page 11: ......

Page 12: ...ne 1 585 223 4060 Fax 1 585 223 9180 E mail security sales us bosch com www boschsecurity us Europe Middle East Africa Bosch Security Systems B V P O Box 80002 5600 JB Eindhoven The Netherlands E mail ema securitysystems bosch com http www boschsecurity com Asia Pacific Bosch Security Systems Pte Ltd 38C Jalan Pemimpin Singapore 577180 Singapore Phone 65 319 3488 Fax 65 319 3499 E mail sg security...

Reviews: