Solution 6000
Installation Manual
System Programming
11-15
Bosch Security Systems 07/14 BLCC610I
If this option is not set, when a user attempts to arm an
area with zones unsealed or existing trouble condition,
they will be required to press [OK] for each unsealed zone
or trouble condition before the area would arm.
System > System Options >
Keypad Idle Screen
MENU 7-7-2
(*** System Wide Parameter ***)
0 0
00 - No Idle Screen
02 - Time
01 - Date And Time
03 - Custom Screen
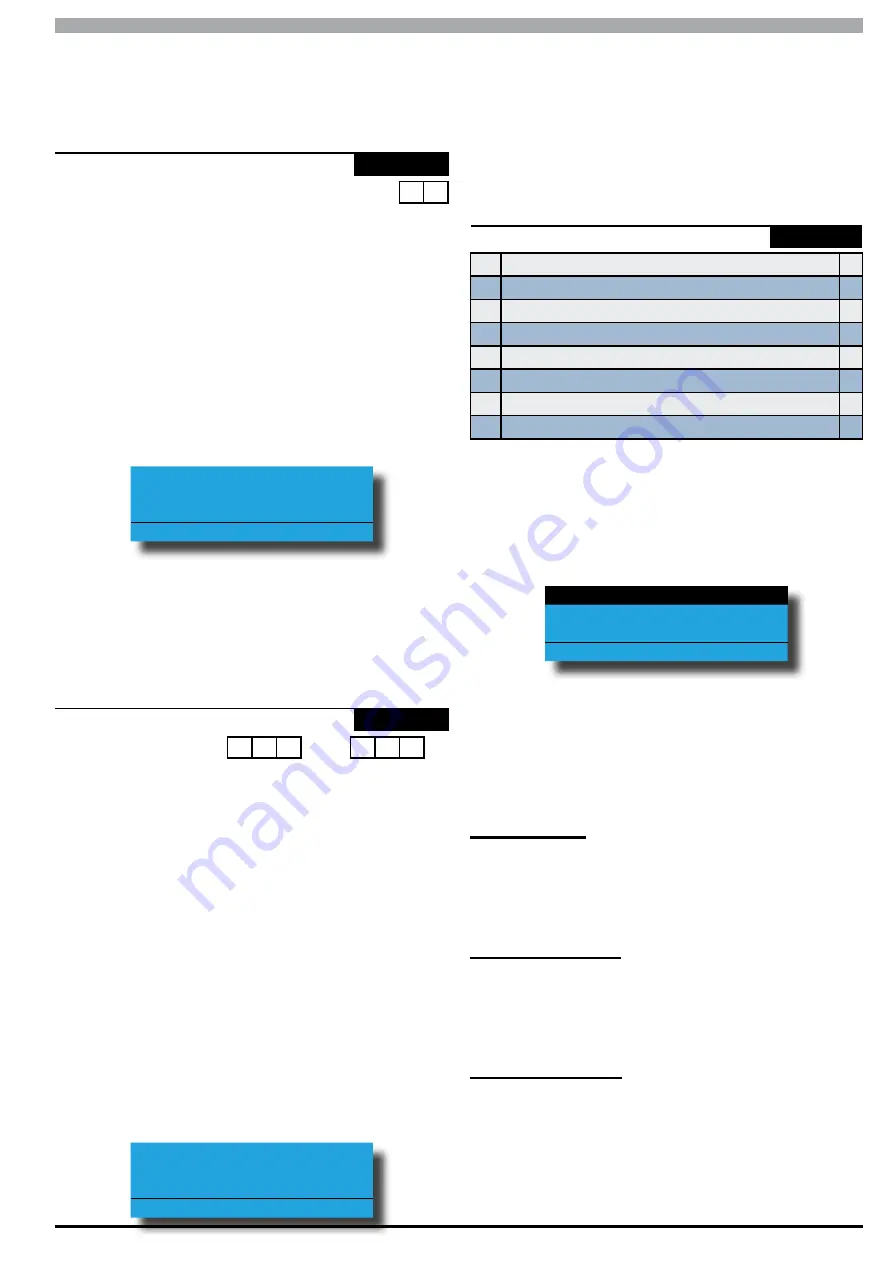
This menu allows you to select a keypad Idle Screen which
will appear on the display when there has been no activity
at the keypad for a period of 2 minutes. The keypad display
will return to normal as soon as any key has been pressed.
All keypads on the system will display the same screen
saver. See the examples below.
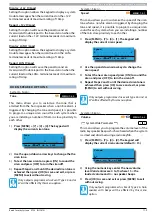
1)
Press [MENU] + [7] + [7] + [2]. The keypad will
display the current Keypad Idle Screen option.
Keypad Idle Screen
00 - No Idle Screen
Press
0-9 OK to SAVE
2)
Use the up and down arrow keys to select which
idle screen you want to display then press [OK] to
save and exit or press [MENU] to exit without
saving.
System > System Options >
Keypad Hi/Lo Temp
-
MENU 7-7-3
0 0 0
˚C
0 0 0
˚C
Hi TEMP
Lo TEMP
(*** System Wide Parameter ***)
This menu allows you to set the keypad High and Low
temperature values which the system will monitor. Valid
temperatures are from 00 ˚C minimum to a maximum of
50 ˚C with a tolerance = +/- 1 ˚C.
If the temperature on the selected keypad falls below the
minimum set temperature then the keypad will display
‘Low Temp xx
˚
C If the temperature increases above the
maximum set temperature then the keypad will display
High temp xx
˚
C.
Where xx = the set temperature to be monitored.
(*** System Wide Parameter ***)
1)
Press [MENU] + [7] + [7] + [3]. The keypad will
display the current temperature settings.
Keypad Hi/Lo Temp
High Temp Low Temp
000 000
Press
OK to SAVE
2)
Use the up and down arrow keys to program the
High and Low temperatures. Use the left and right
arrow keys to move between the High and Low
temperatures.
Valid range =( 000
˚
C to 050
˚
C).
3)
Press [OK] to save and exit or press [MENU] to exit
without saving.
System > System Options >
Installer Options
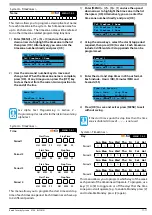
MENU 7-7-4
1
Report Installer
N
2
Report Prog Change
Y
3
Restrict Installer PIN
N
4
Reserved
N
5
Auto Exit Install 2hr
Y
6
Auto Exit Service 2hr
Y
7
Multi Tenant Mode
N
8
Allow Defaulting
Y
(*** System Wide Parameter ***)
This menu allows you to configure the Installer system
options.
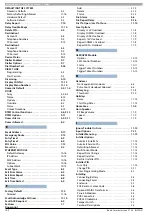
1)
Press [MENU] + [7] + [7] + [4]. The keypad will
display the current Installer options.
Report Installer
Report Prog Change
Restrict Installer PIN
Press
OK ON OFF MENU
2)
Use the up and down arrow keys to highlight the
option then press the [ON] key to enable or the
[OFF] key to disable.
3)
Repeat Step 2 until all options are programmed as
required, then press [OK] to save and exit or press
[MENU] to exit without saving.
Report Installer
Setting this option will cause the panel to make a log
entry and to send a report to the base station when the
installer enters and exits Installer programming mode.
The entry/exit reports will follow the System Route.
Report Prog Change
Setting this option will cause the panel to make a log
entry and to send a report to the base station when
the installer has changed programming data. The data
changed reports will follow the System Route.
Restrict Installer PIN
After power up, the installer PIN can turn on or off an
area (or multiple areas if partitioned) until a user PIN is
used to turn an area on or off. If the system is in service
mode, then the installer PIN can always silence and turn
off an area when an alarm even occurs.


