background image

en 

Troubleshooting

48

Fault

Cause

troubleshooting

Heavy foam build-up

Detergent dosage is too
high.

Immediate measure: Mix one table-
spoon of fabric softener with 0.5
litres of water and pour the mixture
into the left-hand compartment (not
for outdoor clothing, sportswear or
items stuffed with down).

Reduce the amount of detergent for
the next washing cycle with the
same load.

Noise

Fault

Cause

troubleshooting

Rushing, hissing noise.

Water is flushed under pres-
sure into the detergent
drawer.

Not a fault – normal operating
noise.

Loud noises during the spin
cycle.

Appliance is not correctly
aligned.

Aligning the appliance

The appliance feet are not
fixed.

Secure the appliance feet. Aligning
the appliance

Transit bolts have not been
removed.

Removing the transit bolts

Banging noises, rattling in
the drain pump.

Foreign bodies have got into
the drain pump.

→ 

"Cleaning the drain pump",

Page 38

Slurping, rhythmical suction
noise.

The drain pump is active, the
detergent solution is
pumped out.

Not a fault – normal operating
noise.

Problem with results

Fault

Cause

troubleshooting

Creasing.

The spin speed is too high.

The next time you run a wash cycle,
set a lower spin speed.

The load is too large.

The next time you run a wash cycle,
reduce the amount of laundry being
loaded.

The wrong programme is se-
lected for the type of fabric.

Select the programmes that are
suitable for the type of fabric. 

→ 

"Programmes", Page 24

Summary of Contents for WAN20051IL

Page 1: ...Register your new device on MyBosch now and get free benefits bosch home com welcome Washing machine WAN20051IL en User manual and installation instructions ...

Page 2: ...8 Preparing the laundry 28 Sorting laundry 29 Degrees of soiling 29 Care symbols on the care labels 29 Detergents and care products 30 Detergent recommendation 30 Detergent dosage 31 Basic operation 31 Switching on the appliance 31 Setting a programme 31 Adjusting the programme set tings 32 Loading laundry 32 Using a measuring aid for liquid detergent 32 Adding detergent and care product 33 Starti...

Page 3: ...44 Malfunctions 45 Noise 48 Problem with results 48 Leakage 49 Odours 50 Emergency release 51 Transportation storage and disposal 51 Removing the appliance 51 Inserting the transit bolts 51 Using the appliance again 52 Disposing of old appliance 52 Customer Service 53 Product number E Nr and pro duction number FD 53 Consumption values 54 Technical specifications 54 ...

Page 4: ...rmation safe for future reference or for the next owner Check the appliance after unpacking it Do not connect the ap pliance if it has been damaged in transit Intended use Read the information on intended use to ensure that you use the appliance correctly and safely Only use this appliance According to this installation and instruction manual For washing machine washable fabrics and hand washable ...

Page 5: ...k Improper installation is dangerous Connect and operate the appliance only in accordance with the specifications on the rating plate Connect the appliance to a power supply with alternating current only via a properly installed socket with earthing The protective conductor system of the domestic electrical installation must be properly installed The installation must have a sufficiently large cro...

Page 6: ...f ted Do not lift the appliance on your own If this appliance is not correctly installed in a washer dryer stack the installed appliance may fall Only stack the dryer on a washing machine using the con nection kit from the dryer manufacturer No other installa tion method is permitted Do not install the appliance in a washer dryer stack if the dryer manufacturer does not offer a suitable connection...

Page 7: ...pliance may lead to cuts Do not touch the sharp edges on the appliance Wear protective gloves when installing and transporting the appliance Safe use Follow these safety instructions when using the appliance WARNING Risk of electric shock If the appliance or the power cord is damaged this is danger ous Never operate a damaged appliance Never pull on the power cord to unplug the appliance Al ways u...

Page 8: ... no longer close WARNING Risk of suffocation Children may breathe in or swallow small parts causing them to suffocate Keep small parts away from children Do not let children play with small parts WARNING Risk of poisoning Detergents and care products may result in poisoning if con sumed If accidentally swallowed seek medical advice Keep detergents and care products out of the reach of chil dren WA...

Page 9: ...wash at high temperatures the detergent solution gets hot Do not touch the hot detergent solution CAUTION Risk of chemical burns If the detergent drawer is opened detergent and care products may spray out from the appliance Contact with eyes or skin may cause irritation Rinse eyes and or skin thoroughly with clean water if they come into contact with detergents or care products If accidentally swa...

Page 10: ...gress of moisture can cause an electric shock Do not use steam or high pressure cleaners hoses or sprays to clean the appliance WARNING Risk of injury The use of non original spare parts and non original accessor ies is dangerous Only use the manufacturer s original spare parts and ori ginal accessories WARNING Risk of poisoning Poisonous fumes may be given off if you use cleaning agents that cont...

Page 11: ...h as adapters extensions valves or similar Ensure that the inner diameter of the water tap is at least 17 mm Make sure that the length of the thread on the connection to the water tap is at least 10 mm If the water pressure is too high or too low the appliance may not be able to operate properly Make sure that the water pres sure in the water supply system is min 100 kPa 1 bar and max 1000 kPa 10 ...

Page 12: ...sumption is most efficient Add Page 31 detergent based on the laundry s degree of soiling For light to normal soiling a smal ler amount of detergent is suffi cient Observe the dosage recom mendation from the detergent manufacturer Reduce the washing temperature for lightly and normally soiled laundry At low temperatures the appliance consumes less energy For light to normal soiling lower temperatu...

Page 13: ... and how best to install your appliance here You will also learn how to connect the ap pliance to the water and power sup ply Unpacking the appliance 1 Remove any packaging and pro tective covers completely from the appliance 2 Check the appliance for visible damage 3 ATTENTION Objects remaining in the drum that are not designed for operation with the appliance may cause material damage and dam ag...

Page 14: ... Washing machine 2 Accompanying documents 3 Water inlet hose 4 Cover caps Requirements for the installation location The appliance may wander when it spins Observe the instructions for the installation location Note Please read the information in the Safety Page 4 and Preventing material damage Page 11 sections to ensure that you use the appliance safely ...

Page 15: ... carefully Installation location Requirements On a base Secure the appliance with fixing brackets Page 27 Installation location Requirements On a wooden joist floor Place the appliance on a water resistant wooden board which is screwed tightly to the floor The wooden board should be at least 30 mm thick In a kitchen unit A niche width of 60 cm is required Only install the ap pliance under neath a ...

Page 16: ...the hoses out of the holders 2 Unscrew and remove all four screws for the transit bolts with a WAF 13 wrench 1 2 3 Pull the power cord out of the holder 4 Remove the four sleeves 5 Put on the four cover caps 6 Press down on the four cover caps ...

Page 17: ...s to ensure that you use the appliance safely ATTENTION When draining the water outlet hose is subject to water pressure and may come loose from the installed con nection point Secure the water outlet hose against unintentional loosening Drainage into a si phon Secure the connec tion point with a 24 40 mm hose clamp Drainage into a wash basin Fix and secure the wa ter outlet hose with an elbow Pag...

Page 18: ...al damage Page 11 sections to ensure that you use the appliance safely 1 Loosen the lock nuts using a WAF 17 wrench by turning it in a clock wise direction 2 To align the appliance turn the ap pliance feet Check that the appli ance is level using a spirit level All appliance feet must stand firmly on the ground 3 Screw the lock nuts tightly against the housing using a WAF 17 wrench In doing so hol...

Page 19: ... of your appliance Appliance You can find an overview of the parts of your appliance here 1 2 4 6 3 5 7 7 On certain models specific details such as the colour and shape may differ from those pictured 1 Maintenance flap for the drain pump Page 38 2 Door 3 Detergent drawer Page 20 4 Controls Page 20 5 Water outlet hose Page 17 6 Power cord Page 17 7 Transit bolts Page 15 ...

Page 20: ... 2 Compartment II Detergent for main wash Water softener Bleach Stain remover 3 Compartment Fabric softener Liquid starch Waterproofing agent 4 Compartment I Detergent for prewash Hygiene detergent Controls The controls are used to configure all functions of your appliance and to obtain information about the operating status 2 3 1 1 4 4 1 Programmes Page 24 2 Programme selector Page 31 3 Display P...

Page 21: ...has been set and the remaining number of hours is displayed Buttons Page 23 7 kg 1 Recommended load The maximum load capacity for the selected pro gramme in kg 1000 Spin speed Set spin speed in rpm Buttons Page 23 0 No final spin only draining Rinse Hold no draining Start Pause Start cancel or pause Lights up The programme is running and can be cancelled or paused Flashes The programme can be star...

Page 22: ...ating the childproof lock Page 35 SpeedPerfect Short wash activated Buttons Page 23 Eco Energy saving washing activated Buttons Page 23 Door Lights up The door is locked and cannot be opened Flashes The door is not closed properly Off The door is unlocked and can be opened Tap No water pressure Error code Fault display Signal Page 44 The water pressure is too low E 60 2B 1 Error Error code error d...

Page 23: ...emperature is reduced and the programme duration is extended The washing result is not af fected by this Finish in 1 24 hours Set the programme end The programme duration is already included in the set number of hours Once the programme has started the pro gramme duration is displayed Spin 1000 Adjust the spin speed or activate Rinse Hold If is selected the water is not drained at the end of the w...

Page 24: ...tton linen or blended fabrics 7 90 1000 Cottons Prewash Wash hard wearing items made from cotton linen or blended fabrics Programme with prewash for heavily soiled laundry Divide the detergent between the detergent drawer for the prewash and the main wash Detergent drawer Page 20 7 40 1000 Easy Care Wash items made from synthetic or blended fab rics 4 40 1000 Mixed Load Wash items made from cotton...

Page 25: ... Spin Drain Spins and drains the water If you only want to drain the water activate 0 The laundry is not spun 1000 Shirts Wash non iron shirts and blouses made from cot ton linen synthetic fibres or blended fabrics Tip In order to avoid creasing in your laundry you can activate The laundry is only given a short spin and can be removed while still dripping wet Hang out shirts and blouses while they...

Page 26: ... Use the Easy Care programme to wash heavily soiled laundry Quick 15 30 Wash items made from cotton synthetic or blended fabrics Short programme for small items of lightly soiled laundry The programme duration is approx 30 minutes If you wish to reduce the programme duration to 15 minutes activate The maximum load is reduced to 2 kg 4 30 1000 1 Programme setting ...

Page 27: ...e with a longer hose 2 20 m 00353925 Elbow Secure the water outlet hose in place 00655300 Liquid detergent insert Measure liquid detergent 00637516 Before using for the first time Before using for the first time Prepare the appliance for use Starting an empty washing cycle Your appliance was inspected thor oughly before leaving the factory To remove any residual water run the first wash cycle with...

Page 28: ...Page 31 Laundry Laundry You can wash all items that the man ufacturer has marked as machine washable on the care label and fab rics made from hand washable wool using your appliance Preparing the laundry ATTENTION Objects remaining in the laundry may damage the laundry and the drum Remove all items from any pock ets in your laundry before using the appliance To protect your appliance and the laund...

Page 29: ... 29 Care symbols on the care labels Page 29 Degrees of soiling Degree of soiling Soiling Examples Light No dirt or stains are visible Laundry has absorbed odours Light summer clothing or sports clothing that has been worn for a just a few hours Normal Dirt or light stains are visible T shirts shirts or blouses are sweat soaked or have been worn a few times Towels or bedding that has been used for ...

Page 30: ... use products containing solvents caustic agents or volatile substances e g bleach Use dyes sparingly as salt may damage stainless steel Do not use bleaching agents in the appliance Detergent recommendation This information helps you to choose the right detergent for your fabrics Detergent Fabrics Programme Temperature Standard detergent with op tical brighteners Heat resistant white fabrics made ...

Page 31: ...m II 1 5 2 5 8 4 14 hard III over 2 5 over 14 Example of a manufacturer s instructions for detergent These example values refer to a standard load of 4 5 kg Soiling Light Normal Heavy Water hardness Soft medium 40 ml 55 ml 80 ml Water hardness Hard very hard 55 ml 80 ml 105 ml The dosages can be found on the manufacturer s packaging Adjust the dosage to the actual load Basic operation Basic operat...

Page 32: ...rmation in the Safety Page 4 and Preventing material damage Page 11 sec tions to ensure that you use the appliance safely To prevent creasing take note of the maximum load for the relevant programme Page 24 Requirement Prepare and sort the laundry Laundry Page 28 1 Open the door 2 Ensure that the drum is empty 3 Separate the laundry and place it in the drum 4 Note Ensure that there is no laun dry ...

Page 33: ...tart Reload a The display shows either the pro gramme duration or the Ready in time a After the programme has ended the display shows End Adjusting the Ready in time before the programme starts You can readjust the selected Ready in time before the programme starts 1 Press Start Reload 2 Press Finish in repeatedly until the display indicates the desired Ready in time 3 Press Start Reload Soaking l...

Page 34: ...or The appliance door remains locked for safety reasons if the temperature and water levels are high If the temperature is high start the Rinse programme If the water level is high Start the Spin or Drain pro gramme 3 Remove the laundry Resuming the programme when the programme status is Rinse Hold 1 Set the Spin or Drain pro gramme 2 Press Start Reload Unloading the laundry Note Please read the i...

Page 35: ... buttons for approx 3 seconds a The display shows a The controls are locked a The childproof lock remains active even after the appliance has been switched off Deactivating the childproof lock Requirement To deactivate the childproof lock the appliance must be switched on Press and hold the two 3 sec buttons for approx 3 seconds So that the programme currently running is not cancelled the pro gram...

Page 36: ... your appliance Basic setting Programme pos ition Value Description End signal 2 0 off 1 quiet 2 medium 3 loud 4 very loud Set the volume of the signal at the end of the programme Button signal 3 0 off 1 quiet 2 medium 3 loud 4 very loud The volume of the audible signal emitted when the buttons are pressed Changing the basic settings 1 Set the programme selector to po sition 1 ...

Page 37: ...water and a damp cloth The appliance parts remain clean and hy gienic Remove all detergent residue spray residue or other residues im mediately Fresh deposits are easier to remove without leaving any residue Keep the appliance door and detergent drawer open after use This allows the resid ual water to dry redu cing odours in the ap pliance Cleaning the drum If you often wash at a washing tem perat...

Page 38: ...scaling agents e g for coffee machines may damage the appliance For this appliance only use de scaling agents that are available from the manufacturer s website or our after sales service Cleaning the drain pump Clean the drain pump in the event of faults e g blockages or rattling noises Emptying the drain pump Note Please read the information in the Safety Page 4 and Preventing material damage Pa...

Page 39: ...holder 8 CAUTION Risk of scalding When you wash at high temperat ures the detergent solution gets hot Do not touch the hot detergent solution To allow the detergent solution to flow out into the container remove the sealing cap 9 Firmly press on the sealing cap 10 Insert the drain hose into the holder ...

Page 40: ...ertical position 5 Insert the maintenance flap and lock it into place 1 1 2 6 Close the maintenance flap Before the next wash To prevent unused detergent from flowing straight into the outlet in the next wash run the Drain pro gramme after you have emptied the drain pump 1 Turn on the tap 2 Insert the mains plug 3 Switch on the appliance 4 Pour 1 litre of water into compart ment II 5 Start the Dra...

Page 41: ...the water inlet hose 1 Turn off the tap 2 Set a programme except for Rinse Spin or Drain 3 Start the programme and leave it to run for approx 40 seconds 4 Switch off the appliance 5 Disconnect the appliance s mains plug from the power supply Cleaning the filter on the tap Note Please read the information in the Safety Page 4 and Preventing material damage Page 11 sections to ensure that you use th...

Page 42: ...age 4 and Preventing material damage Page 11 sections to ensure that you use the appliance safely Requirement The water inlet hose is empty Emptying the water inlet hose Page 41 1 Disconnect the hose from the rear of the appliance 1 2 2 Use pliers to remove the filter 3 Clean the filter with a small brush 4 Reinsert the filter 5 Connect the hose and check for leaks ...

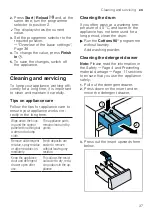
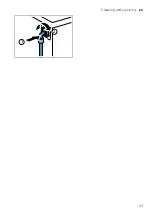
Page 43: ...Cleaning and servicing en 43 2 1 ...

Page 44: ...n a The symbol lights up again E 36 10 Drain pipe or water outlet hose is blocked Clean the drain pipe and the water outlet hose Drain pipe or water drain hose is caught or jammed Ensure that the drain pipe and wa ter drain hose are not kinked or trapped Drain pump is blocked Cleaning the drain pump Page 38 The water outlet hose is con nected too high Install the water outlet hose at a maximum hei...

Page 45: ...o start the programme All other error codes Malfunction Call the after sales service Customer Service Page 53 Malfunctions Fault Cause troubleshooting The appliance is not work ing The mains plug of the power cord is not plugged in Connect the appliance to the power supply The circuit breaker is faulty Check the circuit breaker in the fuse box There has been a power cut Check whether the lighting ...

Page 46: ...gency release Page 51 The water is not draining Drain pipe or water outlet hose is blocked Clean the drain pipe and the water outlet hose Drain pipe or water drain hose is caught or jammed Ensure that the drain pipe and wa ter drain hose are not kinked or trapped Drain pump is blocked Cleaning the drain pump Page 38 is activated Continue the programme by select ing Spin or Drain and press ing Star...

Page 47: ...ad detec tion system eliminates an im balance by repeatedly redis tributing the laundry Not a fault no action required Note When loading where possible place large and small items of laundry together in the drum Different sized items of laundry distribute themselves better during the spin cycle Foam detection system switches on a rinse cycle if foam build up is too high Not a fault no action requi...

Page 48: ...ligning the appliance The appliance feet are not fixed Secure the appliance feet Aligning the appliance Transit bolts have not been removed Removing the transit bolts Banging noises rattling in the drain pump Foreign bodies have got into the drain pump Cleaning the drain pump Page 38 Slurping rhythmical suction noise The drain pump is active the detergent solution is pumped out Not a fault normal ...

Page 49: ...s in the drum Different sized items of laundry distribute themselves better during the spin cycle Start the Spin programme Detergent residue on the damp washing Detergents may contain wa ter insoluble substances that deposit on the laundry Start the Rinse programme Detergent residue on the dry laundry Detergents may contain wa ter insoluble substances that deposit on the laundry Brush out the laun...

Page 50: ...hooting Odours have formed in the appliance Humidity and detergent residue may promote the formation of bacteria Cleaning the drum Page 37 If you are not using the appliance leave the door and detergent drawer open so that residual water can evaporate ...

Page 51: ...disposal Transportation storage and disposal You can find out here how to prepare your appliance for transportation and storage You will also find out how to dispose of old appliances Removing the appliance 1 Turn off the tap 2 Emptying the water inlet hose Page 41 3 Switch off the appliance 4 Unplug the appliance s mains plug 5 Drain the remaining detergent solution Cleaning the drain pump Page 3...

Page 52: ...he appliance thereby putting their lives at risk Do not install the appliance behind a door as this may obstruct the ap pliance door or prevent it from opening With redundant appliances unplug the power cord Then cut through the cord and damage the lock on the appliance door beyond repair so that the appliance door will no longer close 1 Unplug the appliance from the mains 2 Cut through the power ...

Page 53: ...spare parts including after the manufac turer s warranty has expired Detailed information on the warranty period and terms of warranty in your country is available from our Cus tomer Service your retailer or on our website If you contact Customer Service you will require the product number E Nr and the production number FD of your appliance The contact details for Customer Ser vice can be found in...

Page 54: ... 3 4 Wool 30 2 0 19 44 3 4 1 Values in accordance with the applicable version of EN60456 2 Programme setting with maximum speed for testing in accordance with the applicable version of EN60456 with cold water 15 C Technical specifications Technical specifications Facts and figures for your appliance can be found here Appliance height 85 0 cm Appliance width 60 0 cm Appliance depth 55 0 cm Weight 6...

Page 55: ......

Page 56: ...vice Free and easy registration also on mobile phones www bosch home com welcome Looking for help You ll find it here Expert advice for your Bosch home appliances help with problems or a repair from Bosch experts Find out everything about the many ways Bosch can support you www bosch home com service Contact data of all countries are listed in the attached service direct ory 9001516635 9001516635 ...

Reviews: