background image

en 

operation

34

Ensure that there is no laundry
trapped in the door.

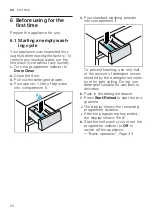
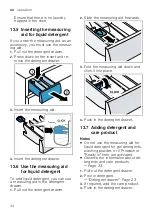
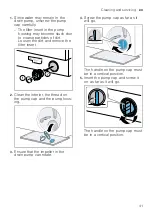
13.5 Inserting the measuring

aid for liquid detergent

If you order the measuring aid as an
accessory, you must use the measur-
ing aid.

1.

Pull out the detergent drawer.

2.

Press down on the insert and re-
move the detergent drawer.

3.

Insert the measuring aid.

4.

Insert the detergent drawer.

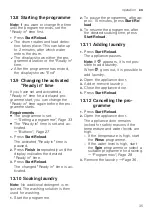
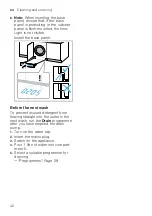
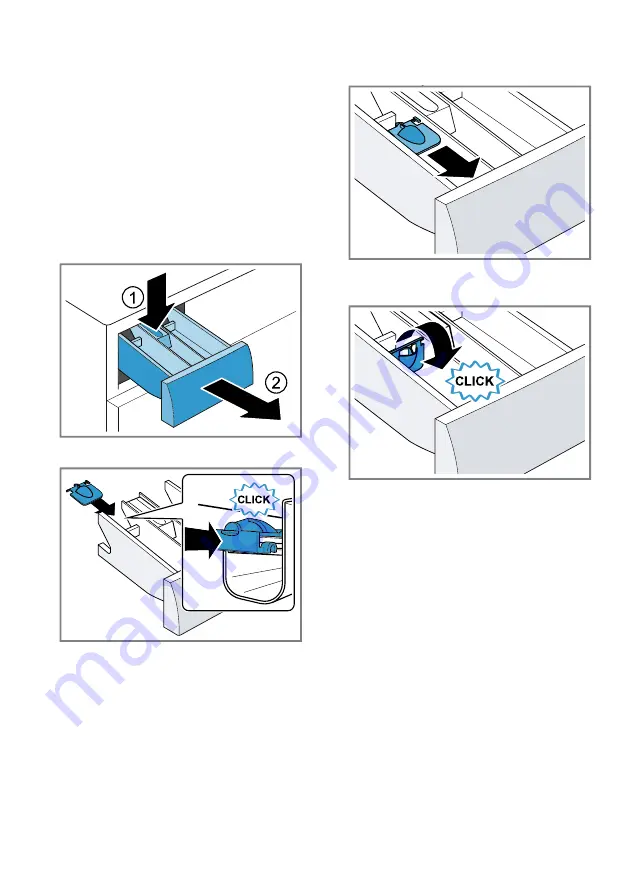
13.6 Use the measuring aid

for liquid detergent

To add liquid detergent, you can use
a measuring aid in the detergent
drawer.

1.

Pull out the detergent drawer.

2.

Slide the measuring aid forwards.

3.

Fold the measuring aid down and
click it into place.

4.

Push in the detergent drawer.

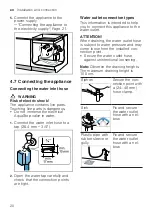
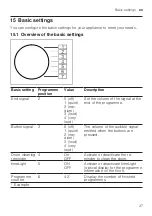
13.7 Adding detergent and

care product

Notes

¡

Do not use the measuring aid for
liquid detergent for gel detergents,
washing powder, or if Prewash or
"Ready in" time are activated.

¡

Observe the information about de-
tergents and care products
→ 

Page 33

.

1.

Pull out the detergent drawer.

2.

Pour in detergent. 
→ 

"Detergent drawer", Page 23

3.

If required, add the care product.

4.

Push in the detergent drawer.

Summary of Contents for WIW28502GB

Page 1: ...Register your new device on MyBosch now and get free benefits bosch home com welcome Washing machine WIW28502GB en User manual and installation instructions ...

Page 2: ...21 4 9 Connecting the appliance to the electricity supply 21 5 Familiarising yourself with your appliance 22 5 1 Appliance 22 5 2 Detergent drawer 23 5 3 Control panel 23 6 Before using for the first time 24 6 1 Starting an empty washing cycle 24 7 Display 25 8 Buttons 27 9 Programmes 28 10 Accessories 32 11 Laundry 32 11 1 Preparing the laundry 32 12 Detergents and care products 33 13 Basic opera...

Page 3: ...and servicing 38 16 1 Cleaning the drum 38 16 2 Cleaning the detergent drawer 38 16 3 Cleaning the drain pump 39 17 Troubleshooting 43 17 1 Emergency release 52 18 Transportation storage and disposal 52 18 1 Removing the appliance 52 18 2 Inserting the transit bolts 52 18 3 Using the appliance again 52 18 4 Disposing of old appliance 53 19 Customer Service 53 19 1 Product number E Nr and productio...

Page 4: ...cts suitable for washing machines In private households and in enclosed spaces in a domestic en vironment Up to an altitude of max 4000 m above sea level 1 3 Restriction on user group This appliance may be used by children aged 8 or over and by people who have reduced physical sensory or mental abilities or inadequate experience and or knowledge provided that they are supervised or have been instr...

Page 5: ...ce e g a timer or remote control When the appliance is installed the mains plug of the power cord must be freely accessible If free access is not possible an all pole isolating switch must be installed in the permanent elec trical installation according to the installation regulations When installing the appliance check that the power cable is not trapped or damaged If the insulation of the power ...

Page 6: ...i ances may tip over WARNING Risk of suffocation Children may put packaging material over their heads or wrap themselves up in it and suffocate Keep packaging material away from children Do not let children play with packaging material CAUTION Risk of injury The appliance may vibrate or move when in use Place the appliance on a clean even solid surface Align the appliance using the appliance feet ...

Page 7: ... use the appliance in enclosed spaces Never expose the appliance to intense heat or humidity Do not use steam or high pressure cleaners hoses or sprays to clean the appliance WARNING Risk of harm to health Children can lock themselves in the appliance thereby putting their lives at risk Do not install the appliance behind a door as this may obstruct the appliance door or prevent it from opening Wi...

Page 8: ...t on or lean against the open door Do not sit on or lean against the appliance door Do not place any objects on the appliance door Reaching into the drum while it is still turning may cause hand in juries Wait for the drum to come to a complete stop before reaching inside CAUTION Risk of scalding When you wash at high temperatures the detergent solution gets hot Do not touch the hot detergent solu...

Page 9: ...ust be re placed by the manufacturer the manufacturer s Customer Ser vice or a similarly qualified person in order to prevent any risk An ingress of moisture can cause an electric shock Do not use steam or high pressure cleaners hoses or sprays to clean the appliance WARNING Risk of injury The use of non original spare parts and non original accessories is dangerous Only use the manufacturer s ori...

Page 10: ...exten sions valves or similar Make sure that the valve housing for the water inlet hose does not come into contact with its sur roundings and is not subjected to any external forces Ensure that the inner diameter of the water tap is at least 17 mm Make sure that the length of the thread on the connection to the water tap is at least 10 mm If the water pressure is too high or too low the appliance ...

Page 11: ...i cient Observe the dosage recom mendation from the detergent manufacturer Reduce the washing temperature for lightly and normally soiled laundry a At lower temperatures the appli ance consumes less energy For light to normal soiling lower tem peratures than indicated on the care label are also sufficient Set the maximum spin speed if you want to dry the laundry in the tumble dryer afterwards a Th...

Page 12: ...esult in material damage or damage to the appliance Do not operate the appliance with incomplete or defective accessor ies Replace the accessories in ques tion before operating the appli ance Accessories Page 32 Note The appliance has been tested at the factory to check it is in working order As a result water stains may remain in the appliance These marks will disappear after the first wash cycle...

Page 13: ... minimum thickness of 30 mm which is screwed tightly to the floor Installation loca tion Requirements Kitchen unit Only install the appliance under neath a continu ous worktop that is securely con nected to adja cent cabinets Required niche width 60 cm Note The use of sliding plates Accessories Page 32 makes it easier to slide the appliance into the recess Moisten the slid ing plates with a mixtur...

Page 14: ...or the 4 transit bolts with a WAF 13 wrench 3 Remove the power cable from the holder 4 Remove the 4 sleeves 5 Put on the 4 cover caps 6 Press down on the 4 cover caps 4 5 Tools for assembly You require the following tools for the assembly Spirit level Wrench WAF 13 Wrench WAF 17 Forstner 35 mm drill bit ...

Page 15: ... appliance is on the runners 2 Measure the built in niche 3 Lay the power cord as well as the water inlet and water drain hose 4 Slide the appliance in and at the same time pull through the power cord water inlet and water drain hose 5 Connect the water inlet hose Connecting the water inlet hose Page 20 6 Connect the water drain hose Water outlet connection types Page 20 7 Unscrew the rear applian...

Page 16: ...s with metal elements in the area of the control panel 1 Hold the cabinet door at the re quired height on the appliance and mark the upper edge of the appli ance on the inside of the door Mark on the top edge of the appli ance at the left hand stop Mark on the top edge of the appli ance at the right hand stop 2 Using the mark for the top edge of the appliance on the inside of the door as a basis m...

Page 17: ...right hand stop 3 At the previously marked points use a Forstner 35 mm drill to drill the holes for the hinges At the previously marked points use a 2 mm twist drill to drill holes for the screws 4 Insert the hinges into the holes and screw them in 5 Screw on the counter plates for the magnetic catches ...

Page 18: ...18 6 Insert the hinges into the appliance 7 Slide in the covering rail and screw it in 8 Put the magnetic catches on the appliance Aligning the cabinet door Vertically aligning the cabinet door Horizontally aligning the cabinet door ...

Page 19: ...ers for the base panel 2 Measure dimension Z and dimen sion Y 3 Screw the spacers in as per the di mensions 4 Note When inserting the base panel ensure that if the base panel is protruding or the cabinet panel is flush mounted the time Light is not visible Install the base panel ...

Page 20: ... check that the connection points are tight Water outlet connection types This information is intended to help you to connect this appliance to the water outlet ATTENTION When draining the water outlet hose is subject to water pressure and may come loose from the installed con nection point Secure the water outlet hose against unintentional loosening Note Observe the draining heights The maximum d...

Page 21: ...firmly on the ground 3 Screw the lock nuts tightly against the housing using a WAF 17 wrench In doing so hold the foot tight and do not adjust its height 4 9 Connecting the appliance to the electricity supply Note Your electrical domestic install ation for this appliance must comply with the local legal provisions and safety regulations and should in clude a residual current circuit breaker 1 Inse...

Page 22: ...7 7 8 9 10 11 On certain models specific details such as the colour and shape may differ from those pictured 1 Maintenance flap for the drain pump Page 39 2 Door 3 Detergent drawer Page 23 4 Control panel Page 23 5 Water outlet hose Page 20 6 Power cord Page 21 7 Transit bolts Page 13 8 Water inlet hose Page 20 9 Emergency release Page 52 10 TimeLight Page 37 11 Drain hose Page 39 ...

Page 23: ...for main wash Water softener Bleach Stain remover 3 Compartment Fabric softener Liquid starch Waterproofing agent 4 Compartment I Detergent for prewash Hygiene detergent 5 3 Control panel You can use the control panel to configure all functions of your appliance and to obtain information about the operating status 1 2 3 4 1 Programmes Page 28 2 Programme selector Page 33 3 Display Page 25 4 Button...

Page 24: ...ur approx 1 litre of tap water into compartment II 5 Pour standard washing powder into compartment II To prevent foaming use only half of the amount of detergent recom mended by the detergent manufac turer for light soiling Do not use detergent suitable for woollens or delicates 6 Push in the detergent drawer 7 Press Start Reload to start the pro gramme a The display shows the remaining programme ...

Page 25: ...Ready in time Buttons Page 27 8 0 kg 1 Recommended load The maximum load capacity for the selec ted programme in kg 1400 Spin speed Set spin speed in rpm Buttons Page 27 0 No final spin only draining Rinse Hold no draining 70 Temperature Set temperature in C Buttons Page 27 cold Start Re load Start Pause Start cancel or pause Lights up The programme is running and can be cancelled or paused Flashe...

Page 26: ...ck Page 36 SpeedPerfect Short wash activated Buttons Page 27 Reminder to clean the drum Flashes Drum is dirty Run the Drum Clean programme for cleaning and caring for the drum and the outer tub Cleaning the drum Page 38 Foam detection system The appliance has detected too much foam Door Lights up The door is locked and can not be opened Flashes The door is not closed prop erly Off The door is unlo...

Page 27: ... started the programme duration is displayed Temp C 70 C Adjust the temperature in C Spin Speed 1400 Adjust the spin speed or activate Rinse Hold If is selected the water is not drained at the end of the washing cycle and the spin cycle is deactiv ated The laundry remains in the rins ing water 3 sec Activate Deactivate Childproof lock Page 36 Start Reload Multiple selection Basic settings Page 37 ...

Page 28: ...ormance corresponds to the best possible washing performance class according to the legal requirements For this programme the washing temperature is automatically adjusted depending on the load size in order to achieve the best possible energy effi ciency with the best possible washing result You cannot change the washing temperature Programme setting Note The temperature cannot be adjusted in thi...

Page 29: ...Max 40 C Max 800 rpm 2 0 Wool Hand or machine washable items that are made from wool or contain wool To prevent the laundry from shrinking the drum moves the items very gently with long pauses Use a detergent that is suitable for wool Programme setting Max 40 C Max 800 rpm 2 0 Rinse Rinse and then spin the laundry and drain the wa ter Programme setting Max 1400 rpm Spin Drain Spin and drain the wa...

Page 30: ...ic softener Note To prevent excessive foaming remove air from laundry items by rolling them up before you wash them Programme setting Max 60 C Max 1200 rpm 1 5 Dark Wash Wash dark coloured and colour intense items made from cotton or easy care fabric e g jeans Turn laundry inside out before washing Use liquid detergent Programme setting Max 40 C Max 1200 rpm 4 0 Drum Clean Cleaning and caring for ...

Page 31: ...ed a programme at 60 C or higher for a long time Super Quick 15 30 Wash items made from cotton or synthetic or blen ded fabrics Short programme for small items of lightly soiled laundry The programme duration is approx 30 minutes If you wish to reduce the programme duration to 15 minutes activate Speed Perfect The maximum load is reduced to 2 0 kg Programme setting Max 40 C Max 1200 rpm 4 0 1 Spee...

Page 32: ...h home com 11 1 Preparing the laundry ATTENTION Objects remaining in the laundry may damage the laundry and the drum Remove all items from any pock ets in your laundry before using the appliance To protect your appliance and the laundry prepare the laundry be forehand Empty any pockets Brush sand out of all collars and pockets Close bed covers and cushion covers Close all zips Velcro fasteners hoo...

Page 33: ...an find further information in the digital instruction manual by scanning the QR code in the table of contents or on www bosch home com 13 1 Switching on the appli ance Requirement The appliance has been correctly installed and connec ted Installation and connection Page 12 Turn the programme selector to a programme Note The lighting for the drum goes out automatically 13 2 Setting a programme 1 T...

Page 34: ... liquid detergent you can use a measuring aid in the detergent drawer 1 Pull out the detergent drawer 2 Slide the measuring aid forwards 3 Fold the measuring aid down and click it into place 4 Push in the detergent drawer 13 7 Adding detergent and care product Notes Do not use the measuring aid for liquid detergent for gel detergents washing powder or if Prewash or Ready in time are activated Obse...

Page 35: ... indicates the desired Ready in time 3 Press Start Reload The changed Ready in time is ac tivated 13 10 Soaking laundry Note No additional detergent is re quired The washing solution is then used for washing 1 Start the programme 2 To pause the programme after ap prox 10 minutes press Start Re load 3 To resume the programme after the desired soaking time press Start Reload 13 11 Adding laundry 1 P...

Page 36: ...rubber gasket dry and re move any foreign objects 3 Leave the appliance door and de tergent drawer open so that resid ual water can evaporate 14 Childproof lock Secure your appliance against being operated unintentionally using the controls 14 1 Activating the childproof lock Press and hold the two 3 sec buttons for approx 3 seconds a The display shows a The controls are locked a The childproof lo...

Page 37: ...Set the volume of the signal at the end of the programme Button signal 3 0 off 1 quiet 2 me dium 3 loud 4 very loud The volume of the audible signal emitted when the buttons are pressed Drum cleaning reminder 4 On OFF Activate or deactivate the re minder to clean the drum timeLight 5 ON OFF Activate or deactivate timeLight optical display for the programme information on the floor Programme counte...

Page 38: ...You can find further information in the digital instruction manual by scanning the QR code in the table of contents or on www bosch home com 16 1 Cleaning the drum CAUTION Risk of injury Permanently washing at low temper atures and a lack of ventilation for the appliance may damage the drum and cause injury Regularly run a programme for cleaning the drum or wash at tem peratures of at least 60 C L...

Page 39: ...click it into place 6 Clean the opening for the deter gent drawer 7 Push in the detergent drawer 16 3 Cleaning the drain pump Clean the drain pump in the event of faults e g blockages or rattling noises Emptying the drain pump 1 Turn off the water tap 2 Switch off the appliance 3 Disconnect the appliance s mains plug from the power supply 4 Remove the base panel ...

Page 40: ...k of scalding When you wash at high temperat ures the detergent solution gets hot Do not touch the hot detergent solution To allow the detergent solution to flow out into the container remove the sealing cap 8 Firmly press on the sealing cap 9 Insert the drain hose into the holder Cleaning the drain pump Requirement The drain pump is empty ...

Page 41: ...oosen the dirt and remove the filter insert 2 Clean the interior the thread on the pump cap and the pump hous ing 3 Ensure that the impeller in the drain pump can rotate 4 Screw the pump cap as far as it will go 90 The handle on the pump cap must be in a vertical position 5 Insert the pump cap and screw it on as far as it will go 90 The handle on the pump cap must be in a vertical position ...

Page 42: ...ible Install the base panel Before the next wash To prevent unused detergent from flowing straight into the outlet in the next wash run the Drain programme after you have emptied the drain pump 1 Turn on the water tap 2 Insert the mains plug 3 Switch on the appliance 4 Pour 1 litre of water into compart ment II 5 Select a suitable programme for draining Programmes Page 28 ...

Page 43: ...s any button a The symbol lights up again E 36 10 Drain pipe or water outlet hose is blocked Clean the drain pipe and the water outlet hose Drain pipe or water drain hose is caught or jammed Ensure that the drain pipe and water drain hose are not kinked or trapped Drain pump is blocked Cleaning the drain pump Page 39 The water outlet hose is connected too high Install the water outlet hose at a ma...

Page 44: ...E 30 10 and or The water pressure is low No remedial action possible The filter in the water inflow is blocked Clean the water inflow filter The tap is turned off Turn on the tap The water inlet hose is kinked or jammed Ensure that the water inlet hose is not kinked or jammed Water level measurement system is defective Note With the error message the appliance starts a draining process 1 First wai...

Page 45: ...flashes Door is not closed 1 Close the door 2 Press Start Reload to start the programme Laundry is caught in the door 1 Open the door again 2 Remove any trapped laundry 3 Close the door 4 Press Start Reload to start the programme All other error codes Malfunction Call the after sales service Customer Service Page 53 E 30 20 Solenoid valve defective Call the after sales service Customer Service Pag...

Page 46: ... 4 Press Start Reload to start the programme The door cannot be opened is activated Continue the programme by selecting Spin or Drain and pressing Start Reload Resuming the programme when the programme status is Rinse Hold Page 36 The temperature is too high Wait until the temperature has dropped Cancelling the programme Page 35 Water level is too high Select a suitable programme for draining Prog...

Page 47: ...ed extensions from the water hose Connecting the appliance Page 20 The pump cap is not fully screwed in Ensure that the pump cap is screwed in all the way into the appliance The handle on the pump cap must be in a vertical position Cleaning the drain pump Page 40 Water is not flowing in Detergent is not being dispensed You have not pressed Start Reload Press Start Reload The filter in the water in...

Page 48: ...it is operating Drum jerks after the programme starts This is caused by an internal motor test Not a fault no action required Residual water is present in the com partment Insert in compartment is blocked Cleaning the detergent drawer Page 38 Vibrations and move ment of the appliance whilst spinning Appliance is not correctly aligned Aligning the appliance Page 21 The appliance feet are not fixed ...

Page 49: ...r water outlet hose is blocked Clean the drain pipe and the water outlet hose Drain pipe or water drain hose is caught or jammed Ensure that the drain pipe and water drain hose are not kinked or trapped The unbalanced load detection system has interrupted the spin cycle because the laundry is unevenly distrib uted Redistribute the laundry in the drum Note Where possible mix large and small items i...

Page 50: ...When dosing liquid detergent and fabric softener observe the marking in the detergent drawer and do not dose above this The spin result is not satisfactory The laun dry is too wet too damp A low spin speed is selected The next time you run a wash cycle set a higher spin speed Start the Spin programme Drain pipe or water outlet hose is blocked Clean the drain pipe and the water outlet hose Drain pi...

Page 51: ...dry Brush out the laundry after washing and drying Water is leaking out at the water inlet hose Water inlet hose is not correctly securely connected 1 Connect the water supply hose correctly Connecting the water inlet hose Page 20 2 Tighten the screw connection Water is leaking out at the water outlet hose The water outlet hose is damaged Replace the damaged water outlet hose Water outlet hose is ...

Page 52: ...g the appliance Note You can find further information in the digital instruction manual by scanning the QR code in the table of contents or on www bosch home com 1 Turn off the tap 2 Empty the water inlet hose 3 Switch off the appliance 4 Unplug the appliance s mains plug 5 Drain the water Cleaning the drain pump Page 39 6 Detach the hoses 18 2 Inserting the transit bolts Secure the appliance for ...

Page 53: ...roughout the EU 19 Customer Service If you have any queries on use are unable to rectify faults on the appli ance yourself or if your appliance needs to be repaired contact Cus tomer Service Function relevant genuine spare parts according to the corresponding Eco design Order can be obtained from Customer Service for a period of at least 10 years from the date on which your appliance was placed on...

Page 54: ...must be connected to the power supply The liability guarantee is valid for the service life of the appliance A claim can only be made under the guarantee if the appliance has been correctly installed and con nected with Aqua Stop according to our instructions this also in cludes correctly fitting the Aqua Stop extension genuine access ory Our guarantee does not cover defective supply lines or fitt...

Page 55: ... 0 2 25 0 170 33 0 25 1400 54 00 Cot tons 20 C 8 0 3 20 0 320 88 0 23 1400 52 00 Cot tons 40 C 8 0 3 20 1 030 88 0 45 1400 52 00 Cot tons 60 C 8 0 3 20 1 350 88 0 53 1400 52 00 Cot tons 40 C Prewash 8 0 4 00 1 200 92 0 45 1400 52 00 Easy Care 40 C 4 0 2 30 0 770 64 0 44 1200 30 00 Mixed Load 40 C 4 0 1 05 0 610 45 0 41 1400 55 00 Wool 30 C 2 0 0 45 0 220 42 0 24 800 27 00 1 Due to the influence of...

Page 56: ... the power cord 210 cm 1 Depending on the appliance spe cifications This product contains light sources from energy efficiency class F These light sources are available as a spare part and must only be replaced by trained specialist staff You can find more information about your model online at https eprel ec europa eu 1 This web address is linked to the official EU EPREL product database Please t...

Page 57: ......

Page 58: ......

Page 59: ......

Page 60: ...ng for help You ll find it here Expert advice for your Bosch home appliances help with problems or a repair from Bosch experts Find out everything about the many ways Bosch can support you www bosch home com service Contact data of all countries are listed in the attached service direct ory 9001707003 9001707003 020302 en BSH Hausgeräte GmbH Carl Wery Straße 34 81739 München GERMANY www bosch home...

Reviews: