background image

5

English

Recommended charging capacity:

WL 15 E

12 V:

12 Ah ... 150 Ah

24 V:

12 Ah ...  75 Ah

WL 20 E

12 V:

12 Ah ... 180 Ah

24 V:

12 Ah ...  90 Ah

1.

Pull out the mains plug.

2.

Unscrew the inspection plugs of
standard batteries before bat-
tery charging.

3.

Securely connect the charging
clips to the battery, ensuring that
the polarity is correct:
– red clip to positive terminal
– black clip to negative terminal

4.

Set the selector switch  (1) to the
correct battery type:

Maintenance-free batteries

Standard batteries

5.

Only for WL 20 E:
Set the control knob (4) to the
left-hand limit position (mini-
mum charging current).

6.

Set voltage selector switch (2) to
position „12 V” or „24 V”.

7.

Insert mains plug.

8.

Only for WL 20 E:
Set the charging current to the
value specified by the battery
manufacturer at the control
knob (4).

The instructions of the bat-
tery manufacturer must be
observed in all cases when
setting the charging current.

In this operating mode the
charging current should not

be greater than 20% of the bat-
tery capacity (Ah).

Example:

In this operating mode a maxi-
mum charging current of

36 Ah x 0.2 /h 

 7 A

is required for an 36 Ah battery

9.

Continuously monitor the char-
ging current on the
ammeter (3).

The battery must be checked
before trickle charging. Only
fault-free batteries must be
charged further or trickle-
charged!

10. Set the operating mode selec-

tor switch (1) to the position
for maintenance-free batte-
ries

for further charging,

trickle charging or floating
operation of the battery.

Check the battery condition
every three months.

After the end of charging:

11. Pull out the mains plug.

12. Remove the charging clips from

the battery.

5 Faults

Charger does not
function after switching on:

1.

Pull out the mains plug.

2.

Check the mains connection.

3.

Check the mains fuse:

1.

Check polarity:
– Red clip to positive terminal
– Black clip to negative terminal

2.

Check that the charging clips
are securely attached.

3.

Check the rated battery voltage.

The charger must be checked by the
after-sales service if it still does not
function.

6 Technical data

Dimensions L x W x H:

140 x 265 x 180 mm

Weight:

WL 15 E

5 kg

WL 20 E

6 kg

Ambient temperature:

–10

C ... +40

C

Rated mains voltage:

230 V +6%/–10%

Rated mains frequency: 50...60 Hz

Power consumption:

WL 15 E

230 VA

WL 20 E

330 VA

Mains fuse:

WL 15 E H250 slow-blow 2,0 A
WL 20 E H250 slow-blow 3,15A

Mains connection cable:

0,75 mm

2

 / 1,8 m

Rated battery voltage:

12/24 V

Charging current:

WL 15 E

12 V

10 A

arithm.

 / 15 A

eff.

24 V

5,0 A

arithm.

 / 7,5 A

eff.

WL 20 E

12 V

15 A

arithm.

 / 20 A

eff.

24 V

7,5 A

arithm.

 / 10 A

eff.

Ammeter

WL 15 E

0...20 A

WL 20 E

0...30 A

Final charging voltages:

Standard batteries

14.4 V or 28.8 V

Maintenance-free batteries 

13.8 V or 27.6 V

Charging characteristic:

IWU

Charging leads

2.5 mm

2

 / 1.4 m / PVC

The charging leads must not
be changed!

Degree of protection(DIN 40050):

IP 21

Safety class (DIN 40530):

II

RFI suppression

to VDE 0875

Switch-on prevention in the event of
short-circuit or incorrect polarity

Radio interference
suppression

It is herewith certified that chargers
WL 15 E and WL 20 E are provided
with a radio interference suppressor
in compliance with the regulations of
EN 55014.

7 After-sales service

Please contact an after-sales ser-
vice center for Bosch products if
spare parts or after-sales services
are required.

The list of Bosch subsidia-
ries abroad and foreign

agents is provided on the last
page of the operating instruc-
tions.

Summary of Contents for WL 15 E

Page 1: ...201 039 WL 20 E 7 780 201 040 Bedienungsanleitung Ladegerät für 12 24 V Batterien Operating instructions Charger for 12 24 V batteries Mode d emploi Chargeur de batterie 12 24 V Instrucciones de Servicio Cardadar para baterias de 12 24 V Instruzioni per l uso Caricabatterie per batterie a 12 24 V Gebruiksaanwijzing Laadapparaat voor 12 24 V accu s ...

Page 2: ...g und gewählte Ladespannung müssen übereinstimmen Die Netzanschlußleitung und die Ladeleitungen müssen in einwandfreiem Zustand sein Das Ladegerät darf nur an Stromnetze angeschlossen werden deren Spannung mit der Spannungsangabe auf dem Typenschild überein stimmt Vor Beginn des Ladevorgan ges müssen die Vorschriften des Batterieherstellers und des Fahrzeugherstellers be achtet werden Schutzbrille...

Page 3: ...fen 3 Netzsicherung überprüfen 4 Polung prüfen Rote Zange Pluspol Schwarze Zange Minuspol 5 Festen Sitz der Ladezangen prüfen 6 Batterie Nennspannung prü fen Ist das Ladegerät noch immer ohne Funktion muß das Ladegerät vom Kundendienst überprüft werden 6 Technische Daten Abmessungen L x B x H 140 x 265 x 180 mm Gewicht WL 15 E 5 kg WL 20 E 6 kg Umgebungstemperatur 10 C 40 C Netz Nennspannung 230 V...

Page 4: ...ery voltage and selected charging voltage must agree The mains connection cable and the charging leads must be in perfect condition The charger must only be connected to a mains power supply where the mains vol tage agrees with the voltage rating on the rating plate Comply with the instructions of the vehicle manufacturer when using the charger as a starting aid and when char ging vehicle batterie...

Page 5: ...the charging clips from the battery 5 Faults Charger does not function after switching on 1 Pull out the mains plug 2 Check the mains connection 3 Check the mains fuse 1 Check polarity Red clip to positive terminal Black clip to negative terminal 2 Check that the charging clips are securely attached 3 Check the rated battery voltage The charger must be checked by the after sales service if it stil...

Page 6: ...oivent cor respondre Le cordon secteur et les câbles de charge doivent être en parfait état Le chargeur ne doit être relié qu à des réseaux dont la ten sion correspond à la tension indiquée sur la plaque sig nalétique Si le chargeur est réglé sur l aide au démarrage ou sur la charge des batteries respec ter les consignes du con structeur automobile Porter des lunettes de protec tion Laver immédiat...

Page 7: ...tionne pas après la mise en mar che 1 Débrancher la fiche mâle de la prise de courant 2 Vérifier la liaison secteur 3 Vérifier le fusible secteur 1 Vérifier la polarité Pince rouge sur le pôle positif Pince noire sur le pôle négatif 2 Vérifier la bonne tenue des pinces de charge 3 Vérifier la tension nominale de la batterie Si le chargeur ne fonctionne tou jours pas le faire vérifier par le ser vi...

Page 8: ...para la carga se deberá efectuar únicamente con baterías comprobadas No cargar las baterías libres de mantenimiento junto con baterías standard No se deben cargar baterías no recargables La tensión nominal de las baterías y la tensión de carga seleccionada tienen que coincidir entre sí El cable de conexión a la red y los cables de carga tienen que encontrarse en estado impecable El equipo cargador...

Page 9: ... carga 11 Desenchufar el enchufe de la red 12 Quitar las pinzas de carga de la batería 5 Averías y o perturbaciones El equipo cargador no fun ciona después de haber sido conectado 1 Desenchufar el enchufe de la red 2 Revisar la conexión a la red 3 Revisar el fusible de la red 1 Revisar las polaridades Pinza roja al polo positivo Pinza negra al polo negativo 2 Comprobar el asiento firme de las pinz...

Page 10: ...usare batte rie non ricaricabili La tensione nominale della batteria e la tensione di carica selezionata devono corris pondere Il cavo di alimentazione ed i conduttori di carica devono essere in perfetto stato Il caricabatterie deve essere collegato esclusivamente ad una rete elettrica la cui ten sione corrisponda alla ten sione indicata sulla targhetta dati nominali Con il rinforzo d inizio caric...

Page 11: ...nutenzione Lo stato della batteria deve essere controllato ogni tre mesi Alla fine dell operazione di carica 11 Sfilare laspinadialimentazione 12 Rimuovere le pinze di carica dalla batteria 5 Inconvenienti Il caricabatterie non fun ziona 1 Sfilare laspinadialimentazione 2 Controllare il collegamento alla rete 3 Controllare il fusibile di rete 1 Verificare le polarità Pinza rossa al polo positivo P...

Page 12: ... en ingestelde oplaadspanning moeten overeenstemmen De netvoedingskabel en de accukabels mogen geen ge breken vertonen De acculader mag alleen op stroomnetten worden aange sloten waarvan de spanning overeenstemt met de op het typeplaatje vermelde span ning Bij gebruik als starthulp en bij het opladen van accu s van voertuigen moeten de voor schriften van de fabrikanten van voertuigen in acht wor d...

Page 13: ...t na het inschakelen niet 1 Stekker uit het stopcontact trek ken 2 Netverbinding controleren 3 Netzekering controleren 1 Poolaansluiting controleren rode klem op pluspool zwarte klem op minpool 2 Controlerenof de accuklemmen goed vastzitten 3 Nominaleaccuspanning contro leren Als de acculader het nog steeds niet doet moet de acculader door de Servicedienst worden gecontro leerd 6 Technische specif...

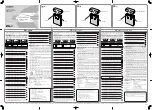
Page 14: ...12 V 24 V AMPERE 1 2 3 A 12 V 24 V AMPERE 1 2 3 4 WL 15 E WL 20 E ...

Page 15: ...enue Michelet Boîte Bostale 170 F 93 404 Saint Ouen Telefon 1 40 10 71 11 Telefax 1 40 10 78 10 Großbritannien United Kingdom Robert Bosch Limited Broadwater Park North Orbital Road Denham Uxbridge Middlesex UB9 5HJ P O Box 98 Telefon 08 95 83 44 66 Telefax 08 95 83 83 33 Italien Italia Robert Bosch S p A Via Petitti 15 I 20149 Milano Lombardia Telefon 02 36 96 1 Telefax 02 36 96 423 Niederlande N...

Reviews: