background image

Safety instructions    

en

11

Caution!

Material damage/damage to 

the appliance

If the amount of laundry in 

the appliance exceeds its 

maximum load capacity, it 

may not be able to operate 

properly, or this may result in 

material damage or damage 

to the appliance.

Do not exceed the maximum 

load capacity of dry laundry. 

Make sure you comply with 

the maximum load capacities 

specified for each of the 

programs. 

~

 Page 25

Material damage/damage to the appliance

If you operate the appliance 

without a fluff catcher (e.g. 

fluff filter, fluff depot, 

depending on appliance 

specifications), or if the fluff 

catcher is incomplete or 

defective, this may result in 

damage to the appliance.

Do not operate the appliance 

without a fluff catcher, or with 

a fluff catcher that is 

incomplete or defective.

Material damage/damage to the appliance

Light objects such as hair 

and lint may be sucked into 

the air inlet when the 

appliance is in operation.

Keep these away from the 

appliance.

Material damage/damage to the appliance

Foam and foam rubber may 

deform or melt if dried in the 

appliance.

Do not dry laundry items that 

contain foam or foam rubber 

in the appliance.

Material damage/damage to the appliance

If you pour the wrong 

quantity of detergent or 

cleaning agent into the 

appliance, this may result in 

material damage or damage 

to the appliance.

Use detergents/care 

products/cleaning agents 

and softeners in accordance 

with the manufacturers' 

instructions.

Material damage/damage to the appliance

If the appliance overheats, it 

may not be able to operate 

properly, or this may result in 

material damage or damage 

to the appliance.

Make sure that the 

appliance's air inlet is never 

obstructed when the 

appliance is in operation, 

and that the area around the 

appliance is adequately 

ventilated.

Summary of Contents for WTW854S9SN

Page 1: ...enInstallation and operating instructions Tumble dryer WTW854S9SN ...

Page 2: ...the operating and installation instructions describe different models any differences will be pointed out at the relevant points in the text Read these operating and installation instructions before operating the tumble dryer Display rules Warning This combination of symbol and signal word indicates a possibly dangerous situation Not heeding the warning can cause death or injuries Caution This sig...

Page 3: ...ry 24 Sorting washing according to 24 Programmes and buttons 25 Programmes 25 Buttons 27 1 Operating the appliance 28 Loading laundry and switching on the dryer 28 Setting a programme 28 Starting the programme 28 Programme sequence 28 Changing the programme or adding laundry 29 Cancelling the programme 29 Programme end 29 Removing laundry and switching off the dryer 29 Clean the fluff filter 30 Em...

Page 4: ...dden This appliance is intended for use up to a maximum height of 4000 metres above sea level Before you switch on the appliance Check that there is no visible damage to the appliance Do not operate the appliance if it is damaged Should you have any problems please contact your specialist dealer or our customer service Read and follow the operating and installation instructions and all other infor...

Page 5: ...maintain this appliance unsupervised Keep children under 3 years and pets away from this appliance Do not leave the appliance unattended when children or other people who are unable to assess the risks are in the vicinity Warning Risk of death Children may lock themselves inside appliances and find themselves in a life threatening situation Do not position the appliance behind a door as this may o...

Page 6: ...tion Warning Risk of electric shock fire material damage damage to the appliance If the appliance is not installed properly this may lead to a dangerous situation Ensure the following The mains voltage on your power socket must match the rated voltage specified on the appliance identification plate The connected loads and the required fuse protection are specified on the identification plate The a...

Page 7: ...e sure that it fulfils all the applicable regulations Warning Risk of electric shock fire material damage damage to the appliance If the appliance s mains cable is altered or damaged this may result in electric shock short circuiting or fire due to overheating The mains cable must not be kinked crushed or altered and must not come into contact with any heat sources Warning Risk of fire material da...

Page 8: ...if available Page 16 The appliance MUST be secured with this connection set Stacking the appliance in any other way is forbidden Riskofinjury materialdamage damagetotheappliance If you take hold of any of the appliance s protruding parts e g the appliance door in order to lift or move it these parts may break off and cause injury Do not take hold of any of the appliance s protruding parts in order...

Page 9: ...e if industrial chemicals have been used to clean the laundry Warning Risk of explosions fire If there is any residual material left in the fluff filter this may ignite when drying is in progress or even cause the appliance to catch fire or explode Clean the fluff filter regularly Riskofexplosions fire Certain objects may ignite when drying is in progress or even cause the appliance to catch fire ...

Page 10: ...sk of poisoning material damage Condensation water is not suitable for drinking and may be contaminated with lint Contaminated condensation water may be hazardous to health and may cause material damage Do not drink or reuse Warning Risk of poisoning Poisonous fumes may be given off by cleaning agents that contain solvents e g cleaning solvent Do not use cleaning agents that contain solvents Warni...

Page 11: ...Materialdamage damagetotheappliance Light objects such as hair and lint may be sucked into the air inlet when the appliance is in operation Keep these away from the appliance Materialdamage damagetotheappliance Foam and foam rubber may deform or melt if dried in the appliance Do not dry laundry items that contain foam or foam rubber in the appliance Materialdamage damagetotheappliance If you pour ...

Page 12: ... not make any technical modifications to the appliance or its features Repairs and any other work on the appliance must only be conducted by our customer service or by an electrician The same applies for replacing the mains cable when necessary Spare mains cables can be ordered from our customer service Warning Risk of poisoning Poisonous fumes may be given off by cleaning agents that contain solv...

Page 13: ... with the surfaces of the appliance Clean the appliance with nothing but water and a soft damp cloth Remove any detergent spray or other residues immediately 7 Environmental protection EnvironmentalprotectionPackaging old appliance Coolant The dryer s heat exchanger contains fluorinated greenhouse gas in a hermetically sealed unit Dispose of the dryer properly Dispose of packaging in an environmen...

Page 14: ...isplay panel and indicator lamps go off after a few minutes and the Start button flashes To activate the lighting press any button open or close the dryer door or turn the program selector 5 Installation and connection InstallationandconnectionScope of delivery Dryer Installation and operating instructions Basket for woollens Condensation drain Installing and connecting the dryer Warning Risk of d...

Page 15: ...e dryer for damage caused during transportation Never operate a dryer if it is damaged Any residual water in the dryer may freeze and damage the dryer Do not install the dryer in rooms that are at risk of frost During installation ensure that The dryer is placed on a clean level and firm surface The mains plug can be accessed at all times The air inlet on the dryer is kept clear and there is suffi...

Page 16: ...to the platform drawer Order number WMZ20500 Basket for woollens Dry individual woollen items sports shoes and soft toys in the basket for woollens Order number WMZ20600 Transport and frost protection 1 Empty the condensate container 2 Select any programme using the programme selector 3 Press the Start button 4 Wait for 5 minutes Note The condensation is drained 5 Empty the condensate container ag...

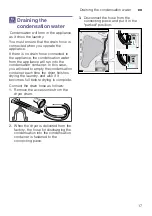
Page 17: ...ppliance will run into the condensation container In this case you will need to empty the condensation container each time the dryer finishes drying the laundry and also if it becomes full before drying is complete Connect the drain hose as follows 1 Remove the accessories from the dryer drum 2 When the dryer is delivered from the factory the hose for discharging the condensation into the condensa...

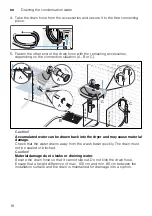
Page 18: ...r can be drawn back into the dryer and may cause material damage Check that the water drains away from the wash basin quickly The drain must not be sealed or blocked Caution Material damage due to leaks or draining water Secure the drain hose so that it cannot slip out Do not kink the drain hose Ensure that a height difference of max 100 cm and min 80 cm between the installation surface and the dr...

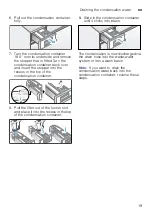
Page 19: ... into the recess in the top of the condensation container 8 Pull the filter out of the lock in slot and place it into the recess in the top of the condensation container 9 Slide in the condensation container until it clicks into place The condensation is now discharged via the drain hose into the waste water system or into a wash basin Note If you want to drain the condensation water back into the...

Page 20: ...ntsinbrief 1 Load the laundry and close the door Switch on the dryer Select a programme and if necessary adjust the programme default settings 2 Select the start button A Dry Unload the laundry 3 Switch off the dryer Empty the condensate container Clean the fluff filter ...

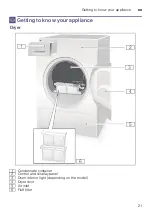
Page 21: ...your appliance en 21 Getting to know your appliance GettingtoknowyourapplianceDryer Condensate container 0 Control and display panel 8 Drum interior light depending on the model Dryer door H Air inlet P Fluff filter 3 ...

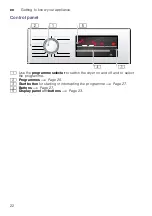
Page 22: ...Control panel Use the programme selector to switch the dryer on and off and to select the programme 0 Programmes Page 25 8 Start button for starting or interrupting the programme Page 27 Buttons Page 27 H Display panel withbuttons Page 23 ...

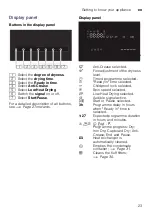
Page 23: ...ase selected Fine adjustment of the dryness level 5 Timed programme selected ñ Ready in time selected E Childproof lock selected 0 Spin speed selected s Low Heat Drying selected C Audible signal active A Start or Pause selected 3 h Programme delay in hours when Ready in time is selected 1 27 Expected programme duration in hours and minutes Ù ö Q Ÿš Programme progress Dry Iron Dry Cupboard Dry Anti...

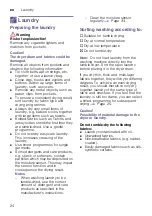
Page 24: ...articles which may be deposited on the moisture sensor This may impair the sensor function and in consequence the drying result Notes When washing laundry to be tumble dried use the correct amount of detergent and care products as specified in the manufacturer s instructions Clean the moisture sensor regularly Page 34 Sorting washing according to c Suitable for tumble drying a Dry at normal temper...

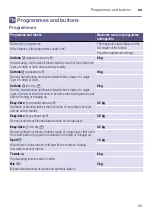
Page 25: ...on dry ö Normal hard wearing and heat resistant fabrics made of a single layer of cotton or linen that need to be damp after drying and are suit able for ironing or hanging up 9 kg Easy Care f cupboard extra dry Synthetic or blended fabrics that are made of more than one layer and do not dry readily 3 5 kg Easy Care f cupboard dry Normal synthetic or blended fabrics made of a single layer 3 5 kg E...

Page 26: ... extend the programme length 3 kg You can adjust the programme length using the button for the drying time Time progr cold 5 All types of fabric For freshening up or airing items of laundry that have not been worn for long 3 kg You can adjust the programme length using the button for the drying time Shirts Non iron shirts or blouses made of cotton linen synthetic fibres or blended fabrics 1 5 kg S...

Page 27: ...e programmes Between 20 minutes and 3 hours in 10 minute increments ñ Ready in The programme will end in 1 24 hrs Set the Ready in time in increments of one hour to delay the start of the programme The required number of hours after the programme ends is displayed in the display panel Q Anti crease The drum moves the laundry at regular intervals for 60 or 120 minutes after drying in any programme ...

Page 28: ...in the display panel Note Default programme settings are standard settings that are already defined when a programme is selected After selecting a programme you can see the default programme settings in the display panel 3 If required adjust the default programme settings You can find detailed information on this from Page 25onwards Starting the programme Press the Start button Note If you want to...

Page 29: ...play panel is updated depending on the load and residual moisture in the laundry The values displayed may change after the programme is changed or the load is adapted Cancelling the programme The programme can be interrupted at any time to pause open the dryer door or press the Start button Caution Risk of fire Laundry may catch fire If you cancel the programme you must remove the laundry items an...

Page 30: ...ff filter after each drying cycle 1 Open the dryer door and remove all fluff from the door 2 Pull out the two part fluff filter 3 Remove the fluff from the recess in the fluff filter Note Ensure that no fluff falls into the open shaft 4 Pull apart the two part fluff filter 5 Open both filters and remove all the fluff 6 Rinse away the fluff under warm running water 7 Dry the fluff filter close it a...

Page 31: ...ensate container horizontally 2 Pour out the condensation water Caution Dirty condensation water may be harmful to your health and cause material damage Condensation water is not suitable for drinking and may be contaminated with fluff Do not drink the condensation water or reuse it 3 Push in the condensate container until you feel it lock back into place in the dryer Note The filter in the conden...

Page 32: ... programme selector clockwise to position 2 2 The spin speed is shown in the display 3 Press the Ready in time button or the drying time button to change the spin speed 4 Turn the programme selector clockwise to position 3 5 The volume of the audible signal at the end of the programme is shown in the display 0 off 1 quiet 2 medium 3 loud 4 very loud 6 Press the Ready in time button or the drying t...

Page 33: ...g of the appliance From time to time the compressor in the dryer generates a humming noise However the volume may vary depending on the programme and progress of the drying process Every now and then the compressor is ventilated This creates a whirring noise The automatic cleaning of the dryer causes a clicking sound The condensation is pumped into the condensate container by a pump This generates...

Page 34: ... by a fine layer of limescale or residues of detergents and care products Such residues must be removed regularly as the sensor function and in consequence the drying result may be impaired Open the door and clean the moisture sensor with a coarse sponge Caution Moisture sensor may be damaged Do not clean moisture sensors with abrasives and steel wool Cleaning the filter in the condensate containe...

Page 35: ...ey are left in the drum Water is leaking out Not a fault the dryer may be positioned on an incline Level the dryer Change in the pro gramme duration dis played during drying Not a fault The moisture sensors detect the remaining moisture in the load and adjust the programme length except timed programmes Laundry is not dried cor rectly or is still too damp After the end of the programme warm laundr...

Page 36: ...oom Display panel goes off and Start button flashes Not a fault Energy saving mode is active Page 14 Residual water in the condensate con tainer despite the dryer being connected to the condensation drain Not a fault If the condensation drain is installed residual water remains in the condensate container due to the dryer s self cleaning function Humidity in the room increases Not a fault Make sur...

Page 37: ...ct information for your nearest after sales service can be found here or in the enclosed after sales service directory Please provide after sales service with the dryer s product number E no and production number FD You can find this information on the inside of the dryer door or on the rear of the dryer Trust the expertise of the manufacturer Contact us You can therefore be sure that the repair i...

Page 38: ...80 min 103 min 1 63 kWh 0 90 kWh 800 rpm 210 min 119 min 1 95 kWh 1 06 kWh Easy Care 3 5 kg 3 5 kg Cupboard Dry 800 rpm 71 min 0 56 kWh 600 rpm 84 min 0 68 kWh Programme setting in accordance with the applicable EN61121 standard when using the external drain hose The values may differ from those specified depending on the type of fabric composition of laundry to be dried residual moisture in the l...

Page 39: ...h Weight Approx 56 kg Maximum load 9 kg Condensate container 4 6 l Connected voltage 220 240 V Connected load Max 1000 W Fuse 10 A Drum interior light Ambient temperature 5 35 C Power consumption when switched off 0 10 W Power consumption when ready for use left on mode 0 75 W Depending on the model ...

Page 40: ...001310028 9705 You can find the contact information for all countries in the attached after sales service directory 7 Advice and repair order in the event of faults GB 0344 892 8979 Calls charged at local or mobile rate IE 01450 2655 0 03 per minute at peak Off peak 0 0088 per minute ...

Reviews: