English |
13
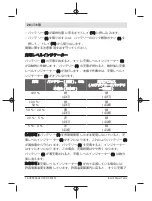
Charging
Battery separate or
in the power tool (in motion)
Charging process
(battery with connected power
adaptor)
100 %
Green
(continuous)
Green
(continuous)
100 %−50 %
Green
(continuous)
Green
(flashing)
50 %−20 %
Yellow
(continuous)
Green
(flashing)
20 %−5 %
Red
(continuous)
Green
(flashing)
5 %−0 %
Red
(flashing)
Green
(flashing)
Note:
If the battery
(5)
has been stored away and not been used for a long period of
time, it is possible that the battery charge indicator
(2)
will not be activated. This pro-
tects the battery
(5)
from deep discharge. Once the battery
(5)
is charged, the indicator
will be activated again. In this case, the charging time may increase.
The battery charge indicator
(2)
goes out a few minutes after the battery
(5)
has been
fully charged.
Note:
If the battery charge indicator
(2)
is flashing white, the temperature is outside the
permitted ambient temperature range. The charging process begins automatically once
the permitted temperature range has been reached again. The battery charge indicator
(2)
will flash green during the charging process.
Sanding sheets with hook-and-loop backing (see figure B)
Remove dirt and dust from the sanding plate
(7)
, e.g. with a brush, before attaching a
new sanding sheet. Tap the hook-and-loop fastening of the sanding plate
(7)
before fit-
ting the sanding sheet
(11)
to facilitate maximum adhesion.
The sanding plate
(7)
is fitted with a hook-and-loop fastening, allowing sanding sheets
(11)
with a hook-and-loop backing to be secured quickly and easily.
Position the sanding sheet
(11)
so that it is flush with one a side of the sanding plate
(7)
,
then place the sanding sheet on the sanding plate and press it on firmly.
To remove the sanding sheet
(11)
, take hold of it by a corner and pull it away from the
sanding plate
(7)
.
Bosch Power Tools
1 609 92A 54E | (29.05.2019)


