background image

6 of 76

Información de seguridad

Indicaciones de precaución del 

producto

Las indicaciones de PRECACUCIÓN siguientes están ubicadas 
en la parte trasera del producto.

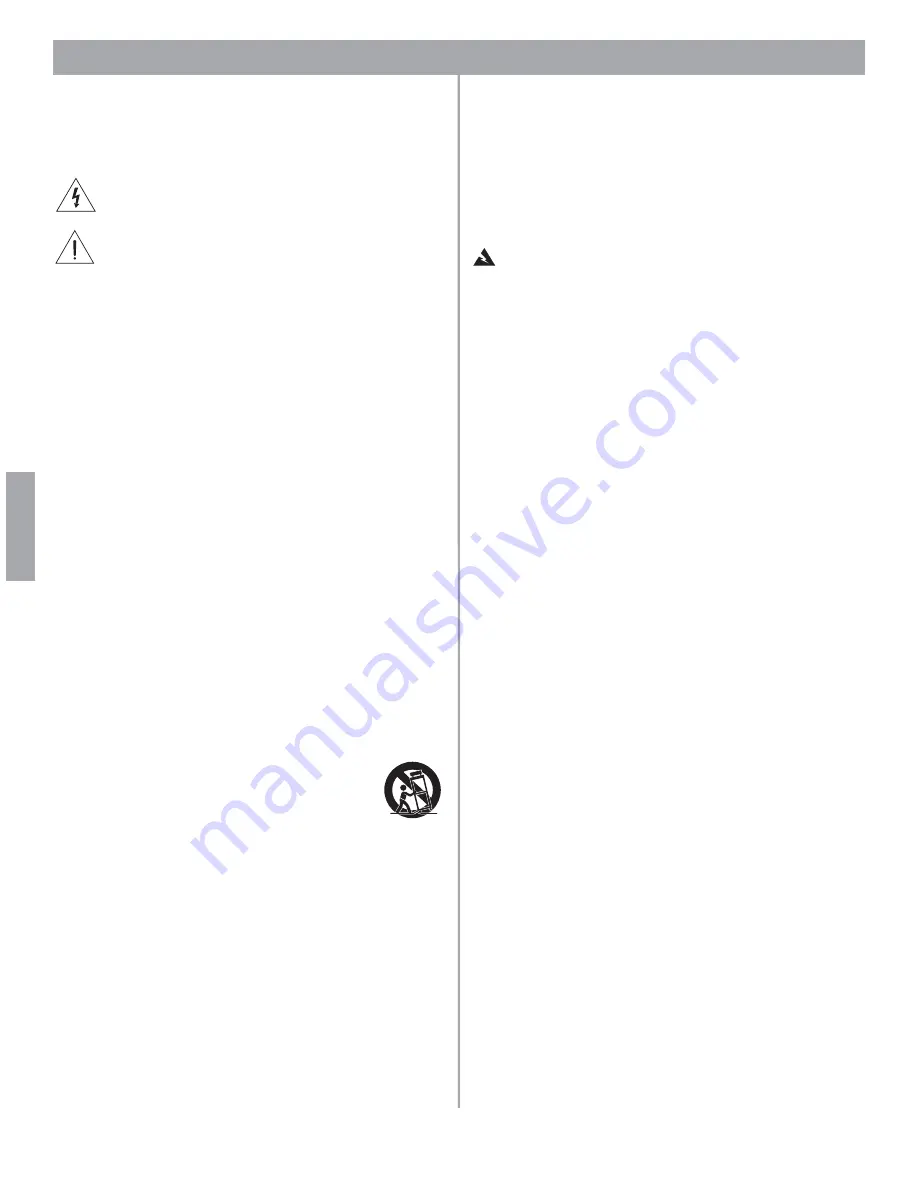
El símbolo de un relámpago con una flecha, dentro de un 
triángulo equilátero, avisa al usuario de que dentro de la caja 
del sistema puede haber voltaje de una magnitud suficiente 
para constituir un riesgo de descarga eléctrica.

El signo de exclamación dentro de un triángulo equilátero, tal 
como aparece marcado en el sistema, sirve para avisar al 
usuario de que existen instrucciones de funcionamiento y 
mantenimiento importantes en esta guía del usuario.

Instrucciones de seguridad 

importantes

1.

Lea las siguientes instrucciones.


2.

Guarde estas instrucciones

 para consultarlas en el futuro.

3.

Respete todas las advertencias

 que se indican en el producto y 

en la guías de usuario.

4.

Siga todas las instrucciones.


5.

No utilice este aparato cerca del agua o humedad.

6.

Limpie sólo con un trapo seco.


7.

No bloquee las aberturas de ventilación. Instálelo según las 
instrucciones del fabricante

. Para garantizar un funcionamiento 

fiable del producto y evitar que se produzcan sobrecalentamientos, 
colóquelo en una ubicación y posición que permita una ventilación 
adecuada. 

8.

No lo instale cerca de fuentes de calor, tales como radiadores, 
salidas de aire caliente, hornos u otros aparatos (incluidos 
amplificadores) que generen calor.


9.

No elimine el dispositivo de seguridad del enchufe con toma a 
tierra o polarizado. Los enchufes polarizados disponen de dos 
clavijas, una de mayor tamaño que la otra. Los enchufes con 
toma a tierra tienen dos clavijas y un tercer terminal de tierra. 
La clavija más ancha o el tercer terminal se incluye con fines 
de seguridad. Si el enchufe suministrado no encaja en la 
toma, póngase en contacto con un electricista para sustituir 
la toma antigua.


10.

Proteja el cable de alimentación de forma que nadie lo pise 
o quede apretado, particularmente cerca de los enchufes, 
receptáculos de tomas múltiples y en el lugar en que sale 
del aparato.


11.

Utilice sólo conexiones y accesorios suministrados por 
el fabricante.


12.

Utilícelo sólo con el carrito, soporte, trípode, 
abrazadera o mesa suministrado por el fabricante o 
que se venda con el dispositivo. Cuando se utilice 
un carrito, tenga cuidado al mover la combinación 
de carrito/dispositivo para evitar que se produzcan 
lesiones en caso de que se caiga.


13.

Desenchufe el dispositivo durante tormentas eléctricas o si no 
lo va a utilizar durante periodos largos de tiempo 

para evitar que 

se dañe. 

14.

Toda reparación debe ser realizada por personal cualificado. 
Lleve el dispositivo a reparar si presenta algún daño como, 
por ejemplo, si el cable de alimentación o el enchufe están 
dañados, si se han vertido líquidos o se han caído objetos 
sobre el dispositivo o si éste ha estado expuesto a la lluvia o 
humedad; si no funciona correctamente o se ha caído al suelo.


No intente reparar el producto usted mismo. Abrir o retirar las tapas 
le expondrá a voltajes peligrosos o a otros peligros. Póngase en 
contacto con Bose para que le indiquen la ubicación del servicio 
técnico autorizado de su zona.

15.

Para prevenir el riesgo de fuego o descarga eléctrica, evite la 
sobrecarga de los enchufes, alargadores o receptáculos de 
varias tomas.


16.

Impida que caigan objetos o líquidos sobre el producto

, ya que 

podrían entrar en contacto con puntos de niveles de voltaje altos o 
partes que podrían sufrir un cortocircuito y provocar incendios o 
descargas eléctricas.

17.

Consulte las indicaciones de seguridad en la caja del producto.


18.

No coloque sobre el aparato ninguna llama viva, como por 
ejemplo una vela.


ADVERTENCIA: 

Con el fin de reducir el riesgo de descarga 

eléctrica, no exponga el pedestal a la lluvia o humedad.

Información sobre productos que 

generan ruido eléctrico

Este equipo se ha probado y ha quedado demostrado que 
cumple con los límites para dispositivos digitales de clase B, 
de acuerdo con el apartado 15 de las normas de la FCC. Estos 
límites están diseñados para ofrecer una protección razonable 
contra las interferencias perjudiciales en una instalación 
doméstica. Este equipo genera, utiliza y puede irradiar energía 
de radiofrecuencia y, si no se instala y se utiliza de acuerdo con 
las instrucciones suministradas, podría ocasionar interferencias 
perjudiciales para las comunicaciones de radio. No obstante, 
no se puede garantizar que no se vayan a producir este tipo de 
interferencias en una instalación en particular. Si este equipo 
ocasiona interferencias perjudiciales en la recepción de radio o 
televisión, que puede comprobarse encendiendo y apagando 
el equipo, se recomienda que intente corregir la interferencia 
mediante una de las siguientes acciones:

• Vuelva a orientar o a colocar la antena de recepción.

• Aumente la separación entre el equipo y el receptor.

• Conecte el equipo a la toma de un circuito diferente al que está 

conectado el receptor.

• Póngase en contacto con el distribuidor o con un técnico de 

radio y televisión.

Nota: 

Cualquier modificación no autorizada del mando a distancia 

del receptor o de la radio podría anular la autoridad del usuario para 
utilizar este equipo.

Este producto cumple las especificaciones canadienses para 
dispositivos de clase B ICES-003.

La información proporcionada en esta guía de usuario no incluye 
la totalidad de los detalles de diseño, producción o variaciones 
de este equipo. Tampoco cubre todas las posibles situaciones 
que pueden surgir durante la instalación, funcionamiento o 
mantenimiento. Si necesita asistencia más allá de la ayuda que 
pueda proporcionarle esta guía de usuario, póngase en contacto 
con nuestro departamento de atención al cliente. Consulte 
“Atención al cliente” en la página 69.

Español

Summary of Contents for FreeSpace E-4

Page 1: ...FreeSpace E 4 Business Music System OWNER S GUIDE...

Page 2: ...0 1 Test laboratory Bose Corporation 1 New York Avenue Framingham MA 01701 USA and in accordance with the Low Voltage Directive 73 23 EEC is in compliance with the following norm s or document s Techn...

Page 3: ...objects have fallen into the apparatus the apparatus has been exposed to rain or moisture does not operate nor mally or has been dropped Do not attempt to service this prod uct yourself Opening or re...

Page 4: ...kadiget der er blevet spildt v ske der er kommet objekter ind i apparatet hvis apparatet er blevet udsat for regn eller fugt ikke virker normalt eller er blevet tabt fors g ikke at servicere dette pro...

Page 5: ...e falls das Netzkabel oder der Netzstecker besch digt ist Fl ssigkeit oder Fremdk rper in das Ger t gelangt sind oder das Ger t Regen bzw Feuchtigkeit ausgesetzt war nicht einwandfrei arbeitet oder he...

Page 6: ...e han ca do objetos sobre el dispositivo o si ste ha estado expuesto a la lluvia o humedad si no funciona correctamente o se ha ca do al suelo No intente reparar el producto usted mismo Abrir o retira...

Page 7: ...de la fiche lectrique renversement d un liquide ou de tout objet sur l appareil exposition de l appareil la pluie ou l humidit mauvais fonctionnement chute de l appareil etc N essayez pas de r parer c...

Page 8: ...o danneggiati se stato versato del liquido o sono caduti oggetti sull apparato se l apparato stato esposto a pioggia o umidit se non funziona normalmente o caduto Non tenti di eseguire riparazioni aut...

Page 9: ...cten op het apparaat zijn gevallen als het apparaat is blootgesteld aan regen of vocht niet juist werkt of is gevallen Probeer dit product niet zelf te repareren Het openen of verwijderen van afdekpla...

Page 10: ...ska har spillts i apparaten eller fr mmande f rem l har hamnat i den apparaten har utsatts f r regn eller fukt apparaten fungerar inte felfritt eller har tappats F rs k inte tg rda felen sj lv ppning...

Page 11: ...Amplifier ZONE OUT outputs 32 4 7 10 Output voltage setting 70 100V 32 4 7 11 ZONE 4 LINE OUT output 33 4 8 AC power connections 33 5 0 Using FreeSpace System Installer Software 34 5 1 Installing the...

Page 12: ...uto Volume does not calibrate 69 8 4 7 All front panel LEDs are amber 69 8 5 Customer support 69 8 5 1 Technical assistance 69 8 5 2 Reporting software bugs and issues 70 9 0 Upgrading E 4 Microcontro...

Page 13: ...s in speech projection Source Leveling Automatically compensates for variations in source input levels Dynamic Equalization Maintains tonal balance at all listening levels Room Equalization Provides e...

Page 14: ...Kit Euro PC029860 One sensing microphone that can be mounted as is or in a standard Euro single gang junction box FreeSpace E 4 System Accessory Kit U S PC030105 Supplemental rear panel mating connec...

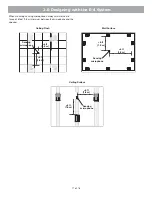
Page 15: ...e is found in an area where no part of the area is louder or quieter than any other A room with non uniform background noise would seem louder in some areas people talking machinery running etc and qu...

Page 16: ...ng are examples of correct and incorrect sensing microphone placements Mic Correct placement Incorrect placement Correct placement Incorrect placement Ceiling Flush Wall Surface Sensing microphone Sen...

Page 17: ...always maintain a dis tance of 6 feet 1 8 m minimum between the microphone and the speaker Mic 6 6 Mic Mic 6 6 Ceiling Flush Wall Surface Ceiling Surface Sensing microphone 6 ft 1 8 m Sensing micropho...

Page 18: ...s used If the control is very rarely used or it requires a secure location it should be placed with the equipment If the control is for an area that requires frequent adjustments then it is best to pl...

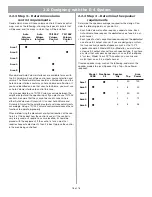
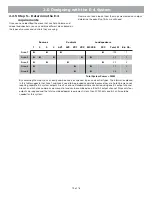
Page 19: ...types and control types The information placed in this table suggests that Area 1 and Area 3 need to be grouped separately because they are Auto Volume zones requiring separate E 4 system outputs Area...

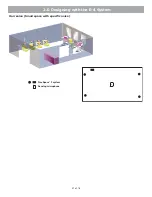
Page 20: ...20 of 76 2 0 Designing with the E 4 System 2 3 Auto Volume layout examples Large open retail space with single music source FreeSpace Acoustimass module Model 16 pendant mounted Sensing microphone...

Page 21: ...21 of 76 2 0 Designing with the E 4 System Hair salon Small space with specific noise FreeSpace 3 system Sensing microphone...

Page 22: ...22 of 76 2 0 Designing with the E 4 System Hotel lobby 22 ft 6 7 m 40 ft 12 2 m Model 16 flush mounted Sensing microphone...

Page 23: ...se LEDs work in pairs 1 and 2 3 and 4 and indicate the operating status of the four amplifier output channels Green Normal operation Red Fault condition Unlit No signal AUDIO SOURCES These LEDs indica...

Page 24: ...OLD PBX OUT An audio output used to provide music input to a PBX system 3 2 4 AC power OUTPUT VOLTAGE Sets the ZONE OUT lines to 70 100V Set fuse box to 100 120V for 70V 220 240V for 100V POWER ON OFF...

Page 25: ...h FreeSpace system Installer software CD Contains application software for programming the E 4 system 4 3 Placement guidelines Place the E 4 unit where it is protected from heat and allowed adequate v...

Page 26: ...s Note If the E 4 unit is to be transported while mounted in a rack be advised that the rear of the E 4 unit must be mechanically supported Install a shelf under the unit or use brackets in such a wa...

Page 27: ...he microphone opening Remove the plug when finished Mounting locations For mounting instructions see Mounting guidelines for sensing microphones on page 15 4 6 2 User interfaces Required accessory Fre...

Page 28: ...see User Interface Operation on page 60 S1 Source 1 5VD D1 LED R1 562 S6 Volume Up 5VD D6 LED R6 562 JR1 RJ 45 1 2 3 4 5 6 7 8 33 F C7 5VD S5 Volume Down 5VD D5 LED R5 562 S2 Source 2 5VD D2 LED R2 56...

Page 29: ...nly use standard ethernet Cat 5 cable to connect the user interface to the E 4 unit DO NOT use crossover XOV cables 4 7 4 Remote standby switch If you are installing a remote standby switch connect it...

Page 30: ...source input A microphone or an audio source can be connected to the MIC LINE 3 input using one of the following cable types XLR Phone Plug Balanced RCA Phone Plug Unbalanced T S T S T S 1 2 3 2 3 T S...

Page 31: ...to the DIRECT IN input using one of the following cable types The con trol PTT input requires a normally open switch RCA T S T S PTT XLR 3 1 2 3 PTT Phone Plug Balanced T R S T R S PTT Phone Plug Unba...

Page 32: ...on 70V is selected for 100 120VAC 100V is selected for 220 240VAC ZONE OUT 3 4 1 2 USE ONLY CLASS 2 WIRING ZONE OUT CONNECTOR ORIENTATION Installer s Note Please notice the polarity markings on the ZO...

Page 33: ...Fuse box configuration The fuse box is configured at the factory according to the specifi cations of your order Should you need to replace the fuse follow these steps 1 Using a thin screwdriver blade...

Page 34: ...he E 4 hardware 2 Set the rear panel POWER switch to ON Verify that the STANDBY indicator is lit on the E 4 front panel Then press the STANDBY push button to switch the E 4 hardware to the operating m...

Page 35: ...ardware on selected serial port Programmer s Note Before dismissing the Choose COM port dialog select the COM 2 port and click Try Again Not doing this will cause the COM 1 port to be locked After you...

Page 36: ...e click the Flash Hardware Configuration button to send the design file and configuration to the hardware It is good pratice to save the design file to your hard drive click the Save As button 2 Disco...

Page 37: ...g FreeSpace System Installer Software 5 3 The Installer software user interface The following describes the software user interface Tool box Mode buttons Window sizing tools Work area Control pane Sys...

Page 38: ...C s hard drive Flash Hardware Configuration Sends the design file and current settings from your PC to the memory of the connected hardware device This determines the default startup state of the devi...

Page 39: ...t panel of the hardware device that you selected in the system overview pane Reading from left to right this diagram shows you the functions and signal paths from input sources to output zones All fun...

Page 40: ...event only Mute Volume Source and Auto Volume are zone events When you click one of these buttons the event is added to the list and the controls for the selected event are dis played in the Event con...

Page 41: ...r of remaining events Zone events programmed to occur at the same time as a Sys tem ON event will not occur To ensure that zone events will hap pen they must be programmed to occur 15 minutes after th...

Page 42: ...s Note Events are only saved to the E 4 unit when you click the Flash Hardware Configu ration button 5 5 3 Viewing and changing event settings To view any event and change the settings first click th...

Page 43: ...ave occurred To view the Error Log click the Service Hardware button If you are already connected to hardware the Error Log is retrieved from the hardware and displayed in the win dow If not yet conne...

Page 44: ...mation for repair technicians to help them repair the system For more information on reported errors see FreeSpace E 4 system error log on page 64 The buttons below the Error Log display allow you to...

Page 45: ...wer loss the E 4 hardware will return to power in the STANDBY mode To return to operation press the STANDBY button or press any key on any user Interface 4 Launch the Installer software See Using Free...

Page 46: ...gn for each zone and assign sources for each See Source assign on page 50 6 Set up the source EQ for MIC LINE 3 and MIC PAGE LINE 4 inputs See Source EQ on page 51 7 Select Page Set Up See Page set up...

Page 47: ...ce is used in a zone the volume control cannot set the gain outside these limits Programmer s Note In an Auto Volume zone the maximum and minimum level stops are disabled once an Auto Volume calibrati...

Page 48: ...tapped at 16W To add a subzone Click the Add button When the Add Subzone window appears enter a name for the new subzone select the speaker model installed enter the quantity and select a tap setting...

Page 49: ...e capable of accepting microphone signals This power source is used for condenser type microphones Gain slider Click and drag the gain slider up down to set the input gain Changes in the slider s posi...

Page 50: ...can choose which system sources will be available in each zone The Source Assign control panel lists all system sources on the left and zone sources on the right Sources are assigned by moving them f...

Page 51: ...the user interface installed in the zone 6 3 5 Source EQ An input source EQ control panel is available for inputs 3 and 4 This three band equalizer is used primarily to compensate for microphone resp...

Page 52: ...e Page Setup control panel This enables the Ducking Depth and Release Time controls 2 Set the Ducking Depth to the amount in dB that the music will be reduced to once a page is triggered 3 Set the Rel...

Page 53: ...in 0 5 second increments Programmer s Note The attack time for a page is approximately 1 millisecond for a PTT input and 20 milli seconds for a voice activated input 6 3 7 Zone EQ The Zone EQ control...

Page 54: ...re the hardware is connected properly An Auto Volume or Standard wall plate must be connected to the WALL PLATE CONNECTION input connector The speaker s must be directly wired to the ZONE OUT connecto...

Page 55: ...wer the volume using an autotransformer the E 4 system will raise the volume Like wise if you raise the volume using an autotransformer the E 4 system will lower the volume Auto Volume setup procedure...

Page 56: ...ource list is wrong click the Cancel button use the Source Assign control panel to cor rect the problem and start the process again 7 Click Continue to begin the source calibration setup steps Wait fo...

Page 57: ...inutes per source For each source the input gain is measured and optimized and the source level is activated When this is done the software displays the following confirmation 9 Click Continue to begi...

Page 58: ...on in an Auto Volume zone click the Reset button The Reset button is available only after a zone is suc cessfully calibrated Programmer s Note Be sure you want to reset the zone before you click the R...

Page 59: ...functions that were pre viously disabled This button is enabled only when the zone is in a calibrated state See Resetting a calibrated Auto Volume zone on page 58 Auto Volume operation The Auto Volume...

Page 60: ...Auto Volume interface operation Press source 1 2 or 3 to select the audio source assigned to that line A green LED indicates the active source Press the Volume or Volume button to increase or decrease...

Page 61: ...AMP OUTPUTS 1 2 3 4 SYSTEM STATUS AUDIO SOURCES 1 2 3 4 DIRECT INPUT STANDBY STANDBY Unlit SYSTEM STATUS Green AMP OUTPUTS Unlit or Green AUDIO SOURCES Unlit Amber or Green DIRECT INPUT Unlit AMP OUT...

Page 62: ...al source that was overdriving the output To make sure an output transformer is not being saturated check to see if the correct speaker EQ setting is selected If none of these actions solve the proble...

Page 63: ...1 2 3 4 SYSTEM STATUS AUDIO SOURCES 1 2 3 4 DIRECT INPUT STANDBY STANDY SYSTEM LEDs are off AC power is on Is E 4 unit plugged into an AC source Plug the E 4 unit into an AC receptacle No Yes Set E 4...

Page 64: ...monitors con tact closures front panel connections and user interface con nections for incoming event messages Any failures in these areas will cause the message Power on self test incomplete to appea...

Page 65: ...s The status of the amplifier output at the time of the alarm Possible status messages are amplifier module muted and speaker relay off Fan Speed The fan speed at the time of the alarm Operating Mode...

Page 66: ...This protection mode is designed to prevent damage to the amplifier or speakers from excessive high frequency audio or ultrasonic energy The amplifier is not capable of sustained operation at full pow...

Page 67: ...8 4 2 No audio in zone If the system is powered on and operational but there is no sound check the following Do the front panel LEDs indicate normal operation Is the source operating Is routing correc...

Page 68: ...faults Contact Bose Customer Service Yes No No Yes Bad sound Is the sound unnatural Verify that the correct Speaker EQ is selected in the Installer soft ware for that zone Verify that the speakers are...

Page 69: ...limits This may be due to Broken microphone cable Speakers are not connected Sensing microphone is not connected or is connected to the wrong zone 8 4 7 All front panel LEDs are amber If all front pa...

Page 70: ...Win dows Search of Find feature to look for files named FreeSpaceInstallerOutput FreeSpaceInstallerErrors and FreeSpaceInstallerLog on all local hard drives This feature can be found in the Start men...

Page 71: ...rdware This automatically updates the design file so that it is compatible with the current soft ware version When you are asked to confirm that you are going to overwrite the E 4 hardware memory clic...

Page 72: ...you do not see the correct microcontroller version number or if any of the other firmware version numbers are less than the values shown in this example please contact your local Bose Customer Suppor...

Page 73: ...ng 10 3 Front panel indicators and control connections Amp output signal indicators Zone 1 Zone 4 dual color LED Source input signal indicators Source 1 Source 4 dual color LED Other indicators System...

Page 74: ...tor Output configuration 70V or 100V Switch AC power consumption 60W or less at idle 200W with musical program 600W at maximum continuous rated power 1 kHz sine wave input 70V or 100V mode AC power re...

Page 75: ...ect source 3 0x840x000x030x000x000 x510x020x010x000xdb 0x840x000x030x010x000 x510x020x010x000xdc 0x840x000x030x020x000 x510x020x010x000xdd 0x840x000x030x030x000 x510x020x010x000xde Select source 4 0x8...

Page 76: ...2003 Bose Corporation The Mountain Framingham MA 01701 9168 USA 268134 AM Rev 01 JN31022 76...

Reviews: