background image

14

TEST PROCEDURES

1.  Rub and Tick Test

1.1  Apply an 8Vrms10Hz signal to the
input terminals of the speaker.

1.2  No extraneous noise such as rubbing,
scraping or ticking should be heard.

2.  Phase Test

2.1  Disconnect the connectors at the V-4
or M-10 terminals. Momentarily apply
8

±

1Vdc to the terminals. Observe polarity

when connecting the dc power supply. All
the drivers should  move outward.

3.   Frequency Power Sweep Test

3.1  Apply an 8Vrms, 10Hz signal to the
speaker input terminals.

3.2  Sweep the Loudspeaker from 10Hz to
2kHz.

3.3  Lower the applied voltage to 4Vrms
and sweep the loudspeaker from 1kHz to
5kHz.

3.4  Listen for any buzzes, rattles or other
extraneous noises from the loudspeaker.

High-Frequency -

Mid-Range -

High-Fre

Mid-Range +

pin 1 +

pin 2 +

pin 1 -

pin 2 -

JUMPER

JUMPER

IF JUMPERS ARE USED
CONNECT TEST CABLES
HERE AT THE TERMINAL
BLOCK.

IF THE JUMPERS ARE NOT USED
CONNECT TO THE TERMINAL BLOCK
ACCORDING TO THIS PIN LAY-OUT.

Figure 3. Connection Diagram

Note: Connect the cables to the terminal
block as shown in Figure 3.

Summary of Contents for PANARAY LT 3202 II

Page 1: ... 1997 Bose Corporation Part Number 190489 Service Manual 4402 II 9702 II 3202 II PANARAY LT Systems 3202 II 4402 II 9702 II ...

Page 2: ...aray Exploded View 9 Figure 2 Panaray Series II Exploded View 9 Disassembly Assembly Procedures 10 12 Diaphragm Replacement Procedure 13 Test Procedures 14 Figure 3 Connection Diagram 14 Part List Notes 15 Figure 4 Panaray Series II Exploded View 16 Panaray Lt Series II Part List 16 Panaray Lt Part List 17 Figure 5 Panaray Exploded View 17 Packing Part List 18 Figure 6 Packing 18 CAUTION THE PANAR...

Page 3: ...Impedance Passive 2 Way Bi amplified Mid frequency High frequency 16Ω 16Ω 8Ω Maximum Acoustic Output IEC Noise Passive 2 Way 134dB SPL 1m rms 140dB SPL 1m peak Bi amplified 134dB SPL 1m rms 140dB SPL 1m peak Sensitivity Pink Noise Passive 2 Way Bi amplified Mid frequency High frequency 110dB SPL 1w 1m 107dB SPL 1w 1m 111dB SPL 1w 1m Beamwidth 6dB point Horizontal Vertical 27 degrees 20 degrees Max...

Page 4: ...Impedance Passive 2 Way Bi amplified Mid frequency High frequency 8Ω 8Ω 8Ω Maximum Acoustic Output IEC Noise Passive 2 Way 130dB SPL 1m rms 136dB SPL 1m peak Bi amplified 130dB SPL 1m rms 136dB SPL 1m peak Sensitivity Pink Noise Passive 2 Way Bi amplified Mid frequency High frequency 108dB SPL 1w 1m 106dB SPL 1w 1m 107dB SPL 1w 1m Beamwidth 6dB point Horizontal Vertical 36 degrees 36 degrees Maxim...

Page 5: ...Impedance Passive 2 Way Bi amplified Mid frequency High frequency 8Ω 8Ω 8Ω Maximum Acoustic Output IEC Noise Passive 2 Way Bi amplified 128dB SPL 1m rms 134dB SPL 1m peak 128dB SPL 1m rms 134dB SPL 1m peak Sensitivity Pink Noise Passive 2 Way Bi amplified Mid frequency High frequency 104dB SPL 1w 1m 105dB SPL 1w 1m 104dB SPL 1w 1m Beamwidth 6dB point Horizontal Vertical 87 degrees 70 degrees Maxim...

Page 6: ...1 4 M10 Frequency Range 160Hz to 16Hz 3dB Nominal Impedance Mid frequency High frequency 8Ω 8Ω Maximum Acoustic Output Mid frequency 130dB SPL 1m rms 136dB SPL 1m peak High frequency 130dB SPL 1m rms 136dB SPL 1m peak Sensitivity Mid frequency High frequency 109dB SPL 1w 1m 114dB SPL 1w 1m Beamwidth 6dB point Horizontal Vertical 27 degrees 20 degrees Recommended Amplifier Power Mid frequency High ...

Page 7: ...4 M10 Frequency Range 160Hz to 16kHz 3dB Nominal Impedance Mid frequency High frequency 16Ω 8Ω Maximum Acoustic Output Mid frequency 124dB SPL 1m rms 130dB SPL 1m peak High frequency 128dB SPL 1m rms 134dB SPL 1m peak Sensitivity Mid frequency High frequency 105dB SPL 1w 1m 112dB SPL 1w 1m Beamwidth 6dB point Horizontal Vertical 40 degrees 40 degrees Recommended Amplifier Power Mid frequency High ...

Page 8: ...4 M10 Frequency Range 160Hz to 16kHz 3dB Nominal Impedance Mid frequency High frequency 16Ω 8Ω Maximum Acoustic Output Mid frequency 122dB SPL 1m rms 128dB SPL 1m peak High frequency 124dB SPL 1m rms 130dB SPL 1m peak Sensitivity Mid frequency High frequency 103dB SPL 1w 1m 105dB SPL 1w 1m Beamwidth 6dB point Horizontal Vertical 87 degrees 70 degrees Recommended Amplifier Power Mid frequency High ...

Page 9: ...9 Figure 1 Panaray Exploded View Figure 2 Panaray Series II Exploded View 1 4 2 7 5 15 12 11 13 10 19 3 6 2 3 6 4 5 7 8 5 9 10 11 1 ...

Page 10: ...s 6 to the terminals on the driver 2 4 Perform the test procedures on page 13 2 5 Reconnect the Neutrik Speakon connector to the speaker panel and re place the weather protector if used 3 M 10 Driver Removal 3 1 Perform procedure 1 1 3 2 Remove the bottom two screws 5 on the connector panel 7 3 3 Loosen the two top screws on the connector panel This will allow room for the M 10 driver when lifting...

Page 11: ...lace the compression driver assembly 1 into the cabinet and secure it to the cabinet 2 5 Align the cover assembly 15 tabs with the slots in the cabinet and slide the cover into place Secure the cover to the cabinet 2 6 Reconnect the Neutrik Speakon connector to the connector panel 3 Vee Four Driver Removal 3 1 Perform steps 1 1 and 1 2 3 2 Disconnect the green and white wires from the Vee Four ter...

Page 12: ...ng 6 3 Perform the test procedures on page 13 7 Crossover Component Removal 7 1 Perform steps 1 1 and 1 2 7 2 To remove the capacitors remove the screws from the bracket 12 and discon nect the wires 7 3 To remove the inductor assembly 13 remove the screw 19 from the center of the inductor Disconnect the inductor from the capacitor and the wire harness and remove the inductor 8 Crossover Component ...

Page 13: ...is clean make sure that there is no debris on the front plate DIAPHRAGM REPLACEMENT PROCEDURE 4 Diaphragm Kit Replacement 4 1 Remove the replacement diaphragm from its carton Set it down so the coil is facing up 4 2 Grasp the diaphragm assembly around its edges and gently place it onto the front of the compression driver assembly Note Take care not to damage the bobbin as it comes in contact with ...

Page 14: ...Test 3 1 Apply an 8Vrms 10Hz signal to the speaker input terminals 3 2 Sweep the Loudspeaker from 10Hz to 2kHz 3 3 Lower the applied voltage to 4Vrms and sweep the loudspeaker from 1kHz to 5kHz 3 4 Listen for any buzzes rattles or other extraneous noises from the loudspeaker High Frequency Mid Range High Frequency Mid Range pin 1 pin 2 pin 1 pin 2 JUMPER JUMPER IF JUMPERS ARE USED CONNECT TEST CAB...

Page 15: ... LT Systems 3 There are two Vee Four mid range driver assemblies used on the 3202 II 4 There are two M 10 drivers used on the 3202 panaray loudspeaker 2 The replacement diaphragm kit is used to repair both the original and series II high fre quency compression drivers Part number 186100 is used for the Panaray LT Series II Systems ...

Page 16: ...ew Mach 25 20 Flat XREC SS 4 176614 08 6 Connector Panel Assy LT II 1 187976 03 3202 II 6 Connector Panel Assy LT II 1 187976 02 7 Screw Tapp 8 11X 75 Pan XRC SQ 8 187942 12 8 Conn Speakon Panel Mount 2 187887 9 Clip Tinnerman 2 187943 10 Cap Filter Oval 10 6uF 1 187890 11 Cap Filter Oval 3uF 1 176668 12 Strap Mounting Cap 2 176669 13 Inductor 63uH 1 187889 14 Spacer Round 1 150x 074 1 130913 15 C...

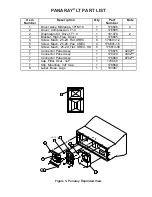
Page 17: ...2 Diaphragm Kit Driver T1 4 1 181470 2 3 Bracket High Freq Driver 1 176665 4 Screw Mach 25 20 Flat XREC 8 176601 12 5 Screw Mach 25 20 Pan XREC 4 176801 16 6 Screw Mach 25 20 Flat XREC SS 8 176614 08 7 Connector Panel Assy 1 176675 3202 7 Connector Panel Assy 1 176720 4402 7 Connector Panel Assy 1 176864 9702 7 Cap Filter Oval 3uF 1 176668 7 Stip Mounting 3uF Cap 1 176669 8 Label Bose Logo 1 18306...

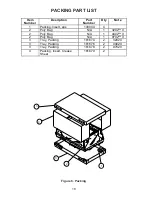
Page 18: ...ption Part Number Oty Note 1 Packing Insert eps 148044 4 2 Poly Bag N A 1 3202 II 2 Poly Bag N A 1 4402 II 2 Poly Bag N A 1 9702 II 3 Tray Packing 181674 2 3202 II 3 Tray Packing 181676 2 4402 II 3 Tray Packing 181678 2 9702 II 4 Packing Insert Crease Sheet 181679 2 ...

Reviews: