background image

3

TAB 5

TAB  4

TAB  6

TAB  8

TAB 7

English

TAB 3

TAB 2

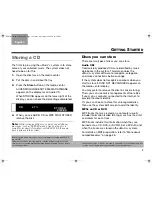
Storing a CD

The first step in using the uMusic

®

+  system is to store 

some of your collected music. The system does not 

need to be on for this.

1.

Open the disc tray on the media center.

2.

Put the disc in and close the tray. 

3.

Press the

 Store

 button on the media center.

ACCESSING GRACENOTE MEDIA DATABASE 

appears on the display for an Audio CD. 
When STORING appears on the lower right of the 

display, you can check the percentage completed.

4.

When you see AUDIO CD (or MP3 DISC) STORED, 
remove the disc.

Note: 

While storing an MP3 disc, you may see additional 

messages (such as SKIPPED when a track on the disc is 
corrupt or incorrectly formatted) or DUPLICATE (if the same 
track is already in the system).

Before copying audio material onto your computer or creating an MP3 CD, 

you should:
•Make sure you have the legal right to copy the particular audio content;

•Avoid sources of audio material that may be questionable, such as certain

file sharing facilities;

Discs you can store

There are two types of discs you can store.

Audio CDs

Commercially produced CDs are identified by music 

databases in the system. This data enables the 

system software to recognize, categorize, 

and make connections between songs.
If the system does not recognize an album when you 

start to store it, DISC NOT RECOGNIZED appears on 

the media center display. 
You may prefer to remove the disc to cancel storing. 

Then, you can use music management software (like 

iTunes), on a computer connected to the Internet, to 

provide the album identity.
Or, you can choose to store this unrecognized disc, 

then use the system Edit screen to add the identity. 

MP3s on CD or DVD

MP3 tracks that are created on a computer usually 

include information (called ID3 tags), such as the artist 

and album for each track. 
MP3 tracks include this information when they are 

burned onto a CD, DVD, or DVD-R (not a DVD+R) and 
when the tracks are stored in the   system.
For details on MP3 preparation, refer to “More about 

compatible discs” on page 26.

•Not use the copies or CDs as a means to share audio content with others, but 

confine such copying, where permissible, to your personal use.

C D

4 7 %

S T O R E D

S

TORING

G

ETTING

 S

TARTED

NuMusic booklet book.book  Page 3  Monday, November 24, 2008  10:52 AM

Summary of Contents for uMusic + AM314482

Page 1: ...the complementary uMusic MP3 CD containing 25 MP3s for this quick and easy start to storing and enjoying musical tracks Follow Launch Steps 1 4 and in less than an hour you ll have a good feel for ho...

Page 2: ...acks to Playlist 1 page 11 When this is done you can play this list and check the contents Step 3 Name your playlist Use the Edit Screen to give your playlist the title Evening page 13 When this is do...

Page 3: ...ng and editing text 14 To enter the Edit screen 15 Adding letters to the text line 15 One example of entering a name 16 Removing tracks from a playlist 17 USING INTELLIGENT PLAYBACK 19 Playing your mu...

Page 4: ...t is similar to the track now playing by pressing the Encore button Hear the entire album that includes the track now playing by pressing the Whole CD button View your collection organized by genre ar...

Page 5: ...f discs you can store Audio CDs Commercially produced CDs are identified by music databases in the system This data enables the uMusic system software to recognize categorize and make connections betw...

Page 6: ...storing A damaged or poor quality disc can take 15 minutes or more to store Keeping music data up to date Whenever you store a CD the system refers to an internal music catalog for data about the CD...

Page 7: ...ry or as part of a playlist To control the music As you listen you can use the remote control to Interrupt the music by pressing the pause button To resume play where the track stopped press the pause...

Page 8: ...move down and highlight tracks in the list To play other tracks on this album highlight a track you want and press ENTER The selected track plays first followed by the tracks below it To return to the...

Page 9: ...e media center display when any track from a disc plays Return to continuous play by pressing uMusic Using repeat and shuffle You can apply Repeat and Shuffle play modes when the CD Playlist Whole CD...

Page 10: ...ess the down arrow button to highlight the category you want Pressing and holding the down arrow button scrolls through each list faster 5 Narrow your choices by pressing the right arrow button to see...

Page 11: ...pressing Library to return to the main list of categories Changing music titles and genres Searching for specific music is easy when it is assigned to the right genre and named as you remember it If i...

Page 12: ...ll display each album associated with this artist To change a name in Artists Albums or Tracks See To enter the Edit screen on page 15 Linking or unlinking tracks You can change how the tracks from a...

Page 13: ...Press the right arrow button to move into that category Use the up and down arrow buttons to move through this list to highlight a selection Use the right arrow button to see more details and narrow y...

Page 14: ...rary 1 In the Music Library select Playlists and press the right arrow button to enter this category 2 Select the playlist you want to hear and press the ENTER button to begin play Or you can press th...

Page 15: ...Repeat Play all the tracks on the album that includes the current track by pressing Whole CD Resume continuous uMusic play by pressing the uMusic button Or wait for uMusic play to resume when the sel...

Page 16: ...characters to choose from Basic alphabet A below Numbers and symbols 1 below Language characters below Confirms edits Text line where edits appear Save Erase Space Shift Select Erase to remove a mist...

Page 17: ...it for a Playlist or uStation name is 16 characters To add characters to the text line highlight each letter key and press ENTER To delete the last character from the top line highlight the Erase bar...

Page 18: ...ight 3 Move down to the Space bar and Press ENTER A space appears to the right of the second z and the blank moves to the right 4 Move left to exit the Basic Alphabet and down to the Numbers Symbols k...

Page 19: ...emove all tracks 3 Press the Guide button to see the list of actions you can take 4 Highlight Clear Playlist and press the right arrow button A request for confirmation appears on screen 5 Press the E...

Page 20: ...e from Playlist and press the right arrow button A request for confirmation appears on screen 7 Select Yes or No and press the ENTER button This returns you to a previous screen Music Library P1 Exerc...

Page 21: ...ore a list of tracks Instead it keeps a log of your responses as you listen to your music When a uStation is selected every action you take skipping repeating or listening to an entire song provides c...

Page 22: ...set 1 This preset is then affected by the reactions of anyone who listens to the music To tailor a uStation to your tastes you may want to select a different preset number 2 9 To refresh uStation 1 re...

Page 23: ...the right arrow button 3 Select a uStation and press the ENTER button which applies the track rating You can select another uStation from the list and apply the same track rating if you like Music Li...

Page 24: ...t Edit Name and press the right arrow button The Edit screen keyboard appears 5 Refer to Adding and editing text on page 14 for instructions on using the Edit screen keyboard 6 When the name is comple...

Page 25: ...made to any album Taking this action overwrites your edits with the music information originally provided by the system database This does not affect the names of playlists or uStation presets To rev...

Page 26: ...ar 4 Press the Guide button to see the actions you can take 5 Highlight Clear uStation Ratings and press the right arrow button A A request for confirmation appears on screen 6 Press the ENTER button...

Page 27: ...ght Delete this Selection and press the right arrow button A request for confirmation appears on screen 4 Press the ENTER button to confirm your choice of Yes or No This returns you to a previous scre...

Page 28: ...Avoid sources of audio material that may be questionable such as certain file sharing facilities Not use the copies or CDs as a means to share audio content with others but confine such copying where...

Page 29: ...e bedroom Imagine having access to all your stored music from your bedroom Listen to a quiet classical track as you drift off to sleep or let one of your uStationTM presets deliver more upbeat tunes a...

Page 30: ...ersonal music center II includes detailed instructions on how to use it with your LIFESTYLE system For more information or to purchase additional equipment contact your local Bose dealer Or to reach B...

Page 31: ...ovember 27 2008 2 04 AM 29 FURTHER OPPORTUNITIES TAB 5 TAB 4 TAB 6 TAB 8 TAB 7 English TAB 3 TAB 2 Accessories that add convenience Bose offers a variety of accessories to broaden your choices in sett...

Page 32: ...2009 Bose Corporation The Mountain Framingham MA 01701 9168 USA AM314482 Rev 00...

Reviews: