background image

34

T

ROUBLESHOOTING

English

TAB 6

TAB 8

TAB 7

TAB 3

TAB 5

TAB 2

TAB 4

Performing a system update

By using a computer with an Internet connection, 
system software updates from Bose can be 
downloaded to the USB drive that is included with 
your system.

1.

Press the Setup button on the front of the control 
console to display the Unify

®

 menu.

2.

Using the remote navigation buttons, select Update.

3.

Follow the instructions on the screen.

Contacting customer service

For additional help in solving problems, contact Bose

®


Customer Service. See the address sheet included in 
the carton.

Summary of Contents for VIDEOWAVE II

Page 1: ...VIDEOWAVE II ENTERTAINMENT SYSTEM Setup Guide Gu a de instalaci n Guide d installation...

Page 2: ...Do not place any naked flame sources such as lighted candles on or near the apparatus Keep the remote control batteries away from children They may cause a fire or chemical burn if mishandled Do not...

Page 3: ...eration and to prevent overheating Do not place the monitor near or over a source of heat such as a fireplace or in direct sunlight Notes Where the mains plug or appliance coupler is used as the disco...

Page 4: ...tandard s Operation is subject to the following two conditions 1 These devices may not cause interference and 2 these devices must accept any interference including interference that may cause undesir...

Page 5: ...Monitor placement and connections 8 Monitor placement recommendations 8 Placing the monitor with stand 9 Installing the anti tip straps 11 Wall mounting the monitor 13 Control console placement and co...

Page 6: ...6 English TAB 6 TAB 8 TAB 7 TAB 3 TAB 5 TAB 2 TAB 4...

Page 7: ...ain the system parts that are used in different stages of the setup process Carefully unpack each item as you proceed through the setup If an item is damaged do not attempt to use it Notify Bose or yo...

Page 8: ...to deliver a spacious home theater experience The system features ADAPTiQ audio calibration technology which customizes the sound during setup based on where the system is positioned as well as the si...

Page 9: ...with stand Before you place the monitor you must attach the stand 1 Unpack the stand screws and monitor 2 Lower the monitor onto the stand carefully lining up the holes in the bottom of the monitor w...

Page 10: ...to remove it 4 Insert the screws into the holes on the back of the monitor and tighten using the provided 5 32 in 4 mm hex wrench 5 Place the monitor on a stable flat surface capable of supporting th...

Page 11: ...xtra measure of security in the event that the monitor accidentally starts to tip over Installing the anti tip straps It is important that you install both straps according to the following instructio...

Page 12: ...plumbing lines running through the studs 3 Locate the two wall studs closest to the straps Each strap should be attached to the wall stud closest to it DO NOT attach both straps to the same stud 4 Ho...

Page 13: ...VideoWave system is compatible with any VESA certified bracket that uses a 400 mm x 400 mm screw pattern The panel itself without the stand weighs 119 lbs 59 kg so the mount must be able to support th...

Page 14: ...ing brackets not included to the wall and monitor according to the instruc tions included with the wall bracket 5 Lift the monitor out of the packing WARNING The monitor weighs about 119 lbs 59 kg To...

Page 15: ...console to the monitor Until your system setup is complete and your external devices are connected it is helpful to keep the control console positioned for easy access to its rear connection panel CAU...

Page 16: ...tput cord into the control console Power connector 4 Plug one end of an AC power cord into the power supply Make sure you push the plug in as far as it can go 5 Plug the other end of the power cord in...

Page 17: ...is what you need from Box 2 Box 2 additional included items These are items you may need to connect A V devices to your system When it is time to connect devices the Unify system will guide you in cho...

Page 18: ...Install the two AAA IEC LR3 batteries included matching the polarity markings and to the markings inside the battery compartment 4 Slide the battery cover back into place Status Meaning Red Off Blink...

Page 19: ...e the Unify system menu See Changing Your System Setup in your system Operating Guide For help in trying to resolve any problems see the troubleshooting table in your system Operating Guide Contacting...

Page 20: ...352276 0010 Made for iPod CiPhone Better sound through research 2012 Bose Corporation The Mountain Framingham MA 01701 9168 USA AM352276 Rev OO...

Page 21: ...Operating Guide Gu a del usuario Guide d utilisation VIDEOWAVE II ENTERTAINMENT SYSTEM...

Page 22: ...3 TAB 5 TAB 2 TAB 4 IMPORTANT SAFETY INFORMATION Please review the important safety information in your VideoWave Entertainment System Setup Guide before using your system This will help you operate...

Page 23: ...source controls 15 Entering channel numbers 16 Interacting with source guides and menus 17 SPECIAL FUNCTIONS 18 Changing the image view 18 Video muting 18 USING THE iPOD SOURCE 19 Selecting the iPod...

Page 24: ...Add a new device 28 Homewide 28 Update 28 Teach mode 28 Exit Unify 28 Customizing the control frame 29 Installing the IR emitter 30 Controlling the system using a third party remote 31 TROUBLESHOOTIN...

Page 25: ...or your room If these tasks have not been performed please refer to the VideoWave system setup guide If you wish to add another device to your system see Changing Your System Setup on page 27 This gui...

Page 26: ...This approach is different and will likely require some getting used to at the beginning but we believe it offers benefits that you will appreciate as you use the system Simplified remote control Only...

Page 27: ...elects source and system functions See Click pad overview on page 9 and Controlling Your Sources on page 14 Navigation pad Provides up down left right movement and select functions for navigating on s...

Page 28: ...29 Additional controls for the selected source Numbers for entering channel DVD chapter music track or disc number See Entering channel numbers on page 16 Playback controls used for sources such as DV...

Page 29: ...ew 1 TOUCH Place your thumb on the click pad to see the control frame 3 CLICK Press down on the click pad to select the highlighted control I INTRODUCTION 2 GLIDE Glide your thumb along the click pad...

Page 30: ...cular source For example there may be times when you need to perform a system update because you ve purchased a new source with its own non standard remote control Fortunately we ve made the process e...

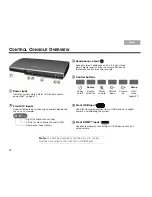
Page 31: ...may take several seconds to start To turn off the system including the connected source press the power button Control console power light Monitor power light Power Status Meaning Red Off Blinking gr...

Page 32: ...is highlighted as shown in the following example 2 Continue pressing the Source select button to move the highlight down the list and select the source you want Note You can also move the highlight up...

Page 33: ...e volume Press the mute button to suspend the system audio Press again to restore Moving through channels Press CH or CH to move up or down one channel Press the Last button to move back and forth bet...

Page 34: ...page29 Additional controls for the selected source Numbers for entering channel DVD chapter music track or disc number See Entering channel numbers on page 16 Playback controls used for sources such...

Page 35: ...rce you are using Note When the control frame is activated the picture is resized to fit within the control frame CONTROLLING YOUR SOURCES 2 Glide your thumb along the click pad to highlight the contr...

Page 36: ...digits for channel numbers you can change this in the Options menu page 25 For example if you need to enter channel numbers as high as 9999 you will need to change the number of digits to 4 If your s...

Page 37: ...CH v Provides up down left right movement and select functions for navigating on screen menus and program guides OK Selects the highlighted item in a guide or menu CONTROLLING YOUR SOURCES 1 Select th...

Page 38: ...the monitor power light is steady green To turn on the video screen press and release the power button Note When listening to audio sources like iPod the system will automatically enter screen saver m...

Page 39: ...n the right USING THE iPOD SOURCE Controlling iPod Use the click pad remote and the playback controls on the control frame to operate your iPod Up one menu item press and hold to scroll quickly Remote...

Page 40: ...stereo headphones with a 3 5 mm stereo plug Volume level is set by the volume buttons on the remote control or control console Front USB input Used for viewing photo files from a USB device or a digi...

Page 41: ...nts USING THE USB SOURCE Photo viewing controls Use the click pad remote control and control frame functions to access and view your photos Up one menu item press and hold to repeat T Down one menu it...

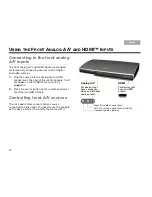
Page 42: ...trol console It will not appear in the SOURCE menu until it is plugged in 2 Press the source button on the remote and select A V Front or HDMI Front Controlling front A V sources The click pad remote...

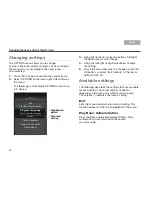
Page 43: ...ration of the system and some sources that are connected to it Although factory settings have been selected to satisfy most system owners you can change them if you wish The instructions on the next t...

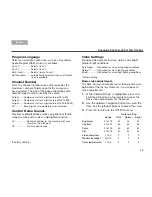
Page 44: ...s change the setting 5 To exit the menu and save the changes press the OK button or select Exit Options at the top or bottom of the list Available settings The following describes the settings that ar...

Page 45: ...lick pad or select a highlighted function On Sound accompanies the movement of your thumb on the click pad Off No click pad sounds Factory setting Video Settings Provides video presets for dark normal...

Page 46: ...al and lifelike when motion smoothing is on However you can set motion smoothing to None if you prefer to view films the way the director intended them to appear Restore Original Settings Returns all...

Page 47: ...u are done select Exit Unify at the bottom of the menu Note To exit the Unify menu at any time or cancel the function you started to use press the source select button on the remote or the Setup butto...

Page 48: ...tion is available only after the initial setup is completed Homewide When your VideoWave system is connected to another Bose entertainment system as an expansion system this function allows you to cha...

Page 49: ...cel Cancels changes made Reset Restores factory settings CHANGING YOUR SYSTEM SETUP 3 Using the navigation pad on the click pad remote select or remove controls for the selected device Press 1111111 o...

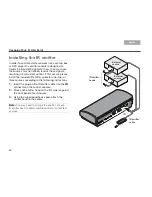
Page 50: ...his occurs please install the included IR emitter cable for one two or three sources according to the following instructions 1 Insert the plug on the IR emitter cable into the IR connector on the cont...

Page 51: ...oWave entertainment system Referring to the owner s guide for your set top box remote follow the instructions for programming the remote to control a TV When it is time to enter a device code enter 00...

Page 52: ...are fully plugged into a live AC mains outlet Select a connected device from the SOURCE menu refer to page 12 Pair the remote See Pairing the remote with the console on page 33 Reset the system See R...

Page 53: ...on press Resetting the system 1 Press and hold the power button on the control console for 5 seconds or until the power light on the control console changes to red The power light on the control conso...

Page 54: ...downloaded to the USB drive that is included with your system 1 Press the Setup button on the front of the control console to display the Unify menu 2 Using the remote navigation buttons select Updat...

Page 55: ...ave the recommended cleaning cloths and solutions Recommended cleaning cloths A double sided microfiber cloth is recommended for cleaning the monitor screen These are extremely soft non abrasive and n...

Page 56: ...cloth first For a light cleaning 1 Turn the system off and disconnect the monitor power cord from the wall receptacle 2 Using as little pressure as possible gently wipe the surface of the monitor scr...

Page 57: ...olby and the double D symbol are registered trademarks of Dolby Laboratories Manufactured under license under U S Patent s 5 956 647 5 974 380 and 6 487 535 other worldwide patents issued pending DTS...

Page 58: ...s under these licenses please refer to the specific terms of the licenses notices and disclaimers which are provided to you in an electronic file named licenses pdf located within the product s contro...

Page 59: ...ature and power output and setup data We may use this data to provide you with better service and support on your VideoWave system and to improve product design in the future Special equipment is requ...

Page 60: ...353022 0010 Made for iPod DiPhone Better sound through research 2012 Bose Corporation The Mountain Framingham MA 01701 9168 USA AM353022 Rev 01...

Page 61: ...est quality parts and the latest assembly and quality control techniques to ensure the reliability and long life of our products Our reputation rests on our steadfast pursuit of this policy in music a...

Page 62: ...11 47168650 techsupport boseindia com www Boseindia com Ireland Bose SMS Ltd Castleblayney Road Carrickmacross Co Monaghan TEL 042 9671531 FAX 042 9671502 www Bose ie ltalia BoseS p A Via della Maglia...

Page 63: ...n inside Please register your product now Contiene informaciOn sabre Ia garantfa Por favor registre su producto ahora Renseignements sur Ia garantie arinterieur Enregistrez s il vous plait votre produ...

Page 64: ...N g z z N c OJ c tD 0 3 3 m m tD AI n 0 0 s 0 0 0 c c c tD 3 OJ tD rT 6 C m tD tD J n tD tD I g 0 X w U1 U1 lO w j I 0 g 0 I...

Page 65: ...ch it was designed manufactured approved and or authorized or repair of products damaged by these modifications and products purchased from unauthorized dealers What we will do During the warranty per...

Reviews: