background image

INSTALLATION & USE

1

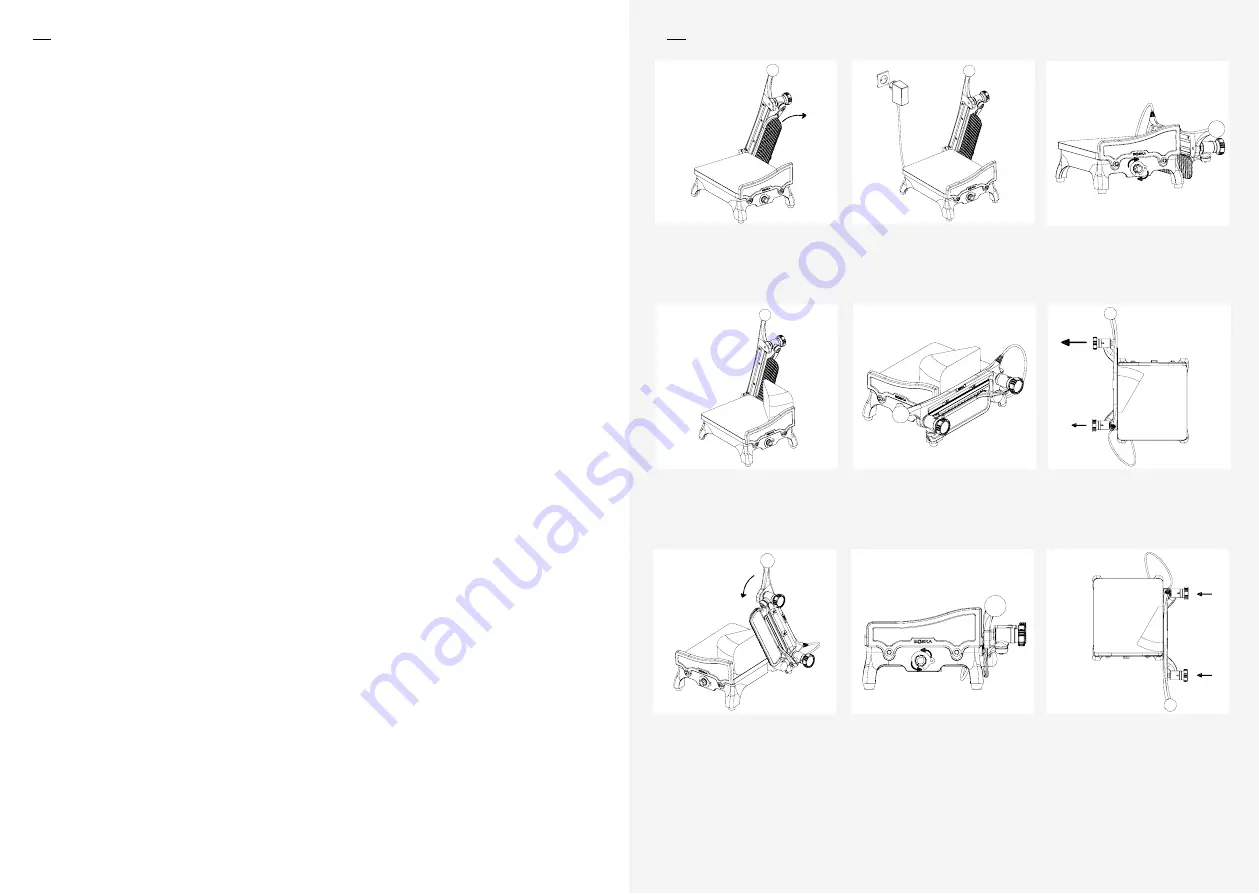
 Remove the blade cover. Please note: the blade is sharp! 

2

 Plug the transformer into the socket (230v~50hz). 

3

 Set the temperature yourself with the temperature control, from level 1 to 10. 

The knife is warm within 5-10 minutes.

4

 Lay the cheese to be sliced with the rind against the clamping plate and the light yellow, 

edible part of the cheese against the thickness regulator. Please note: do not press the cheese 

against the thickness regulator; place the cheese against it and the blade will do the rest.

5

 Adjust the knobs to obtain the desired slice thickness (max 15mm). To minimize slicing loss, 

cut wedge-shaped slices; 

5A

 Set the adjusting knob at the edge of the rind higher than the adjusting knob further away 

from you, so that the cheese is nicely round-cut and you are not left with any unsalable pieces.

6

 Bring the lever down to cut off a slice of cheese.

7

 Turn the temperature controller off. 

8

 Turn the adjusting knobs back to 0 to prevent cuts.

EN

Unika +

Unika +

EN

CLEANING

• 

Make sure the temperature controller is turned off, the adjusting knobs are back to 0, the 
plug has been removed from the socket and the appliance has cooled down fully.

• 

The Unika+ should be cleaned daily.

• 

Clean the Unika+ before you change to a different type of cheese, to prevent

         cross-contamination.
• 

Use hot water, a soft brush and a neutral cleaning agent such as mild soap or washing-up 
liquid to clean the Unika+.

• 

Make sure that the water is no hotter than 70°C to prevent damage to the plastic 

         components.
• 

Never clean with a hard-bristle brush, abrasive materials, cleaning agents containing 
baking soda or chlorine, or disinfecting or corrosive cleaning agents.

• 

Rinse the Unika+ with clean water. Dry the machine thoroughly, to prevent components 
from being damaged by dust and moisture.

• 

After cleaning, put the cover back on the blade.

1

2

3

4

5

5A

6

7

8

Summary of Contents for Unika+

Page 1: ...PROFESSIONAL Unika P R O F E S S I O N A L ...

Page 2: ...eces 6 Bring the lever down to cut off a slice of cheese 7 Turn the temperature controller off 8 Turn the adjusting knobs back to 0 to prevent cuts EN Unika Unika EN CLEANING Make sure the temperature controller is turned off the adjusting knobs are back to 0 the plug has been removed from the socket and the appliance has cooled down fully The Unika should be cleaned daily Clean the Unika before y...

Page 3: ... the cable as this can damage the cable and cause a short circuit Check the plug and cable regularly for damage If either is damaged have it repaired by a designated Boska service technician and replaced if necessary Do not attempt to repair the appliance yourself this can cause danger to life Never attempt to open the housing of the appliance yourself Repairs should only be done by a technician r...

Page 4: ...nt system 32 X00037 Number sticker for control knob 33 X00054 Narrow nut fot thickness regulator 34 X00050 Washer for thickness regulator 35 X88002 Spring 36 509022 Detent 37 X00036 Control knob 38 X00038 Bearing spacer 39 X00025 Thickness regulator 40 X00061 Small washer for thickness regulator 41 X00060 Bolt for thickness regulator 14 X00052 Clamping plate bolt 15 X00053 clamping plate washer re...

Page 5: ...een plak kaas af te snijden 7 Draai de temperatuurregelaar na gebruik uit 8 Draai de stelknoppen weer terug naar 0 om snijwonden te voorkomen Unika Unika REINIGEN Zorg dat de temperatuurregelaar uit staat de stelknoppen terug op 0 staan en de stekker uit het stopcontact is en verzeker jezelf ervan dat het apparaat volledig is afgekoeld De Unika dient dagelijks gereinigd te worden Reinig de Unika v...

Page 6: ...ek nooit aan het snoer dit kan schade aan het snoer en kortsluiting veroorzaken Controleer stekker en snoer regelmatig op eventuele beschadiging Indien deze bescha digd is laat dit repareren door een door Boska aangewezen service monteur en zo nodig vervangen Probeer het apparaat niet zelf te repareren dit kan levensgevaar opleveren Probeer nooit zelf de behuizing van het apparaat te openen Repara...

Page 7: ...ysteem 31 X00037 Cijfersticker tbv stelknop 32 X00054 Smalle moer dikteregelaar 33 X00050 Ring dikteregelaar 34 X88002 Veer 35 509022 Palletje 36 X00036 Stelknop 37 X00038 Busje 38 X00025 Dikteregelaar 39 X00061 Ringetje dikteregelaar 40 X00060 Bout dikteregelaar 14 X00052 Boutje klemplaat 15 X00053 Ringetje klemplaat 16 X00031 Draaiknop temperatuurregeling 17 X00032 Lensje temperatuurregeling 18 ...

Page 8: ...chneiden 7 Drehen Sie den Temperaturregler aus 8 Den Einstellknopf zurück auf 0 drehen um Schnittverletzungen zu vermeiden Unika Unika REINIGUNG Achten Sie darauf dass der Temperaturregler ausgeschaltet ist dass die Einstellknöpfe wieder auf 0 stehen dass der Stecker aus der Steckdose gezogen wurde und stellen Sie sicher dass das Gerät vollständig abgekühlt ist Die Unika muss täglich gereinigt wer...

Page 9: ...am Kabel dies kann Schäden am Kabel oder Kurzschlüsse verursachen Prüfen Sie Stecker und Kabel regelmäßig auf eventuelle Beschädigungen Beschädigungen von einem durch Boska beauftragten Servicemonteur reparieren lassen und falls erforder lich austauschen Versuchen Sie nicht das Gerät selbst zu reparieren dies kann lebensge fährlich sein Versuchen Sie nicht selbst das Gerätegehäuse zu öffnen Repara...

Page 10: ...tem 31 X00037 Ziffern Sticker für Einstellknopf 32 X00054 Schmale Mutter Dickeregler 33 X00050 Ring Dickeregler 34 X88002 Feder 35 509022 Sperrklinke 36 X00036 Einstellknopf 37 X00038 Verbindung 38 X00025 Dickeregler 39 X00061 Kleiner Ring Dickeregler 40 X00060 Schraube Dickeregler 14 X00052 Schraube Klemmplatte 15 X00053 Kleiner Ring Klemmplatte 16 X00031 Drehknopf Temperaturregler 17 X00032 Lins...

Page 11: ...pour couper une tranche de fromage 7 Après utilisation éteindre le régulateur de température 8 Remettre les boutons de réglage en position 0 pour éviter les blessures par coupure Unika Unika NETTOYAGE Veiller à ce que le régulateur de température soit éteint que les boutons de réglage aient été remis en position 0 et la fiche retirée du la prise murale et s assurer que l appareil a complètement re...

Page 12: ...âble car cela pourrait l endommager et provoquer un court circuit Contrôler régulièrement le bon état du câble et de la prise En cas d endommagement faire réparer par un technicien désigné par Boska et au besoin remplacer Ne pas essayer de réparer l appareil soi même car cela pourrait entraîner un danger de mort Ne jamais ouvrir soi même le bâti de l appareil Les réparations doivent être effectuée...

Page 13: ...écrou réglage de l épaisseur 33 X00050 Bague du dispositif de réglage de l épaisseur 34 X88002 Ressort 35 509022 Cliquet d arrêt 36 X00036 Bouton de réglage 37 X00038 Petit manchon 38 X00025 Dispositif de réglage de l épaisseur 39 X00061 Rondelle du dispositif de réglage de l épaisseur 40 X00060 Boulon de réglage de l épaisseur 14 X00052 Petit boulon plaque de serrage 15 X00053 Rondelle plaque de ...

Page 14: ...endibles 6 Empuje el mango hacia abajo para cortar una loncha de queso 7 Apague el regulador de temperatura 8 Vuelva a poner los mandos de regulación en 0 para evitar cortes Unika Unika LIMPIEZA Asegúrese de que el regulador de temperatura esté apagado que los mandos de regulación estén de nuevo en 0 y que se haya retirado el enchufe de la toma de alimentación y verifique que el aparato se haya en...

Page 15: ...cuito Revise regularmente el enchufe y el cable para detectar posibles daños Si está dañado haga que lo repare un técnico de servicio designado por Boska y que lo sustituya en caso necesario No intente reparar el aparato usted mismo podría ser peligroso No intente nunca abrir la carcasa del aparato usted mismo Las reparaciones deberán ser realizadas por un montador reparador designado por Boska La...

Page 16: ...X00037 Pegatina de dígitos para el mando de regulación 32 X00054 Tuerca pequeña para el regulador de espesor 33 X00050 Anilla para el regulador de espesor 34 X88002 Resorte 35 509022 Retén para el 36 X00036 Mando de regulación 37 X00038 Anillo 38 X00025 Regulador de espesor 39 X00061 Anillito para el regulador de espesor 40 X00060 Perno para el regulador de espesor 14 X00052 Perno para la abrazade...

Page 17: ......

Reviews: