background image

INSTRUCTIONS

INSTRUCTIONS

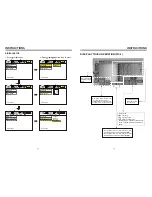
VIDEO SETUP

EXIT SETUP

BRIGHTNESS

CONTRAST

HUE

SATURATION

SHARPNESS

EXIT SETUP

BRIGHTNESS

CONTRAST

HUE

SATURATION

SHARPNESS

EXIT SETUP

BRIGHTNESS

CONTRAST

HUE

SATURATION

SHARPNESS

EXIT SETUP

BRIGHTNESS

CONTRAST

HUE

SATURATION

SHARPNESS

EXIT SETUP

BRIGHTNESS

CONTRAST

HUE

SATURATION

SHARPNESS

EXIT SETUP

BRIGHTNESS

CONTRAST

HUE

SATURATION

SHARPNESS

VIDEO SETUP

VIDEO SETUP

VIDEO SETUP

VIDEO SETUP

VIDEO SETUP

VIDEO SETUP

12
10

8
6
4
2
0

12
10

8
6
4
2
0

+ 6

+ 4
+ 2

 0

- 4
- 6

- 2

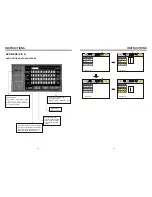
1. Press     or     button

2. Press     /    /    /    button, then to enter.

VIDEO SETTING ON TOUCH SCREEN

Image mode: You can choose the area in the
broken line on the panel, standard, defined, 
soft, according what you need to choose,
the blue back light will disappear.

You can choose: Brightness, Contrast, Color, 
Hue, adjust the image effect according to 
your sight. The blue bar will show your level. 

Video mode: When using this
function, the position will be darker 
on the screen.

Summary of Contents for BV9990

Page 1: ......

Page 2: ...n DVD Basic Operation VCD Basic Operation CD MP3 Basic Operation Music Surroundings Setting EQ Setting Audio Frequency Tone Other Play Mode Trouble Shooting Wiring Diagram Specifications Accessory Panel Button Control Instruction Outlook And Basic Function 3 3 4 5 6 7 8 9 11 12 13 14 16 17 18 20 22 23 33 36 38 39 40 41 42 43 44 45 In Dash DVD MP3 CD Receiver With Motorized Flip Out 7 Widescreen To...

Page 3: ... the laser 2 Playing the radio at higher volumes for a long period of time may cause hearing issues You should play this unit at a moderate listen level 3 This unit is set up by precision parts If you open up this unit you will void any and all of your warranty 4 Please do not touch LCD display with any hard object so that you prevent it from getting scratched or damaged 5 To avoid an accident cau...

Page 4: ...y the disc and show corresponding word When appears on the display that means that there is no function please choose another mode MODE DVD VCD MP3 CD ICON CONTENT DISC SIZE Sound image Sound image Sound only Sound only 12cm 12cm 12cm 12cm INSTRUCTIONS INSTRUCTIONS ACCESSORY Accessory Quantity User Manual 1PC Wire USB Cable Keys Install metal bar Remote controller Warranty card 2PCS 1PC 1PC 1PC 1P...

Page 5: ...AY 1 7 16 9 TFT LCD Display 2 Touchscreen Power supply Power range Max operate current Dimensions Ground system FM tuner European frequency range Signal Noisse ratio Stereo separation Search station volt Distortion rate AM tuner Limit noise sensitivity DVD PLAYER Signal Noise ratio Frequency response DC 12V 10 8 16 0V DC 10A 155X182X53MM Negative ground 87 5 108MHz 55dB 30dB 20 30Buv 1 5 522 1620K...

Page 6: ...lume button The mode will automatically take you back to status before adjustment 5 RESET 1 If unit is not working correctly you should press the RES button This will reset the radio and should start working correctly afterwards 2 After reset all settings will resume back to the factory default settings VOL BAS TRE L R F R INSTRUCTIONS INSTRUCTIONS WIRING DIAGRAM This player is equipped with ISO s...

Page 7: ...ns has dirty There is only one language subtitle in disc Video line between unit and TV is not properly connected SOLUTION Change fuse same as the old one Press RESET button on the panel by pen point then power on Check whether antenna is connected or not or poor connection Change new disc Slot in the disc with sign side up Clean lens by lens clean disc If disc is not with multi language subtitle ...

Page 8: ... TFT on off button 21 Disc load slot 22 SD socket 23 Reset button 24 DN Adjustment TFT Screen 25 UP Adjustment TFT Screen 26 Disc out button PANEL BUTTON CONTROL INSTRUCTION OTHER PLAY MODE AUX IN AUX IN OPERATION 1 Press Source button on remote control or touch AUX on the touch screen to switch to AUX mode 2 This will allow you to listen and or watch any source that you have plugged into this sec...

Page 9: ...e displayed 6 Number Button 1 INT Intro Scan In radio mode press this button to hear radio preset In disc playback mode press this button to start or stip the intro scan function 5 Number Button 2 RPT Repeat Playback In radio mode press this button to hear radio preset In disc playback mode press this button to repeat the current track indefinitely 4 Number Button 3 RDM Random playback In radio mo...

Page 10: ...can resume the sound output long press this button can turn off the TFT LCD display 19 TFT Display screen extend Retreat Press this button to extend the TFT screen from the device or retreat it back The maximum angle of extension is 104 degree Attention Under the disc playing mode there is no image display at the moment of screen extension after the button is pushed It will become normal in 3 seco...

Page 11: ... is used with the remote control in CD MP3 USB SD mode Once you have one of these settings on You will no longer have Bass Treble adjustments until this feature is set to off MAIN MENU TOUCH OPERATION PIC 1 RADIO AUX INPUT DVD BLUETOOTH USB SD GPS POWER OSD SET TV CDC BLUETOOTH This unit without CDC TV GPS function ...

Page 12: ...nction can only be worked by the remote control PROG TC 3 _ _ _ _ 4 _ _ _ _ TC 7 _ _ _ _ 8 _ _ _ _ 5 _ _ _ _ 6 _ _ _ _ TC 11 _ _ _ _ 12 _ _ _ _ 9 _ _ _ _ 10 _ _ _ _ TC 15 _ _ _ _ 16 _ _ _ _ 13 _ _ _ _ 14 _ _ _ _ PLAY DELETE 1 _ _ _ _ 2 _ _ _ _ PROG TC 3 _ _ _ _ 4 _ _ _ _ TC 7 _ _ _ _ 8 _ _ _ _ 5 _ _ _ _ 6 _ _ _ _ TC 11 _ _ _ _ 12 _ _ _ _ 9 _ _ _ _ 10 _ _ _ _ TC 15 _ _ _ _ 16 _ _ _ _ 13 _ _ _ _ 14 ...

Page 13: ... 6 OSD In playing mode short press OSD on remote control to show all information of present dis 7 Randomly Play In CD mode press LOC RDM button on remote control to instantly play each song Press again to back to the normal play 8 EQ Mode 1 This function can only be worked by remote control 2 When playing CD MP3 press the ZOOM button on the remote control you can choose the sound mode 3 When enter...

Page 14: ...ong press number button 8 on the remote control Press button to program play Back to the normal mode press the ST PROG button then press button Note This function can only be worked by the remote control REMOTE CONTROL FUNCTION 4 SOURCE Button Press this button to choose audio sources 5 EQ Button Press this button to choose POP ROCK EQ off 6 SEEK SEEK Button Press this button to manual turning spe...

Page 15: ...ers for example the 19th song press 1 9 button Centesimal numbers for example the 120th song press 1 2 0 button 16 AMS RPT Button In radio mode press this button to browse stored stations In audio mode press this button to play repeatedly 17 TITLE Button In DVD mode press this button to play back to the top menu of disc 18 AUDIO Button In DVD mode press this button to switch language of dialogue I...

Page 16: ...utton a bit longer to operate 4 Previous Next Song Play In playing mode press SEEK SEEK on remote control or touch button on display to choose previous next song 5 Switch System In playing mode short press the BAND P N button on remote control to select PAL AUTO NTSC TV system Note This function can only be worked by the remote control 6 Slow Play Press SLOW button on remote control to slow play T...

Page 17: ...SETUP FULL 6 8 4 8 2 8 OFF 1 Press or button 2 Press button then to enter Touch this area to enter exit main menu DISC PLAY TOUCH OPERATION PIC 4 Touch option next song previous songs adjust monitor angles Pls refer to Pic 5 when touch SET button There is a yellow remind when touch any button You can select X X X X X to speed up when you press this button You can select X X X X X to backward when ...

Page 18: ... 2 0 8 6 4 2 0 DVD MODE PIC 5 AUDIO SETTING ON TOUCH SCREEN Bass choosing when touched the button will be yellow touch this button to exit touch it again to resume Loud choosing this function is defined open when it is touched at the first time the loud function will be closed at the same time yellow light disappear Audio selection VOL BAS TRE BAL FAD When using this function the position bar will...

Page 19: ...HARPNESS VIDEO SETUP VIDEO SETUP VIDEO SETUP VIDEO SETUP VIDEO SETUP VIDEO SETUP 12 10 8 6 4 2 0 12 10 8 6 4 2 0 6 4 2 0 4 6 2 1 Press or button 2 Press button then to enter VIDEO SETTING ON TOUCH SCREEN Image mode You can choose the area in the broken line on the panel standard defined soft according what you need to choose the blue back light will disappear You can choose Brightness Contrast Col...

Page 20: ...is on it means there is strong RDS signals output Short press on this button to decrease radio frequency longer press on this button to seek radio channels frequency decreased direction Short press on this button to increase radio frequency longer press on this button to seek radio channels frequency increased direction Touch this area to enter exit main menu Press this button each time it will au...

Page 21: ...ing mode 5 POP M RDS Channel Mark Indicate RDS channel name 1 RDS Tracking System Press AF button in FM mode and then press last 2 minutes RDS will auto search channel up and down it will stop searching when RDS channel be founded but AF will keep remaining on the screen and waits for the next traffic emergency report 2 RDS Tracking on Playing Mode In playing mode AF tracking system keeps on openi...

Page 22: ...requency Search Station Press SEEK SEEK button on remote control or touch button on display shortly every time to search station in up down direction When get one station it will auto stop searching 3 Browse Auto Search and Store Station 1 In radio mode press AMS RPT button on remote control or APS button on display shortly to browse preset station on 1 6 2 In radio mode press AMS RPT button on re...

Page 23: ... control or touch button on display unit will play from the first song 3 Fast Forward Fast Backward Play In playing mode press SEEK button on remote control or touch button on display to speed play When you need quick back press SEEK button on remote control or touch button on display to quick back play Note Hold above button a bit longer to operate 4 Previous Next Song Play In playing mode press ...

Page 24: ...ointed language 4 About the SETUP please read the follow Press SETUP on the remote control it will appear the following touch menu Press button on pedestal to eject disc PROG TC 1 0 1 0 3 2 0 1 0 6 3 _ _ _ _ 4 _ _ _ _ TC 7 _ _ _ _ 8 _ _ _ _ 5 _ _ _ _ 6 _ _ _ _ TC 11 _ _ _ _ 12 _ _ _ _ 9 _ _ _ _ 10 _ _ _ _ TC 15 _ _ _ _ 16 _ _ _ _ 13 _ _ _ _ 14 _ _ _ _ PLAY DELETE 8 OSD In playing mode short press ...

Reviews: