54
Chapter 3. Recording a Pattern
■
If the metronome tempo is too fast (slow), use the
following procedure to set a comfortable tempo.
1) Press [TEMPO] to make “TEMPO” blink.
2) Use [VALUE*] to adjust the tempo.
3) When you are satisfied with the tempo, press
[TEMPO] once again.
NOTE
The tempo you specify is temporary, and will not be stored in the
pattern.
When you have finished rehearsing, continue with the
following steps.
13.
Press [REC] to make the REC indicator light, and start
recording.
14.
In time with the metronome, strike the pads to which
the instruments you want to record are assigned.
The velocity (force with which you strike the pads) will
also be recorded.
The sounds you record will continue playing repeatedly.
■
As necessary, use [PAD BANK] to switch the pad bank.
■
By holding [ROLL/FLAM] while you strike a pad, you
can record a roll (flam).
NOTE
Even if a roll has been set to play notes at an extremely short
interval, the notes that are actually recorded will be spaced at
intervals of the specified Quantize value. If you want to record the
roll as it was originally specified (Interval: p. 47), set Quantize to
“OFF.”
NOTE
Up to nine instruments can be recorded on the same step. If you
attempt to record more than this, the tenth and subsequent will be
ignored.
NOTE
It is not possible to record two or more instruments of the same pad
number on the same step.
●●●●●●●●●●●●●●●●●●●●●●●●●●●●●●●●●●●●●●●●●●●●●●●●●●●●●●●●●●●●●●●●●●●●●●●●●●●●●●●●●●●●●●●●●●●●●●●●●●●●
●
To delete a previously recorded note while recording
While holding down [DELETE], press the pad to which the
instrument you want to delete has been assigned.
Notes of the corresponding instrument will be deleted as
long as you continue holding [DELETE] and that pad.
●●●●●●●●●●●●●●●●●●●●●●●●●●●●●●●●●●●●●●●●●●●●●●●●●●●●●●●●●●●●●●●●●●●●●●●●●●●●●●●●●●●●●●●●●●●●●●●●●●●●
15.
When you finish recording, press [STOP/EXIT].
Step Recording a Pattern
1.
Press [SONG/PTN] so the display indicates
“PATTERN.”
The DR-770 is now in Pattern mode.
2.
Press [REAL/STEP] so the display indicates “STEP.”
This selects step recording.
fig.103-03a
3.
Use [VALUE*] to select the pattern (user pattern) that
you want to record.
4.
Press [REC].
The REC indicator will light, and the display will
indicate “QUANTIZE.”
fig.103-04a
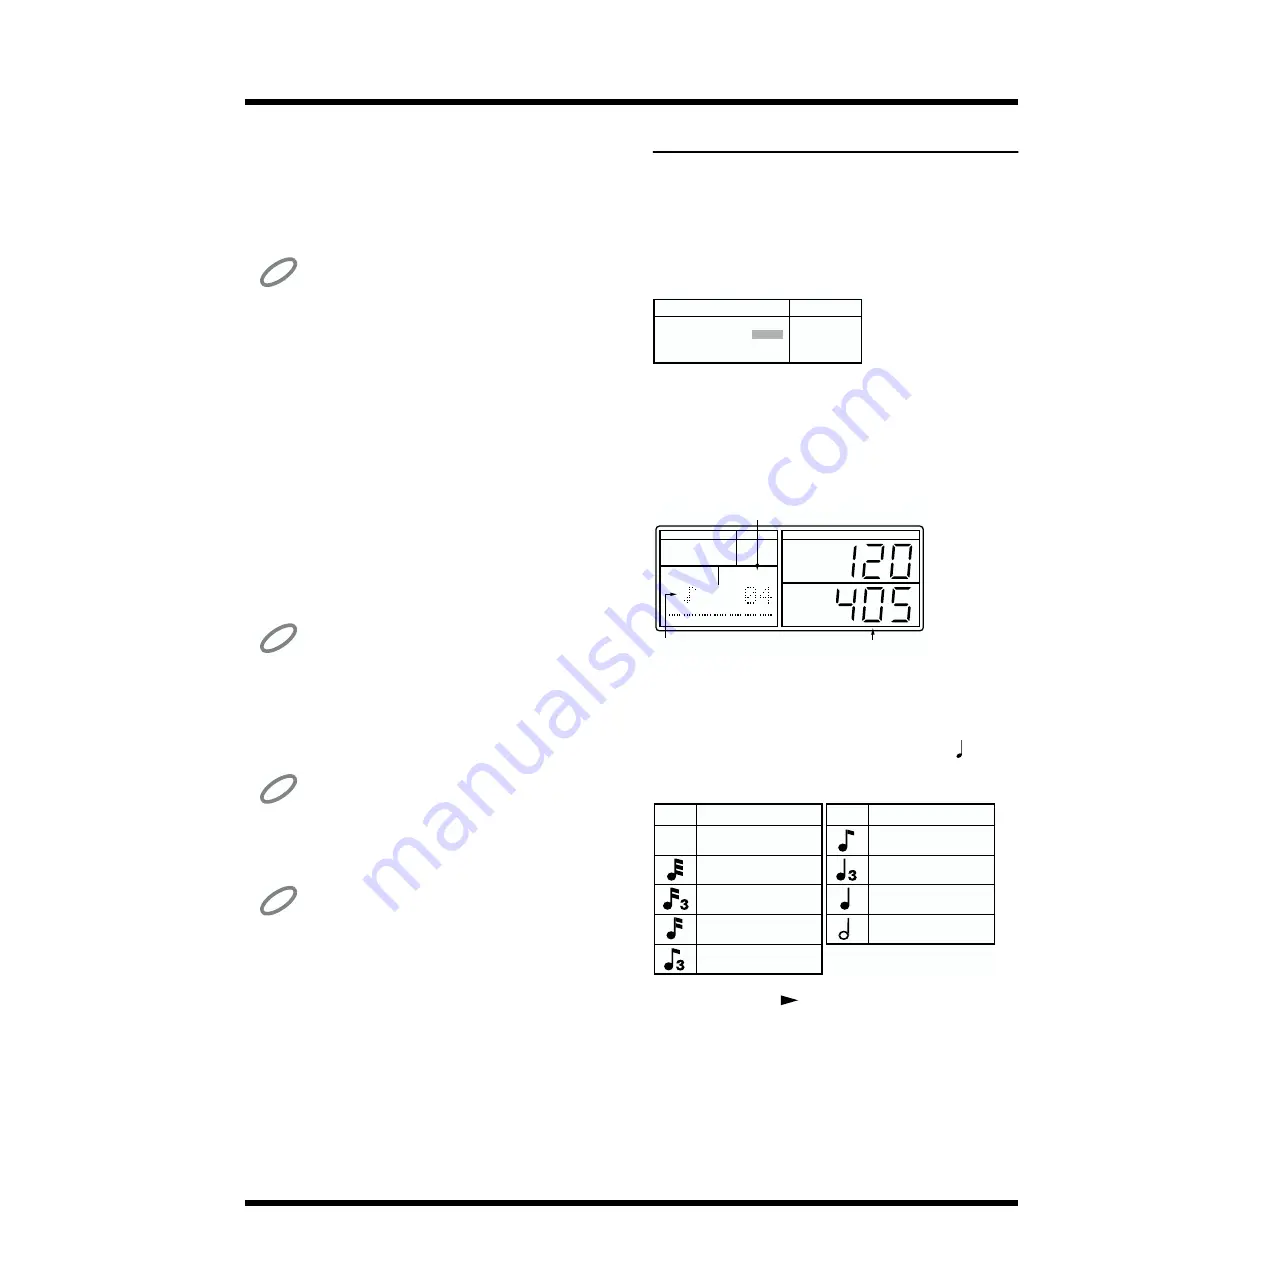
5.
Use [VALUE*] to make Quantize settings.
For step recording, the Quantize setting specifies how
finely each beat will be divided.
The number of steps per clock is calculated as =96
clocks.
fig.103-05a
6.
Press [CURSOR
] to make the Beat Length display
blink.
7.
Use [VALUE*] to specify the Beat Length.
Beat Length is the number of quarter notes in the
pattern.
For example, if you wanted to record a one-measure
pattern in 4/4 time, you would set a beat length of “4.” If
you wanted to record a two-measure pattern in 3/4 time,
you would set a beat length of “6.”
FUNC
MODE
INSERT
COPY
DELETE
PATTERN
PAD
UTILITY
REAL
EFFECTS
MIDI
SONG
STEP
PAD BANK
FUNC
MODE
A
B
B
TEMPO
DPP
DRUM KIT
REVERB IND
FLANGER
PATTERN
SONG
PAD NUMBER
INSERT
COPY
DELETE
SONG
PATTERN
PAD
UTILITY
REAL
STEP
EFFECTS
MIDI
QUANTIZE
NEXT PTN
PART
BEAT
LENGTH
PATTERN
Beat length
Quantize
Pattern number
(192)
Half note
(96)
Quarter note
(64)
Quarter note triplets
(48)
8th note
(24)
16th note
(16)
16th note triplets
(12)
32nd note
(1)
OFF
no quantize
(32)
8th note triplets
Display
Quantize (Clock)
Display
Quantize (Clock)
Summary of Contents for Dr. Rhythm DR-770
Page 119: ...119 MEMO...

