background image

English

6

protect our environment and conserve natural resources by 
returning the spent nickel cadmium, nickel metal hydride 
or lithium-ion batteries to an authorized BOSTITCH service 
center or to your local retailer for recycling. You may also 
contact your local recycling center for information on 
where to drop off the spent battery. RBRC® is a registered 
trademark of Call 2 Recycle, Inc

.

Important Safety Instructions for All 
Battery Chargers


WARNING: Read all safety warnings and all 
instructions for the battery pack, charger and 
power tool. Failure to follow the warnings and 
instructions may result in electric shock, fire and/
or serious injury.

• 

DO NOT attempt to charge the battery pack with 
any chargers other than the ones in this manual.


The charger and battery pack are specifically designed to 
work together.

• 

These chargers are not intended for any uses other 
than charging BOSTITCH rechargeable batteries. 

Any other uses may result in risk of fire, electric shock 
or electrocution.

• 

Do not expose the charger to rain or snow.

• 

Pull by the plug rather than the cord when 
disconnecting the charger.

 This will reduce the risk of 

damage to the electric plug and cord.

• 

Make sure that the cord is located so that it will not 
be stepped on, tripped over or otherwise subjected 
to damage or stress.

• 

Do not use an extension cord unless it is absolutely 
necessary.

 Use of improper extension cord could result in 

risk of fire, electric shock or electrocution.

• 

When operating a charger outdoors, always provide 
a dry location and use an extension cord suitable 
for outdoor use. 

Use of a cord suitable for outdoor use 

reduces the risk of electric shock.

• 

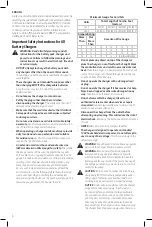
An extension cord must have adequate wire size 
(AWG or American Wire Gauge) for safety. 

The smaller 

the gauge number of the wire, the greater the capacity 
of the cable, that is, 16 gauge has more capacity than 18 
gauge. An undersized cord will cause a drop in line voltage 
resulting in loss of power and overheating. When using 
more than one extension to make up the total length, 
be sure each individual extension contains at least the 
minimum wire size. The following table shows the correct 
size to use depending on cord length and nameplate 
ampere rating. If in doubt, use the next heavier gauge. The 
lower the gauge number, the heavier the cord.

Minimum gauge for Cord sets

Volts

Total length of Cord in Feet 

(meters)

120 V

25 (7.6)

50 (15.2) 100 (30.5) 150 (45.7)

240 V

50 (15.2) 100 (30.5) 200 (61.0) 300 (91.4)

Ampere Rating

American Wire gauge

More 

Than

not 

More 

Than

0

6

18

16

16

14

6

10

18

16

14

12

10

12

16

16

14

12

12

16

14

12

Not Recommended

• 

Do not place any object on top of the charger or 
place the charger on a soft surface that might block 
the ventilation slots and result in excessive internal 
heat. 

Place the charger in a position away from any heat 

source. The charger is ventilated through slots in the top 
and the bottom of the housing.

• 

Do not operate the charger with a damaged cord 
or plug.

• 

Do not operate the charger if it has received a sharp 
blow, been dropped or otherwise damaged in any 
way.

 Take it to an authorized service center.

• 

Do not disassemble the charger; take it to an 
authorized service center when service or repair 
is required.

 Incorrect reassembly may result in a risk of 

electric shock, electrocution or fire.

• 

Disconnect the charger from the outlet before 
attempting any cleaning. This will reduce the risk of 
electric shock.

 Removing the battery pack will not reduce 

this risk.

• 

NEVER

 attempt to connect 2 chargers together.

• 

The charger is designed to operate on standard 
120V household electrical power. Do not attempt to 
use it on any other voltage.

 This does not apply to the 

vehicular charger.


WARNING: 

Shock hazard. Do not allow any liquid to 

get inside the charger. Electric shock may result.


WARNING:

 Burn hazard. Do not submerge the 

battery pack in any liquid or allow any liquid to 
enter the battery pack. Never attempt to open the 
battery pack for any reason. If the plastic housing of 
the battery pack breaks or cracks, return to a service 
center for recycling.


CAUTION: 

Burn hazard. To reduce the risk of injury, 

charge only BOSTITCH rechargeable battery packs. 
Other types of batteries may overheat and burst 
resulting in personal injury and property damage.

NOTICE:

 Under certain conditions, with the charger 

plugged into the power supply, the charger can 
be shorted by foreign material. Foreign materials 
of a conductive nature, such as, but not limited to, 
grinding dust, metal chips, steel wool, aluminum 
foil or any buildup of metallic particles should be 
kept away from the charger cavities. Always unplug 
the charger from the power supply when there is no 

Summary of Contents for BCN662

Page 1: ...ion manual Manuel d instructions Manual de instrucciones If you have any questions or comments contact us Por tuote question ou tout commentaire nous contacter Si tiene dudas o comentarios contáctenos 1 800 556 6696 WWW BOSTITCH COM INSTRUCTIVO DE OPERACIÓN CENTROS DE SERVICIO Y PÓLIZA DE GARANTÍA ADVERTENCIA LÉASE ESTE INSTRUCTIVO ANTES DE USAR EL PRODUCTO ...

Page 2: ...ltaje inicial de la batería medido sin carga de trabajo es 20 voltios El voltaje nominal es de 18 NOTE NEVER sprayorapplylubricantsorcleaningsolventsinsidethetool Thiscanseriouslyaffectthe lifeandperformanceofthetool REMARQUE NE JAMAISvaporiser ouappliquerdetouteautrefaçon aucunlubrifiantousolvantde nettoyagedansl outil Celapourraitaffectersérieusementladuréedevieetlesperformancesdel outil NOTA NU...

Page 3: ...Indicates a practice not related to personal injury which if not avoided may result in property damage WARNING Read all safety warnings and all instructions Failure to follow the warnings and instructions may result in electric shock fire and or serious injury WARNING To reduce the risk of injury read the instruction manual If you have any questions or comments about this or any BOSTITCH tool call...

Page 4: ...t such as dust mask non skid safety shoes hard hat or hearing protection used for appropriate conditions will reduce personal injuries c Prevent unintentional starting Ensure the switch is in the off position before connecting to power source and or battery pack picking up or carrying the tool Carrying power tools with your finger on the switch or energizing power tools that have the switch on inv...

Page 5: ...stener may be forcefully discharged while attempting to free a jammed condition Hold tool by insulated gripping surfaces when performing an operation where driven fasteners may contact hidden wiring Contact with a live wire will make exposed metal parts of the tool live and shock the operator Additional Nailer Safety Warnings Always wear safety glasses Always wear ear protection Only use fasteners...

Page 6: ...wing grinding drilling and other construction activities Wear protective clothing and wash exposed areas with soap and water Allowing dust to get into your mouth eyes or lay on the skin may promote absorption of harmful chemicals WARNING Use of this tool can generate and or disperse dust which may cause serious and permanent respiratory or other injury Always use NIOSH OSHA approved respiratory pr...

Page 7: ...t exposed battery terminals For example do not place the battery pack in aprons pockets tool boxes product kit boxes drawers etc with loose nails screws keys etc Transporting batteries can possibly cause fires if the battery terminals inadvertently come in contact with conductive materials such as keys coins hand tools and the like The US Department of Transportation Hazardous Material Regulations...

Page 8: ...ubt use the next heavier gauge The lower the gauge number the heavier the cord Minimum Gauge for Cord Sets Volts Total Length of Cord in Feet meters 120 V 25 7 6 50 15 2 100 30 5 150 45 7 240 V 50 15 2 100 30 5 200 61 0 300 91 4 Ampere Rating American Wire Gauge More Than Not More Than 0 6 18 16 16 14 6 10 18 16 14 12 10 12 16 16 14 12 12 16 14 12 Not Recommended Do not place any object on top of ...

Page 9: ...ver operate the charger if the fan does not operate properly or if ventilation slots are blocked Do not permit foreign objects to enter the interior of the charger Electronic Protection System Li Ion tools are designed with an Electronic Protection System that will protect the battery pack against overloading overheating or deep discharge The tool will automatically turn off if the Electronic Prot...

Page 10: ... use under wet conditions or in presence of flammable liquids or gases Your cordless straight nailer is a professional power tool DO NOT let children come into contact with the tool Supervision is required when inexperienced operators use this tool Tool Specifications Firing Mode Selectable Sequential or Bump Voltage 20 Height 12 3 31 2 cm Width 3 7 9 3 cm Tool Specifications Length 11 8 29 9 cm W...

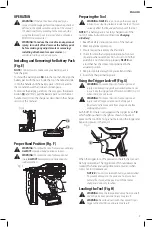
Page 11: ... charged out of the carton Follow instructions outlined see Charging a Battery 1 Read the Safety Instruction section of this manual 2 Wear eye and ear protection 3 Ensure magazine is empty of all fasteners 4 Check for smooth and proper operation of contact trip and pusher assemblies Do not use tool if either assembly is not functioning properly NEVER use a tool that has the contact trip restrained...

Page 12: ... sequential actuation mode provides the maximum delivery of power for driving the longest nails To operate the nailer in sequential actuation mode 1 Slide the selector switch 8 to expose the single nail icon 2 Fully depress nosepiece against the work surface motor will start 3 Pull trigger nail will drive into work surface 4 Release trigger 5 Lift nosepiece off work surface 6 Repeat steps 2 throug...

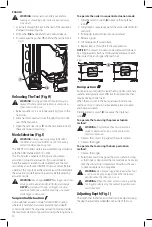
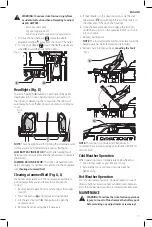
Page 13: ...these instructions to clear 1 Remove battery pack from tool and engage the trigger lock off 2 Press the pusher 16 and remove any loaded nails 3 Lift the jam clear latch 5 then pull up to open the nosepiece door 4 Remove bent nail using pliers if necessary 5 If driver blade is in the down position cycle the stall release lever 12 using enough force to fully slide it to the other end of the slot in ...

Page 14: ...guaranteed against defective material and workmanship We cannot guarantee repairs made or attempted by others You can also write to us for information at BOSTITCH 701 E Joppa Road Towson Maryland 21286 Attention Product Service Be sure to include all of the information shown on the nameplate of your tool model number type serial number etc Register Online Thank you for your purchase Register your ...

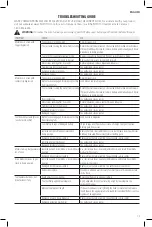
Page 15: ...orized service center Damaged Trigger See authorized service center Tool does not actuate motor runs but will not fire Dryfire lock out engaged blocking contact trip from traveling fully Load nails into magazine Low battery charge or damaged battery Check charge level if pack shows state of charge Charge or replace battery pack if necessary Jammed nail drive blade not returned to home position Rem...

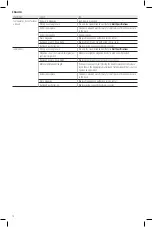
Page 16: ...nter Jammed nail Wrong size or angle nails Use only the recommended nails Refer to Nail Specifications Magazine screws not secured after previous jam clear inspection Make sure to tighten magazine hex bolts with wrench provided Damaged or worn driver blade Replace driver blade See authorized service center Material and fastener length If the unit continues to stall forcing the need to rotate the S...

Page 17: ...éviter pourrait poser des risques de dommages matériels AVERTISSEMENT lire tous les avertissements de sécurité et toutes les directives Le non respect des avertissements et des directives pourrait se solder par un choc électrique un incendie et ou une blessure grave AVERTISSEMENT afin de réduire le risque de blessures lire le mode d emploi de l outil Pour toute question ou remarque au sujet de cet...

Page 18: ...l est impossible d éviter l utilisation d un outil électrique dans un endroit humide brancher l outil dans une prise ou sur un circuit d alimentation dotés d un disjoncteur de fuite à la terre GFCI L utilisation de ce type de disjoncteur réduit les risques de choc électrique 3 Sécurité Personnelle a Être vigilant surveiller le travail effectué et faire preuve de jugement lorsqu un outil électrique...

Page 19: ...rs du bloc piles éviter tout contact avec ce liquide Si un contact accidentel se produit laver à grande eau Si le liquide entre en contact avec les yeux obtenir également des soins médicaux Le liquide qui gicle hors du bloc piles peut provoquer des irritations ou des brûlures 6 Réparation a Faire réparer l outil électrique par un réparateur professionnel en n utilisant que des pièces de rechange i...

Page 20: ...cage d attaches ou un ricochet des clous pourrait en résulter Vérifier l épaisseur du matériau avant d utiliser la cloueuse Un clou en dépassant pourrait causer des blessures Réglage de profondeur pour réduire tout risque de dommages corporels graves causés par le fonctionnement accidentel de l appareil lors du réglage de profondeur SYSTÉMATIQUEMENT ʵ ʵ Retirer le bloc piles ʵ ʵ Enclencher le verr...

Page 21: ...chargeur Consulter le tableau en fin de manuel pour connaître les compatibilités entre chargeurs et blocs piles LIRE TOUTES LES CONSIGNES Consignes Importantes de Sécurité Les Blocs Piles AVERTISSEMENT lire toutes les instructions et toutes les consignes de sécurité propres au bloc piles au chargeur et à l outil électrique Tout manquement aux avertissements et instructions pose des risques de déch...

Page 22: ...et le bloc piles doit être rechargé Fig B REMARQUE le témoin de charge ne fait qu indiquer le niveau de charge du bloc piles Il ne donne aucune indication quant au fonctionnement de l outil Son propre fonctionnement pourra aussi varier en fonction des composants produit de la température et de l application d utilisation Pour plus d informations quant au témoin de charge du bloc piles veuillez app...

Page 23: ...a reçu un coup fait une chute ou a été endommagé de quelque façon que ce soit Le ramener dans un centre de réparation agréé Ne pas démonter le chargeur Pour tout service ou réparation le rapporter dans un centre de réparation agréé Le fait de le réassembler de façon incorrecte comporte des risques de chocs électriques d électrocution et d incendie Débrancher le chargeur du secteur avant tout entre...

Page 24: ...plètement rechargé Installation Murale Ces chargeurs ont été conçus pour une installation murale ou pour être posés sur une table ou une surface de travail Pour une fixation murale installez le chargeur à proximité d une prise électrique et à l écart de coins ou de toute autre obstruction au passage de l air Utilisez l arrière du chargeur pour marquer l emplacement des vis de montage sur le mur Fi...

Page 25: ...geur 9 3 cm 3 7 Longueur 29 9 cm 11 8 Poids sans bloc piles 2 5 kg 5 6 lbs Inclinaison magasin Droit Capacité du chargeur 100 clous Fiche technique des clous Longueurs de clou droit 32 mm 64 mm 1 1 4 po 2 1 2 po Diamètres de tige Calibre 16 Angles des barrettes de clous Droit AVERTISSEMENT pour réduire le risque de blessures graves éteindre l outil et retirer le bloc piles avant d effectuer tout r...

Page 26: ...section portant sur les consignes de sécurité du présent guide 2 Porter des lunettes de protection et des protecteurs auditifs 3 S assurer que le chargeur ne contient aucune attache 4 S assurer que les éléments des déclencheurs par contact et du poussoir fonctionnent bien ne pas utiliser l outil si ces éléments ne fonctionnent pas correctement Ne JAMAIS utiliser l outil lorsque le déclencheur par ...

Page 27: ...t de sélectionner le mode de déclenchement AVERTISSEMENT éloigner SYSTÉMATIQUEMENT les doigts de la gâchette hors utilisation de l outil pour éviter toute décharge accidentelle de clous NE JAMAIS transporter l outil avec le doigt sur la gâchette En mode par contact l outil enfoncera un clou si le déclencheur par contact est heurté alors que la gâchette est appuyée Tir Séquentiel Utilisez le mode d...

Page 28: ...omatiquement après 20 secondes sauf si l outil continue à fonctionner Fig K 4 REMARQUE ces voyants servent à éclairer la surface de travail immédiate et ne sont pas destinés à être utilisés comme lampes de poche VOYANT DE CHARGE le voyant gauche clignotera quatre fois consécutives puis s éteindra pour indiquer que la pile est déchargée VOYANT D ENRAYAGE le voyant droit clignotera en continu si un ...

Page 29: ...xclusivement les accessoires BOSTITCH recommandés avec le présent produit Les accessoires recommandés pour cet outil sont vendus séparément au centre de service de votre région Pour obtenir de l aide concernant l achat d un accessoire communiquer avec BOSTITCH Industrial Tool Co 701 East Joppa Road Towson MD 21286 aux États Unis composer le 1 800 556 6696 ou visiter notre site Web www BOSTITCH com...

Page 30: ...nfère des droits légaux particuliers à l acheteur mais celui ci pourrait aussi bénéficier d autres droits variant d un état ou d une province à l autre En plus de la présente garantie les outils BOSTITCH sont couverts par notre CONTRAT D ENTRETIEN GRATUIT D UN AN BOSTITCH entretiendra l outil et remplacera les pièces usées au cours d une utilisation normale et ce gratuitement pendant une période d...

Page 31: ... de clous dans le magasin L outil cale empêchant le moteur de tourner Tourner alors le levier de désenrayage de l outil et le mécanisme sera libéré Si la lame de l enfonceur ne retourne pas à sa place retirer le bloc piles et repousser manuellement la lame de l enfonceur sur sa position de base Le déclencheur par contact est voilé Voir un centre de réparation agréé Le moteur cesse de tourner au bo...

Page 32: ...foncé Plus de clous dans le magasin Insérer des clous dans le magasin Taille ou angle de clous erroné Utiliser exclusivement les clous recommandés Se reporter au Caractéristiques des clous Débris dans le nez Nettoyer la zone du nez et vérifier qu il n y a aucun petit morceau de clous bloqués dans le rail Débris dans le magasin Nettoyer le magasin Magasin usé Remplacer le magasin Voir un centre de ...

Page 33: ...ndica una situación de peligro potencial que si no se evita podría provocar la muerte o lesiones graves ATENCIÓN Indica una situación de peligro potencial que si no se evita posiblemente provocaría lesiones leves o moderadas Utilizado sin palabras indica un mensaje de seguridad relacionado AVISO Se refiere a una práctica no relacionada a lesiones corporales que de no evitarse puede resultar en dañ...

Page 34: ...el uso de una herramienta eléctrica en un lugar húmedo es imposible de evitar utilice un suministro protegido con un interruptor de circuito por falla a tierra GFCI El uso de un GFCI reduce el riesgo de descargas eléctricas 3 Seguridad Personal a Permanezca alerta controle lo que está haciendo y utilice el sentido común cuando emplee una herramienta eléctrica No utilice una herramienta eléctrica s...

Page 35: ... clavos tornillos u otros objetos metálicos pequeños que puedan realizar una conexión desde un terminal al otro Los cortocircuitos en los terminales de la batería pueden provocar quemaduras o incendio d En condiciones abusivas el líquido puede ser expulsado de la batería Evite su contacto Si entra en contacto accidentalmente enjuague con agua Si el líquido entra en contacto con los ojos busque ate...

Page 36: ...etamente después de cada acción ʵ ʵ Utilice la herramienta en modo secuencial Cuando opere la unidad en modo de tope mantenga siempre el control de la herramienta La posición inadecuada de la herramienta puede provocar una descarga mal dirigida del clavo No coloque clavos en las cabezas de otros clavos Podría producirse un fuerte retroceso el atascamiento de los clavos o el rebote de los clavos Co...

Page 37: ... BATERÍAS Y CARGADORES La batería no viene completamente cargada de fábrica Antes de utilizar la batería y el cargador lea las siguientes instrucciones de seguridad y luego siga los procedimientos de carga indicados Cuando pida baterías de repuesto no olvide indicar el número de catálogo y el voltaje Su herramienta utiliza un cargador BOSTITCH Lea todas las instrucciones de seguridad antes de usar...

Page 38: ...niveles aproximados de carga que quedan en la batería según los indicadores siguientes 75 100 cargada 51 74 cargada 50 cargada La batería tiene que cargarse Para activar el indicador de carga presione y sostenga el botón del indicador Se iluminará una combinación de las tres luces LED verdes que indicará el nivel de carga que queda Cuando el nivel de carga está por debajo del nivel útil el indicad...

Page 39: ...gador ni coloque a este sobre una superficie blanda que pudiera bloquear las ranuras de ventilación y resultar en un calor interno excesivo Coloque el cargador en un lugar alejado de cualquier fuente de calor El cargador se ventila a través de las ranuras que se encuentran en la parte superior e inferior de la caja protectora No opere el cargador si su cable o enchufe están dañados No opere el car...

Page 40: ...argador si el ventilador no funciona adecuadamente o si las ranuras de ventilación están obstruidas No permita que entren objetos extraños dentro del cargador Sistema de Protección Electrónica Las herramientas con baterías de iones de litio están diseñadas con un Sistema de protección electrónico que protegerá la batería contra la sobrecarga el sobrecalentamiento o la descarga completa La herramie...

Page 41: ...éctrica ni tampoco ninguna de sus piezas Podría producir lesiones corporales o daños Consulte la Figura A al principio de este manual para obtener una lista completa de los componentes Uso debido Su clavadora inalámbrica ha sido diseñada para clavar clavos en piezas de trabajo de madera NO debe usarse en condiciones húmedas ni en presencia de líquidos o gases inflamables Su clavadora inalámbrica e...

Page 42: ...e firmemente insertada en la herramienta verifique que ésta no se salga sola Para retirar la unidad de batería de la herramienta presione el botón de liberación 15 y tire firmemente de la de batería para sacarla del mango de la herramienta Insértela en el cargador tal como se describe en la sección del cargador de este manual Fig E 14 15 Posición Adecuada de Las Manos Fig F ADVERTENCIA Parareducir...

Page 43: ... corporales 1 Cargue los clavos a través de la ranura de la parte trasera del cargador pasado el clip de retención 2 Tire del empujador 16 hasta que quede detrás de la barra de clavos y suelte 3 Asegúrese de que el empujador del cargador 16 se encuentra detrás de la última barra de clavos Fig H 7 16 Descarga de La Herramient Fig H ADVERTENCIA El botón de bloqueo del gatillo debe siempre estar bloq...

Page 44: ...mienta según el método de funcionamiento por tope 1 Apriete el gatillo 2 Empuje el activador por contacto contra la superficie de trabajo Siempre que el gatillo esté presionado la herramienta clavará un clavo cada vez que se presione el activador por contacto Esto permite al usuario clavar múltiples clavos en secuencia ADVERTENCIA No mantenga el gatillo presionado cuando la herramienta no esté en ...

Page 45: ...rramientas se usan a temperaturas bajo cero 1 Mantenga la herramienta tan caliente como pueda antes de usarla 2 Accione la herramienta 5 o 6 veces en madera de deshecho antes de usar Funcionamiento en Clima Cálido La herramienta debe funcionar con normalidad No obstante no exponga la herramienta a la luz solar directa ya que el calor excesivo puede dañar los topes u otras piezas de goma lo cual ca...

Page 46: ...ADALAJARA JAL Av La Paz 1779 Col Americana Sector Juárez 33 3825 6978 MEXICO D F Eje Central Lázaro Cárdenas No 18 Local D Col Obrera 55 5588 9377 MERIDA YUC Calle 63 459 A Col Centro 999 928 5038 MONTERREY N L Av Francisco I Madero 831 Poniente Col Centro 818 375 23 13 PUEBLA PUE 17 Norte 205 Col Centro 222 246 3714 QUERETARO QRO Av San Roque 274 Col San Gregorio 442 2 17 63 14 SAN LUIS POTOSI SL...

Page 47: ...e otorga derechos legales específicos además de los cuales puede tener otros dependiendo del estado o la provincia en que se encuentre Además de la garantía las herramientas BOSTITCH están cubiertas por 1 AÑO DE SERVICIO GRATUITO BOSTITCH mantendrá la herramienta y reemplazará las piezas gastadas por su uso normal sin cobro en cualquier momento durante un año a contar de la fecha de compra Los art...

Page 48: ...vadorporcontactoviajecompletamente Carguemásclavosenelcargador Laherramientasehaparado bloqueandoelmotoryno permitiendoquegire Girelapalancadeliberacióndeparadaenlaherramientayel mecanismoseliberará Silahojadelaguíanoregresa saque labateríayempujemanualmentelahojadelaguíahastala posicióninicial Activadorporcontactodoblado Consulteconuncentrodeservicioautorizado Elmotordejadefuncionardespuésde5segu...

Page 49: ...en el cargador Clavos de tamaño o ángulo incorrecto Use solamente los clavos recomendados Consulte el Especificación de los clavos Residuos en la tobera Limpie la tobera y observe detenidamente si hay pequeños trozos de clavos rotos atascados en el riel Residuos en el cargador Limpie el cargador Cargador desgastado Cambie el cargador Consulte con un centro de servicio autorizado Punta de la hoja d...

Page 50: ...BOSTITCH Industrial Tool Co 701 East Joppa Road Towson MD 21286 Jul17 Part No N539801 BCN662 Copyright 2017 BOSTITCH ...

Reviews: