background image

3

SAFETY INSTRUCTIONS

EYE PROTECTION which conforms to ANSI specifications and provides protection against
flying particles both from the FRONT and SIDE should ALWAYS be worn by the operator and
others in the work area when connecting to air supply, loading, operating or servicing this
tool. Eye protection is required to guard against flying fasteners and debris, which could
cause severe eye injury.

The employer and/or user must ensure that proper eye protection is worn.  Eye protection
equipment must conform to the requirements of the American National Standards Institute,
ANSI Z87.1 and provide both frontal and side protection. NOTE: Non-side shielded
spectacles and face shields alone do not provide adequate protection.

CAUTION: Additional Safety Protection will be required in some environments. For
example, the working area may include exposure to noise level which can lead to hearing
damage. The employer and user must ensure that any necessary hearing protection is
provided and used by the operator and others in the work area. Some environments will
require the use of head protection equipment. When required, the employer and user must
ensure that head protection conforming to ANSI Z89.1 is used.

AIR SUPPLY AND CONNECTIONS

Do not use oxygen, combustible gases, or bottled gases as a power source for this tool as
tool may explode, possibly causing injury.

Do not use supply sources which can potentially exceed 200 P.S.I.G. as tool may burst,
possibly causing injury.

The connector on the tool must not hold pressure when air supply is disconnected.  If a
wrong fitting is used, the tool can remain charged with air after disconnecting and thus will
be able to drive a fastener even after the air line is disconnected possibly causing injury.

Do not pull trigger or depress contact arm while connected to the air supply as the tool may
cycle, possibly causing injury.

Always disconnect air supply: 1.) Before making adjustments; 2.) When servicing the tool;
3.) When clearing a jam; 4.) When tool is not in use; 5.) When moving to a different work
area, as accidental actuation may occur, possibly causing injury.

LOADING TOOL

When loading tool:  1.) Never place a hand or any part of body in fastener discharge area of
tool;  2.) Never point tool at anyone;  3.) Do not pull the trigger or depress the trip as
accidental actuation may occur, possibly causing injury.

OPERATION

Always handle the tool with care:  1.) Never engage in horseplay;  2.) Never pull the trigger
unless nose is directed toward the work;  3.) Keep others a safe distance from the tool while
tool is in operation as accidental actuation may occur, possibly causing injury.

The operator must not hold the trigger pulled on contact arm tools except during fastening
operation as serious injury could result if the trip accidentally contacted someone or
something, causing the tool to cycle.

Keep hands and body away from the discharge area of the tool.  A contact arm tool may
bounce from the recoil of driving a fastener and an unwanted second fastener may be
driven possibly causing injury.

Check operation of the contact arm mechanism frequently.  Do not use the tool if the arm
is not working correctly as accidental driving of a fastener may result.  Do not interfere with
the proper operation of the contact arm mechanism.

Do not drive fasteners on top of other fasteners or with the tool at an overly steep angle as
this may cause deflection of fasteners which could cause injury. 

Do not drive fasteners close to the edge of the work piece as the wood may split, allowing
the fastener to be deflected possibly causing injury.

This nailer produces SPARKS during operation. NEVER use the nailer near flammable
substances, gases or vapors including lacquer, paint, benzine, thinner, gasoline, adhesives,
mastics, glues or any other material that is -- or the vapors, fumes or byproducts of which are --
flammable, combustible or explosive. Using the nailer in any such environment could cause an
EXPLOSION resulting in personal injury or death to user and bystanders.

MAINTAINING THE TOOL

When working on air tools note the warnings in this manual and use extra care when
evaluating problem tools.

Summary of Contents for SB-150SLBC

Page 1: ...ARA FUTURA REFERENCIA SI TIENE ALGUNA DUDA COMUN QUESE CON SU REPRESENTANTE DE BOSTITCH O CON SU DISTRIBUIDOR LIRE ATTENTIVEMENT LE PR SENT MANUEL AVANT D UTILISER L APPAREIL PR TER UNE ATTENTION TOUT...

Page 2: ...il purchaser that the product purchased is free from defects in material and workmanship and agrees to repair or replace at Bostitch s option any defective Bostitch branded pneumatic stapler or nailer...

Page 3: ...3 When clearing a jam 4 When tool is not in use 5 When moving to a different work area as accidental actuation may occur possibly causing injury LOADING TOOL When loading tool 1 Never place a hand or...

Page 4: ...under Contact Trip The Sequential Trip Tool has a positive safety advantage because it will not accidentally drive a fastener if the tool is contacted against the work or anything else while the oper...

Page 5: ...wear in pneumatic tools A filter will help to get the best performance and minimum wear from the tool The filter must have adequate flow capacity for the specific installation The filter has to be ke...

Page 6: ...fasteners and debris which could cause severe eye injury The employer and or user must ensure that proper eye protection is worn Eye protection equipment must conform to the requirements of the Americ...

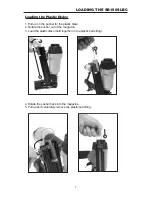
Page 7: ...Pull up on the pusher for the plastic disks 2 Rotate the pusher out of the magazine 3 Load the plastic disks held together on the plastic pull string 3 4 5 4 Rotate the pusher back into the magazine...

Page 8: ...se 2 Pull pusher back to stop staple feeding 3 Open door in front of nose by releasing latch 4 Remove jammed staple 5 Close door and reconnect latch 6 Bring pusher forward to restart staple feeding 7...

Page 9: ...he air hose Do not alter or modify this tool from the original design or function without approval from BOSTITCH Always be aware that misuse and improper handling of this tool can cause injury to your...

Page 10: ...STENER OPERATION To operate the tool in this manner hold the tool with the contact trip pointing towards but not touching the work surface Pull the trigger and then tap the contact trip against the wo...

Page 11: ...the trigger and cycle is complete CAUTION THE TOOL WILL CYCLE EACH TIME THE TRIGGER INTERLOCKAND TRIGGER IS PULLED MAINTAINING THE PNEUMATIC TOOL When working on air tools note the warnings in this m...

Page 12: ...eve not seated correctly on bottom bumper Disassemble to correct Head valve dry Disassemble lubricate Air pressure too low Check air supply equipment Skipping fasteners intermittent feed Worn bumper R...

Page 13: ...13...

Page 14: ...titch L P garantiza al comprador del comerciante original que el producto comprado est exento de defectos en material y fabricaci n y se compromete a reparar o reemplazar a opci n de Bostitch cualquie...

Page 15: ...e efectuar ajustes 2 Al hacerle servicio a la herramienta 3 Al despejar un atascamiento 4 Cuando la herramienta no est en uso 5 Al mudarse de un rea distinta de trabajo ya que se puede activar acciden...

Page 16: ...eguridad porque no aplica accidentalmente un clavo si la herramienta toma contacto con la superficie de trabajo o con otra cosa mientras el operador mantiene el gatillo accionado IDENTIFICACI N DEL MO...

Page 17: ...ltar til un filtro para obtener el mejor rendimiento y minimizar el desgaste de la herramienta El filtro debe tener una capacidad de flujo adecuada para la instalaci n espec fica El filtro debe manten...

Page 18: ...cual puede causar lesiones graves a los ojos El empleador y o el usuario deben asegurar que se protejan debidamente los ojos El equipo de protecci n ocular debe estar en conformidad con los requisito...

Page 19: ...el empujador de los discos de pl stico 2 Gire el empujador para sacarlo del alimentador 3 Cargue los discos de pl stico que est n juntos en la cuerda de pl stico removible 3 4 5 4 Gire el empujador de...

Page 20: ...Jale hacia atr s el empujador para dejar de alimentar grapas 3 Abra la puerta frente a la punta soltando el pestillo 4 Quite la grapa atascada 5 Cierre la puerta y reconecte el pestillo 6 Traiga hacia...

Page 21: ...ltere ni modifique esta herramienta del dise o o funci n original sin la aprobaci n de BOSTITCH Siempre tenga presente que el uso indebido o la manipulaci n incorrecta de esta herramienta puede causar...

Page 22: ...ra usar la herramienta de esta manera sost ngala con el disparo de contacto apuntando hacia la superficie de trabajo pero sin tocarla Accione el gatillo y luego golpee el disparo de contacto contra la...

Page 23: ...car el clavo o grapa Libere el gatillo y se termina el ciclo PRECAUCI N LAHERRAMIENTAHAR UN CICLO CADAVEZ QUE SEACCIONEN EL ENCLAVAMIENTO Y EL GATILLO MANTENIMIENTO DE LA HERRAMIENTA NEUM TICA Al trab...

Page 24: ...ulsor para limpiar El manguito del cilindro no est asentado correctamente en el tope inferior Des rmelo para corregir esto La v lvula cabezal est seca Des rmela y lubr quela La presi n de aire est dem...

Page 25: ...25...

Page 26: ...it est exempt de tout d faut de mat riaux et de fabrication et accepte le cas ch ant de r parer ou de remplacer la discr tion de Bostitch toute agrafeuse ou cloueuse de marque Bostitch d fectueuse pou...

Page 27: ...de sa source d nergie 1 avant tout r glage 2 lors de l entretien 3 lors d un d senrayage 4 la fin de l utilisation 5 lors du d placement vers une nouvelle zone de travail car un d clenchement accident...

Page 28: ...clencheur s quentiel offre un r el avantage de s curit En effet un dispositif ne sera pas accidentellement fix si l outil entre en contact avec l ouvrage ou quoi que ce soit d autre si l op rateur n a...

Page 29: ...e de l usure des outils pneumatiques L utilisation d un filtre permettra d obtenir de meilleures performances ainsi qu une usure minimum de l outil Le filtre doit pouvoir couler l air de fa on ad quat...

Page 30: ...attaches et d bris projet s susceptibles d entra ner des blessures s rieuses L employeur et ou l utilisateur doivent s assurer qu une protection des yeux est port e L quipement de protection doit tre...

Page 31: ...ssoir des disques de plastique 2 Tournez le poussoir pour le sortir du magasin 3 Chargez les disques de plastique tenus ensemble par le fil tirette de plastique 3 4 5 4 Tournez le poussoir pour l enga...

Page 32: ...tractez le pousseur pour arr ter l alimentation en agrafes 3 Ouvrez la porte devant le nez de pose en rel chant le loquet 4 Retirez l agrafe coinc e 5 Refermez la porte et r enclenchez le loquet 6 Ava...

Page 33: ...Ne modifiez pas la conception ou la fonction originale de l outil sans avoir obtenu l accord de BOSTITCH Gardez toujours pr sent l esprit qu une utilisation ou une manipulation incorrecte de cet outil...

Page 34: ...TION RAPIDE D ATTACHES Pour utiliser l outil de cette mani re commencez par tenir la but e de d clenchement au dessus de la surface de travail mais sans tablir le contact Appuyez sur la g chette puis...

Page 35: ...ion Rel chez la g chette le cycle est termin ATTENTION L OUTIL COMMENCE UN CYCLE D S QUE LAS RET EST RETIR E ET QUE LAG CHETTE EST ENCLENCH E MAINTENANCE DE L OUTIL PNEUMATIQUE Lorsque vous travaillez...

Page 36: ...in de corriger le probl me La soupape manque de lubrification D montez lubrifiez La pression d air est trop basse V rifiez l quipement d alimentation d air Saut de dispositifs de fixation alimentation...

Reviews: