background image

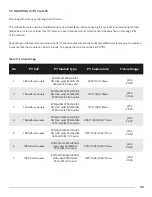
Table 3:  Short Side Mounting

5.4 GROUNDING 

1.   All module frames and mounting racks must be properly grounded in accordance with the National Electrical Code 

and any local jurisdictions.

2.   The modules are required to be grounded, and the module installation needs to comply with all local electrical codes 

and regulations. Additionally, the grounding connection should be made by a qualified electrician.

3.   Proper grounding is achieved by bounding the module frame and all metallic structural components together using 

a suitable grounding conductor. The grounding conductor or strap may be copper, copper alloy, or another material 
acceptable for use as an electrical conductor per respective National Electrical Codes. The grounding conductor must 
make a connection to earth using a suitable earth ground electrode.

4.   Where common grounding hardware (nuts, bolts, star washers, split-ring lock washers, flat washers, etc.) is used 

to attach a grounding/bonding system, the attachment must be made in conformance with the manufacturer’s 
instructions of grounding devices used in the system.

6   Common hardware items such as nuts, bolts, star washers, lock washers and the like have not been evaluated 

for electrical conductivity or for use as grounding devices and should be used only for maintaining mechanical 
connections and holding electrical grounding devices in the proper position for electrical conductivity. Such devices, 
when supplied with the module and evaluated through the requirements in IEC and UL standard, may be used for 
grounding connections in accordance with the instructions provided with the module.

7.   Boviet Solar recommends the method below: 


1.   A grounding kit with M4 size SS cap bolt, M4 size SS flat washer, M4 size SS cup washer, and M4 size SS nut (with teeth)  

is to be attach a copper grounding wire to a grounding hole pre-drilled on the frame. 


2.   Attach the wire between the flat washer and the cup washer. Ensure the cup washer is between the frame and the wire 

with concave side up to prevent corrosion due to dissimilar metal. Tighten the bolt securely using the SS nut with teeth  
(a wrench may be used in this application.) The tighten torque should be 2-3N*m.

8.   Alternate grounding options built into the racking system are acceptable as long as they have been UL approved.

No

PV Cell

PV Module Type

PV Module 

Width(mm) 

Fixture Range(mm)

1

182

All

1134

J:80

2

166

All

1046

J:60

3

158.75

All

1002/1004

J:50

11

Summary of Contents for Vega BVM6610M S-H-HC-BFDG Series

Page 1: ......

Page 2: ...ING AND STORAGE INFORMATION SAFETY PRECAUTIONS INFORMATION ENVIRONMENTAL CONDITIONS INFORMATION 4 1 ENVIRONMENTAL CONDITIONS 4 2 INSTALLATION SITE MOUNTING OVERVIEW 5 1 MOUNTING 5 2 MOUNTING WITH BOLT...

Page 3: ...when it is electrically in accordance with the instructions presented below and the National Electrical Code Any module without a frame laminator should not be considered to comply with the requireme...

Page 4: ...d to prevent danger damage and failure DO NOT touch electrically active parts of the panel such as the output wiring without the adequate safety protection Bare contact may cause an arc or shock that...

Page 5: ...ay by trees buildings or any other surrendering objects 2 Solar modules should normally be mounted facing the equator at an angle to the horizontal plane equivalent to the latitude of the installation...

Page 6: ...OS components The system installer or trained professional personnel must be responsible for the PV system s design installation mechanical load calculation and security of the system Regardless of th...

Page 7: ...H HC BF DG 120 cells BVM6610M XXXL H HC BF 120 cells 1727 1002 1004 35mm A 960 B 1200 6 158 full cell module BVM6612M XXXL H BF DG 144 cells BVM6612M XXXL H BF 144 cells 2015 1002 1004 35mm A 900 B 1...

Page 8: ...under any circumstances as this will not void the warranty 5 2 MOUNTING WITH BOLTS There are four 4 9 14mm and six 7 10mm size mounting holes at each panel to mount the modules on a supporting structu...

Page 9: ...F DG 144 cells BVM7612M XXX H HC BF 144 cells 2296 1134 35mm J 350 K 500 2 166 Half cut module BVM6612M XXXS H HC BF DG 144 cells BVM6612M XXXS H HC BF 144 cells 2135 1046 35mm J 385 K 530 3 166 Half...

Page 10: ...Figure 5 PV Module I J and K represent the range of the fixture A and B represent the module size Figure 6 PV Module I PV module installed at long side with clamp fitting method 09...

Page 11: ...Figure 7 PV Module I Short Side Mounting Figure 8 PV Module I PV module installed at short side with clamp fitting method 10...

Page 12: ...nuts bolts star washers lock washers and the like have not been evaluated for electrical conductivity or for use as grounding devices and should be used only for maintaining mechanical connections an...

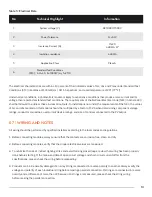
Page 13: ...id quality AC Power Boviet Solar produces following models XXX presents the power range Table 4 PV Module Model No PV Module Type PV Module Model 1 Bifacial Double Glass module BVM7612M XXX H HC BF DG...

Page 14: ...Current A 15 20 40M M2 4 Insulation resistance 40M 5 Application Class Class A 6 Standard Test Conditions STC AM 1 5 E 1000W m2 T 25 C 07 WIRING AND NOTES All wiring should be performed by qualified...

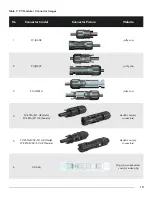
Page 15: ...www amphenol Solar com 7 Amphenol Industrial Operations Helios HH4 Assembled Helios HH4 Assembled www amphenol Solar com 8 Zhe Jiang Renhe 05 6 2q 05 6 2q www renhesolar com cn index php Table 6 PV M...

Page 16: ...Website 1 PV JM608 jmthy com 2 PV JM601 jmthy com 3 PV JM601A jmthy com 4 PV KSTA 611 UR Male PV KBTA 611 UR Female staubli com en connectors 5 PV KSTA EV02 611 UR Made PV KBT4 EV02 611 UR Female sta...

Page 17: ...need to be cleaned clean modules with a soft cloth together with a mild detergent and clean water To avoid severe thermal shocks which might damage the module use water at a similar temperature to th...

Reviews: