background image

          Leave the product in its original packing box until it is ready for installation.

          If pallets are stored outside temporarily, a protective covering over the pallet should be placed to protect products 

from direct weathering.  Pallets should not be stacked more than one pallet high.

          At the installation site, keep modules and electrical contacts clean and dry before installation.

          Do not stack more than the maximum amount of allowable pallets on top of each other.  Do not exceed two layers  

of pallets high.

           Do not place modules directly on top of each other.

          Do not place excessive loads on the module or twist the module frame.

          Do not stand, step, walk and/or jump on the module.

          Do not carry a module by its wires or junction box but by its frame with both hands by two or more persons.

           Do not mark the module with a sharp instrument.


3.

4.

5.

6.

7.

8.

9.

10.

11.

|


SAFETY INFORMATION

The instructions in this safety manual are intended to prevent danger, damage, and failure.

DO NOT touch electrically active parts of the panel, such as the output wiring, without the adequate safety protection. 
Bare contact may cause an arc or shock that can lead to injury or even death. Do not use a module that is broken, torn, 
or damaged. Non-conformity may cause damage, failure, and/or serious bodily injury.

1.   Before installing a system, contact the appropriate authorities for site installation, inspection permission/s  

and requirement/s.

2.   Operators shall foresee the risk of injury during the processes of installation, troubleshooting and maintenance  

of the modules. Therefore, only authorized, and trained personnel should have access to, and perform work  
on the modules or system.

3.   Ensure that modules meet the technical requirements of the system as a whole.

4.   When connecting the modules, remove all metallic jewelry, use properly insulated tools, and wear appropriate 

personal protective equipment to reduce the risk of electrical injury.

5.   Do not disassemble the modules or remove any part of the module.

6.   Do not stand, step on, damage, or scratch surfaces of the module.

03

Summary of Contents for Vega BVM6610M S-H-HC-BFDG Series

Page 1: ......

Page 2: ...ING AND STORAGE INFORMATION SAFETY PRECAUTIONS INFORMATION ENVIRONMENTAL CONDITIONS INFORMATION 4 1 ENVIRONMENTAL CONDITIONS 4 2 INSTALLATION SITE MOUNTING OVERVIEW 5 1 MOUNTING 5 2 MOUNTING WITH BOLT...

Page 3: ...when it is electrically in accordance with the instructions presented below and the National Electrical Code Any module without a frame laminator should not be considered to comply with the requireme...

Page 4: ...d to prevent danger damage and failure DO NOT touch electrically active parts of the panel such as the output wiring without the adequate safety protection Bare contact may cause an arc or shock that...

Page 5: ...ay by trees buildings or any other surrendering objects 2 Solar modules should normally be mounted facing the equator at an angle to the horizontal plane equivalent to the latitude of the installation...

Page 6: ...OS components The system installer or trained professional personnel must be responsible for the PV system s design installation mechanical load calculation and security of the system Regardless of th...

Page 7: ...H HC BF DG 120 cells BVM6610M XXXL H HC BF 120 cells 1727 1002 1004 35mm A 960 B 1200 6 158 full cell module BVM6612M XXXL H BF DG 144 cells BVM6612M XXXL H BF 144 cells 2015 1002 1004 35mm A 900 B 1...

Page 8: ...under any circumstances as this will not void the warranty 5 2 MOUNTING WITH BOLTS There are four 4 9 14mm and six 7 10mm size mounting holes at each panel to mount the modules on a supporting structu...

Page 9: ...F DG 144 cells BVM7612M XXX H HC BF 144 cells 2296 1134 35mm J 350 K 500 2 166 Half cut module BVM6612M XXXS H HC BF DG 144 cells BVM6612M XXXS H HC BF 144 cells 2135 1046 35mm J 385 K 530 3 166 Half...

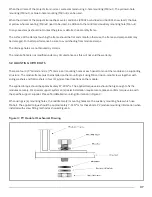
Page 10: ...Figure 5 PV Module I J and K represent the range of the fixture A and B represent the module size Figure 6 PV Module I PV module installed at long side with clamp fitting method 09...

Page 11: ...Figure 7 PV Module I Short Side Mounting Figure 8 PV Module I PV module installed at short side with clamp fitting method 10...

Page 12: ...nuts bolts star washers lock washers and the like have not been evaluated for electrical conductivity or for use as grounding devices and should be used only for maintaining mechanical connections an...

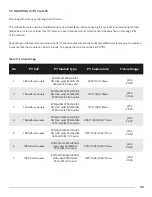
Page 13: ...id quality AC Power Boviet Solar produces following models XXX presents the power range Table 4 PV Module Model No PV Module Type PV Module Model 1 Bifacial Double Glass module BVM7612M XXX H HC BF DG...

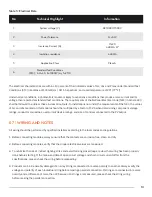
Page 14: ...Current A 15 20 40M M2 4 Insulation resistance 40M 5 Application Class Class A 6 Standard Test Conditions STC AM 1 5 E 1000W m2 T 25 C 07 WIRING AND NOTES All wiring should be performed by qualified...

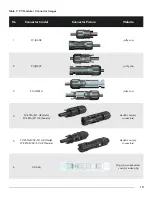
Page 15: ...www amphenol Solar com 7 Amphenol Industrial Operations Helios HH4 Assembled Helios HH4 Assembled www amphenol Solar com 8 Zhe Jiang Renhe 05 6 2q 05 6 2q www renhesolar com cn index php Table 6 PV M...

Page 16: ...Website 1 PV JM608 jmthy com 2 PV JM601 jmthy com 3 PV JM601A jmthy com 4 PV KSTA 611 UR Male PV KBTA 611 UR Female staubli com en connectors 5 PV KSTA EV02 611 UR Made PV KBT4 EV02 611 UR Female sta...

Page 17: ...need to be cleaned clean modules with a soft cloth together with a mild detergent and clean water To avoid severe thermal shocks which might damage the module use water at a similar temperature to th...

Reviews: