background image

Assembly / Owner’s Manual

31

How Often Should You Exercise

&RQVXOWDSK\VLFLDQEHIRUH\RXVWDUWDQH[HUFLVHSURJUDP6WRSH[HUFLVLQJLI\RXIHHOSDLQRUWLJKWQHVVLQ\RXUFKHVWEHFRPHVKRUW
RIEUHDWKRUIHHOIDLQW&RQWDFW\RXUGRFWRUEHIRUH\RXXVHWKHPDFKLQHDJDLQ8VHWKHYDOXHVFDOFXODWHGRUPHDVXUHGE\WKH
PDFKLQH·VFRPSXWHUIRUUHIHUHQFHSXUSRVHVRQO\7KHKHDUWUDWHGLVSOD\HGRQWKHFRQVROHLVDQDSSUR[LPDWLRQDQGVKRXOGEHXVHG

for reference only.

•  3 times a week for about 14 minutes each day.
•  Schedule workouts in advance and try to follow the schedule.


Note: 

,I\RXDUHQHZWRH[HUFLVHRUUHWXUQLQJWRDUHJXODUH[HUFLVHSURJUDPDQG\RXDUHXQDEOHWRFRPIRUWDEO\FRPSOHWHPLQXWHVRIFRQ
WLQXRXVH[HUFLVHDWRQHWLPHMXVWGR±PLQXWHVDQGJUDGXDOO\LQFUHDVH\RXUZRUNRXWWLPHXQWLO\RXFDQUHDFKDPLQXWHWRWDO

Intensity of Workout

To increase the intensity of your workout:
•  Push yourself to increase the number of Pedal revolutions per minute 
•  Place your feet further out toward the rear of the Pedals
•  Increase the Intensity Level and keep your RPM consistent, or increase it as well
•  Use your upper and lower body at different levels
•  Shift your grip location on the Upper Handlebars to work out other parts of your upper body

Hand Placement (Grip Selection)

7KH¿WQHVVPDFKLQHLVHTXLSSHGZLDQGOHEDUVWKDWDOORZIRUDYDULHW\RIXSSHUERG\ZRUNRXWV:KHQVWDUWLQJRXWSODFH\RXUKDQGVZKHUH
LWIHHOVPRVWFRPIRUWDEOHDQGVWDEOHRQWDQGOHEDUV$V\RXSURJUHVVRQ\RXU¿WQHVVURXWLQHVKLIW\RXUKDQGSODFHPHQWWRWDUJHWGLIIHUHQW

muscle groups.

([HUFLVHRQWKLVPDFKLQHUHTXLUHVFRRUGLQDWLRQDQGEDODQFH%HVXUHWRDQWLFLSDWHWKDWFKDQJHVLQVSHHGDQGUHVLVWDQFHOHYHOFDQ

occur during workouts, and be attentive in order to avoid loss of balance and possible injury.

The Static Handlebars can also be used to add stability and allow you to focus the workout more on your legs.

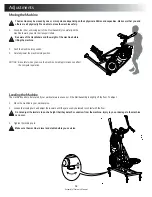
Mounting and Dismounting Your Machine

Care should be used when mounting or dismounting the machine.

%HDZDUHWKDWWKH3HGDODQGOHEDUVDUHFRQQHFWHGDQGZKHQHLWKHURIWKHVHSDUWVPRYHWKHRWKHUGRHVDVZHOO,QRUGHUWR
DYRLGSRVVLEOHVHULRXVLQMXU\JUDVSWKDQGOHEDUVWRVWHDG\\RXUVHOI

Be sure there is nothing under the Pedals or in the Air Resistance Fan before moving anything on the machine. 

7RPRXQW\RXU¿WQHVVPDFKLQH

1.   Move the Pedals until the one nearest to you is in the lowest position.
2.   Grasp the Static Handlebars under the Console Button Assembly.
3.   Steadying yourself with the Static Handlebars, step up onto the lowest Pedal and place your other foot onto the opposite Pedal.


Note:  "Bottomed out” is when the User is unable to start a workout because the Pedals will not move. If this occurs, safely grasp the Static 

Handlebars and apply your weight to the heel of the higher foot. While still grasping the Static Handlebar, lean back slightly applying 
more weight onto the heel. Once the Pedals begin to move, resume your intended workout.

Operations

Summary of Contents for Max Trainer M5

Page 1: ...M5 OWNER S ASSEMBLY MANUAL OWNER S ASSEMBLY MANUAL Manual en Espa ol Latino Americano www support nautilus com...

Page 2: ...Purchase _______________________ 7R UHJLVWHU RXU SURGXFW ZDUUDQW JR WR ZZZ ERZ H FRP UHJLVWHU RU FDOO I RX KDYH TXHVWLRQV RU SUREOHPV ZLWK RXU SURGXFW SOHDVH FDOO Table of Contents Registration 1DXWL...

Page 3: ...FRQGLWLRQ RQWDFW Nautilus Customer Service for repair information Not intended for use by persons with medical conditions where those conditions may impact the safe operation of the machine or pose a...

Page 4: ...This machine is for home use only R QRW ZHDU ORRVH FORWKLQJ RU MHZHOU 7KLV PDFKLQH FRQWDLQV PRYLQJ SDUWV R QRW SXW QJHUV RU RWKHU REMHFWV LQWR PRYLQJ SDUWV RI WKH H HUFLVH equipment Set up and operate...

Page 5: ...the separation between the equipment and receiver Connect the equipment into an outlet on a circuit different from that to which the receiver is connected RQVXOW WKH GHDOHU RU DQ H SHULHQFHG UDGLR 79...

Page 6: ...n attaching 2 pieces lightly lift and look through the bolt holes to help insert the bolt through the holes The assembly requires 2 people Machine Mat 7KH RZ H 0D 7UDLQHU 0DFKLQH 0DW LV DQ RSWLRQDO DF...

Page 7: ...Handlebar Right 11 1 Rail Assembly 1 Upper Handlebar Left 12 1 Stabilizer Assembly 7 2 Leg 13 1 Static Handlebar Assembly 8 2 Foot Pad 14 2 Cap 9 2 Foot Pad Insert 15 1 Heart Rate Chest Strap 10 2 Pe...

Page 8: ...RFNHW HDG H 6FUHZ 0 J 4 DVKHU ODW 0 C 12 DVKHU ODW 0 K 2 DVKHU ODW 0 D 6RFNHW HDG H 6FUHZ 0 L 4 DVKHU ODW 0 E 1 3DQ 3KLOOLSV 6FUHZ 0 M 10 RFN DVKHU 0 F 2 Cap N Lock Washer M8 G 4 Lock Nut M8 O 2 DYH D...

Page 9: ...from the Shipping Plate 6RPH FRPSRQHQWV RI WKH PDFKLQH FDQ EH KHDY RU DZNZDUG 8VH D VHFRQG SHUVRQ ZKHQ GRLQJ WKH DVVHPEO VWHSV LQYROYLQJ WKHVH parts Do not do steps that involve heavy lifting or awkwa...

Page 10: ...H FDQ EH KHDY RU DZNZDUG 8VH D VHFRQG SHUVRQ ZKHQ GRLQJ WKH DVVHPEO VWHSV LQYROYLQJ WKHVH SDUWV R QRW GR VWHSV WKDW LQYROYH KHDY OLIWLQJ RU DZNZDUG PRYHPHQWV RQ RXU RZQ LIW WKH UDPH VVHPEO IURP WKH H...

Page 11: ...Assembly Owner s Manual 11 3 Attach Rear Shroud and Caps to the Frame Assembly NOTICE Place the inside hook of the Rear Shroud on the Frame Assembly and then pivot it up into place 14 14 2 2 X1 E...

Page 12: ...Assembly Owner s Manual 12 4 Attach Legs to Frame Assembly Be aware that the Legs are connected and when either of these parts move the other does as well K X2 N D F 6mm 7 7 X2 O...

Page 13: ...13 5 Attach Pedals to Frame Assembly In order to avoid possible serious injury when inserting the tube ends into the Leg Assemblies be careful to avoid fingers or hands being caught or pinched B X4 6...

Page 14: ...Assembly Owner s Manual 14 6 Connect the Foot Pads and then the Foot Pad Inserts 9 X2 X8 5mm 8 8 A...

Page 15: ...KHVH SDUWV PRYH WKH RWKHU GRHV DV ZHOO 6RPH FRPSRQHQWV RI WKH PDFKLQH FDQ EH KHDY RU DZNZDUG 8VH D VHFRQG SHUVRQ ZKHQ GRLQJ WKH DVVHPEO VWHSV LQYROYLQJ WKHVH parts Do not do steps that involve heavy l...

Page 16: ...Assembly Owner s Manual 16 8 Connect the Static Handlebar Assembly to Frame Assembly NOTICE Do not crimp the Console Cable 13 5mm X4 L M H...

Page 17: ...t your machine to ensure that all hardware is tight and components are properly assembled H VXUH WR UHFRUG WKH VHULDO QXPEHU LQ WKH HOG SURYLGHG DW WKH IURQW RI WKLV PDQXDO Do not use until the machin...

Page 18: ...ition 3 Carefully lower the machine into position NOTICE Be careful when you move the machine All abrupt motions can affect the computer operation LevelingtheMachine 7KH PDFKLQH QHHGV WR EH OHYHOHG LI...

Page 19: ...r F Power Connector N Upper Handlebar G Transport Roller O Bluetooth Connectivity not shown H Leveler 8VH WKH YDOXHV FDOFXODWHG RU PHDVXUHG E WKH PDFKLQH V FRPSXWHU IRU UHIHUHQFH SXUSRVHV RQO 7KH KHDU...

Page 20: ...workout the total time of the workout will count down 7KH PD LPXP GLVSOD LV I WKH WLPH FRXQW LV PRUH WKH ZRUNRXW ZLOO EH HQGHG USER TOTAL ACTIVE REST TOTAL Workout Pro le Display Time Total Time PAUS...

Page 21: ...t Rate display shows the heart rate in beats per minute BPM from the heart rate sensors This value will not be shown if a heart rate signal is not detected RQVXOW D SK VLFLDQ EHIRUH RX VWDUW DQ H HUFL...

Page 22: ...is synced Note If the Bluetooth synced indicator light is active and your Bluetooth enabled device is not V QFHG WKH WQHVV PDFKLQH PD KDYH V QFHG WR DQRWKHU OXHWRRWK enabled device Turn the SRZHU RII...

Page 23: ...back KHFN WKDW WKH ZHW HOHFWURGH DUHDV DUH UPO DJDLQVW RXU VNLQ The transmitter will send your heart rate to the machine s receiver and display your estimated Beats Per Minute BPM Always remove the tr...

Page 24: ...the more fat your body will burn The graph is a brief guideline describing the generally suggested target heart rates based on age As noted above your optimal target rate may be higher or lower Consul...

Page 25: ...H Body Weight Loss Guide included in this manual Consistency XV ZRUN VFKHGXOHV IDPLO REOLJDWLRQV DQG GDLO FKRUHV FDQ PDNH LW GLI FXOW WR W UHJXODU H HUFLVH LQWR RXU OLIH 7U WKHVH WLSV WR LQFUHDVH RXU...

Page 26: ...KH RRU Each repetition of the sequence should take 1 to 3 seconds 5HSHDW DV D FRQWLQXRXV FRQWUROOHG XLG VHTXHQFH RU times Repeat the stretch with the other leg Dynamic Knee Kick Stand tall and hold on...

Page 27: ...VHTXHQFH 10 or 20 times Repeat the stretch with the other leg Touch a wall or hold onto something for balance if necessary Dynamic Side Reach Stand with the feet apart the knees slightly bent and the...

Page 28: ...workout in a shorter period of time Using the Calorie Burn Rate display you can adjust the intensity of your workout quickly to achieve your goals 7KH RZ H 0D 7UDLQHU cardio machine combines 8 ACTIVE...

Page 29: ...XVLQJ RXU FDUGLR PDFKLQH FRQVLGHU GRLQJ WKHVH UHOD LQJ VWUHWFKHV ZKLFK ZLOO KHOS RXU ERG UHFRYHU IURP WKH ZRUNRXW DQG PDNH RX PRUH H LEOH Lying Leg Raise LH RQ WKH RRU IDFH XS ZLWK WKH OHJV VOLJKWO E...

Page 30: ...nd across the thigh Twist the upper body as far as comfortably possible to one side Hold the stretch for 10 to 30 seconds Repeat the stretch on the other side Seated Figure Four 6LW RQ WKH RRU DQG H W...

Page 31: ...XU KDQGV ZKHUH LW IHHOV PRVW FRPIRUWDEOH DQG VWDEOH RQ WKH 8SSHU DQGOHEDUV V RX SURJUHVV RQ RXU WQHVV URXWLQH VKLIW RXU KDQG SODFHPHQW WR WDUJHW GLIIHUHQW muscle groups HUFLVH RQ WKLV PDFKLQH UHTXLUHV...

Page 32: ...WR DYRLG SRVVLEOH VHULRXV LQMXU JUDVS WKH 6WDWLF DQGOHEDUV WR VWHDG RXUVHOI UDVS WKH 6WDWLF DQGOHEDUV XQGHU WKH RQVROH XWWRQ VVHPEO 7 Steadying yourself with the Static Handlebars step up onto the low...

Page 33: ...7KH UVW ZRUNRXW VHJPHQW LV DQ 7 9 LQWHUYDO WKDW ODVWV IRU D VKRUWHU SHULRG RI WLPH 6DIHO SXVK RXUVHOI WR JHW WKH XUQ 5DWH GLVSOD LQWR the Target Burn Rate red LED s and keep it in the range until the...

Page 34: ...l adjust the resistance level to assist the User to reach the Target Burn Rate Note 7KH RUNRXW 3UR OH LVSOD ZLOO DGMXVW WKH XUQ 5DWH SUR OH WR WKH FXUUHQW 8VHU VHWWLQJV Calorie Goal 7KH DORULH RDO ZRU...

Page 35: ...y At the end of the 3 minutes the Console measures your heart rate and the power output These numbers along with information about your age and weight are computed to produce a Fitness Score Note LWQH...

Page 36: ...LVSOD WKH 7 SURPSW ZLWK WKH GHIDXOW ZHLJKW YDOXH 8VH WKH XUQ 5DWH QFUHDVH RU XUQ 5DWH HFUHDVH EXW tons to adjust the value and push START ENTER to set the value 7KH RQVROH ZLOO GLVSOD WKH 7 SURPSW ZLW...

Page 37: ...n Rate level 10 Push the START ENTER button to set the displayed value Note 7KLV SURFHGXUH DOVR ZRUNV ZLWK WKH 60 57 0 QWHUYDO 3URJUDP 7KH RUNRXW GHIDXOWV FDQ EH UHVHW LQ WKH 8VHU 3UR OH VHWWLQJV Cust...

Page 38: ...0RGH VFUHHQ 2 The Console display shows the Sound Settings prompt with the current setting Push the Burn Rate Increase or Burn Rate Decrease buttons to change between the settings of OFF and 1 throug...

Page 39: ...ZRUNRXW XVH a damp cloth to wipe your machine and Console free of sweat 1RWH YRLG H FHVVLYH PRLVWXUH RQ WKH RQVROH Weekly Check for smooth roller operation Wipe the machine to remove dust dirt or grim...

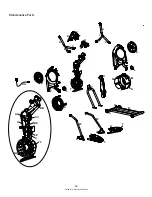
Page 40: ...Assembly Owner s Manual 40 Maintenance Parts D E F C A B G H A C I L K J N M O S Q R P V V W W U T U T X L Z K Y AA EE BB DD FF CC GG HH N II II...

Page 41: ...Water Bottle Holder P Rail Assembly BB Arm Drive Assembly E Console Assembly Q Transport Wheel CC Crank Arm F Speaker R Stabilizer DD Tensioner G Handlebar Static S Leveler EE Drive Pulley Lower H Con...

Page 42: ...able connections orientation Be sure cable is connected securely and oriented properly Small latch on connector should line up and snap into place Check console display for damage Check for visual sig...

Page 43: ...or Pedals H DZDUH WKDW WKH DQ DQGOHEDUV HJV DQG 3HGDOV DUH FRQ nected and when either of these parts move the other does as well If necessary detach the Shrouds to help with removal Do not operate ma...

Page 44: ...HFW ZHEVLWH 5HYLHZ DFFRXQW DQG SDVVZRUG IRU WKH RZ H Connect website RQWDFW DSSVXSSRUW QDXWLOXV FRP IRU IXUWKHU DVVLVWDQFH Workout results not posting IURP RZ H RQQHFW WR MyFitnessPal account Sync acc...

Page 45: ...YHO DGKHULQJ WR D GLHW DQG H HUFLVH URXWLQH RX PD ORVH OEV SHU ZHHN DQG H SHULHQFH LQFUHDVHG HQHUJ OHYHOV 5 Tips for Long Term Success 1 Keep a food log LQFOXGLQJ KXQJHU OHYHOV DQG ZDWHU LQWDNH UHH RQ...

Page 46: ...URYLGHV DERXW FDORULHV DQG WKH PDOH SODQ SURYLGHV DERXW FDORULHV RI KLJK TXDOLW QXWULWLRQ WR QRW RQO KHOS RX ORVH ZHLJKW DQG IHHO JUHDW EXW JHW WKH PRVW RXW RI RXU FDORULHV 7KH YLWDPLQV PLQHUDOV DQG D...

Page 47: ...view of what an ideal day looks like See Portion Size Guide for proper serving sizes smart carb protein fat Breakfast Lunch Dinner Snack 1 Snack 2 fruit smart carb protein healthy fat smart carb prote...

Page 48: ...nut butter Lunch Dinner Options Lean Protein Smart Carb Veggies Pork Loin Sweet Potato Green Beans Grilled or baked pork loin Baked Sweet Potato Green Beans Chicken Stir Fry Flavor with 2 tablespoon t...

Page 49: ...FK WKDW ZRUNV EHVW IRU RX HUH DUH D IHZ H DPSOHV cup lowfat ice cream 1 small bag of baked potato chips 4oz of wine or 12oz light beer FXSV RI DLU SRSSHG RU OLJKW SRSFRUQ Sample 3 Day Plan Based on ea...

Page 50: ...own rice quinoa pasta 1 medium sweet or regular potato 2 corn tortillas 1 slice of bread or 2 light slices equaling 120 calories or less HQJOLVK PXI Q VDQGZLFK WKLQ RU KLJK EHU ZUDS 1 2 cup cooked 1 4...

Page 51: ...n pepperoni and hot dogs to once a week or less FROZEN FOODS All vegetables without sauce All fruit Grains and grain medleys CRACKERS SNACKS ENERGY BARS Any unsalted nuts or seeds LU SRSSHG RU OLJKW S...

Page 52: ...FRPH WKH SODWHDX Calorie adjustments for maintaining weight loss 2QFH RX YH UHDFKHG RXU JRDO ZHLJKW RX FDQ LQFUHDVH RXU FDORULHV SHU GD as long as your activity level stays the same Treat yourself DYH...

Page 53: ...Assembly Owner s Manual 53...

Page 54: ...Assembly Owner s Manual 54...

Page 55: ...moisture or weather misuse mishandling accident natural disasters power surges A machine placed or used in a commercial or institutional setting This includes gyms corporations work places clubs tnes...

Page 56: ...8003606 071518 K EN...
Reviews: