60
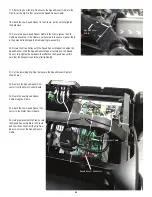
Motor Cover Shroud,
Inside-Top-Left
8. Make sure there is sufficient space to lower the walking deck.
Keep a minimum clearance behind the machine of 79” (2 m)
and 24” (0.6 m) on each side. This is the recommended safe
distance for access, movement and emergency dismounts
from the machine.
9. Make sure there is no object on or around the treadmill to spill or cause
blockage from the fully unfolded position.
10. Slightly push the walking deck forward toward the console, and then
push the Walking Deck Release Button until the locking tube releases and
you can pull the walking deck away from the console. Hold up the rear of
the walking deck, and move to the side of the machine.
Keep clear of the movement path of the walking deck.
11. The hydraulic lift is set up to drop gradually. Hold onto the walking
deck until approximately 2/3 of the movement down. Make sure that you
use proper lifting technique; bend your knees and keep your back straight.
Be aware that the walking deck can possibly drop quickly in the last part of
the movement.
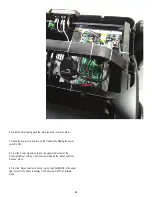
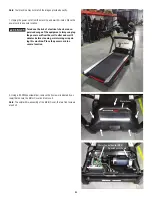
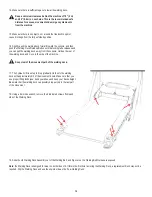
12. Using a #2 Phillips screwdriver, remove the 3 screws (indicated by
arrows) that attach the Inside-Top-Left Motor Cover Shroud. Remove the
Inside-Top-Left Motor Cover Shroud
13. Using a #2 Phillips screwdriver, remove the 3 screws (indicated by
ovals) that attach the Outside-Top-Left Motor Cover Shroud. Remove the
Outside-Top-Left Motor Cover Shroud
Deck Handle
Deck Release Shroud
Motor Cover Shroud,
Outside-Top-Left
Summary of Contents for Treadmill 22
Page 28: ...28 ELECTRICAL WIRING ...

