background image

The 

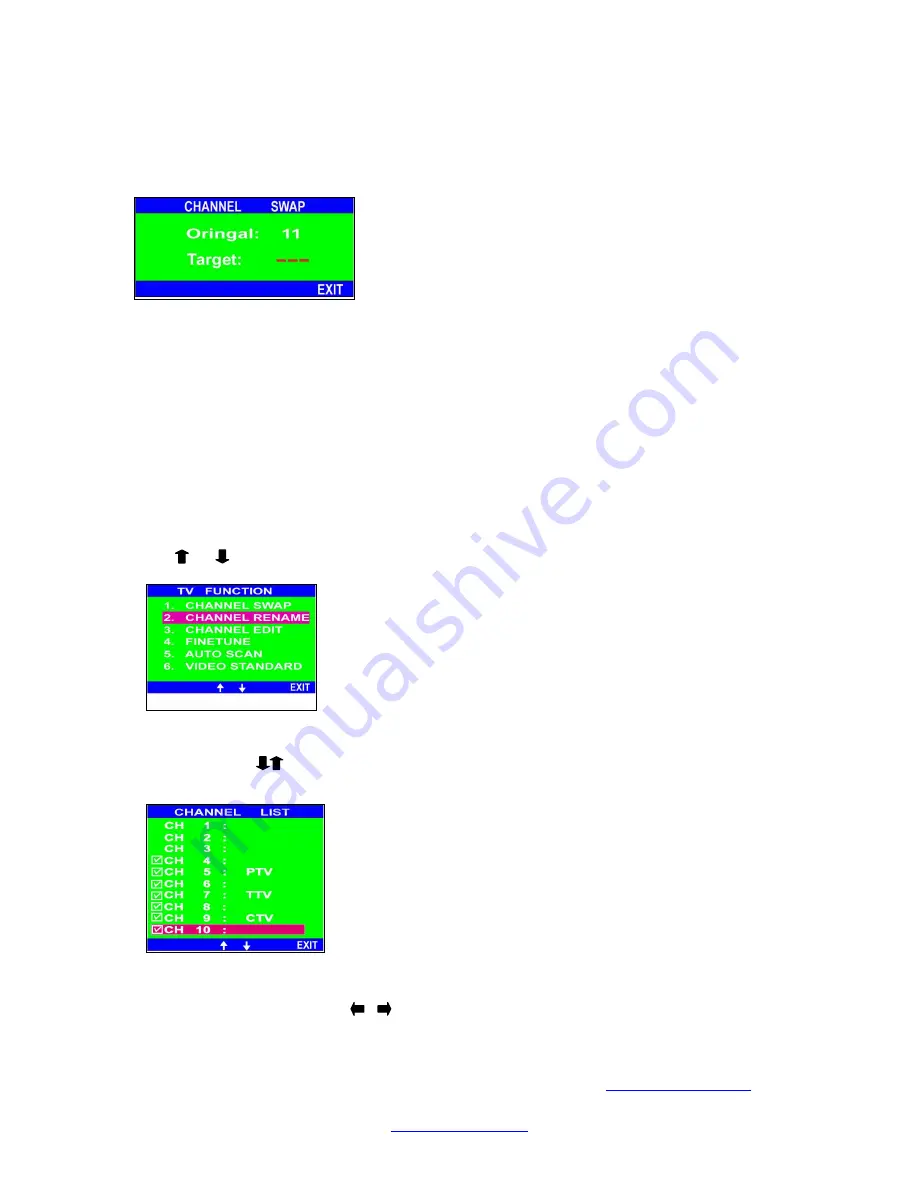
Original

 column remains the present channel number. Key in the channel number 

you like to swap at the 

TARGET

 column.


For example, if you want to change the channel 11 to channel 22.  Press the number key 
on the remote control unit.  After key in the number 22, the channel 11 will be swapped 
with the channel 22.

3. Channel Rename (for PAL model only)

The 

CHANNEL RENAME

 function allows you to edit the channel’s name.  After you 

edit the channel name, it will shows below the channel number.  This function is only 
available when you select your frequency table to “

CATV

” in 

AIRCATV

 function. 

Press    or       and “Enter” button to enter the 

CHANNEL RENAME

 function. 


After entered the 

CHANNEL RENAME

 function, the Channel List dialog will show up.

Press the button         to select the channel you want to rename then press “Enter” to enter 
the channel rename dialog.

The CHANNEL RENAME function provides 5 characters for user’s edit.   Press the 
to select the character, press             to move to the next character you want to change.   

Please browse our online catalogue to view our full product range.

44-48 Maitland Road, Mayfield East, NSW, 2304 Australia, 

sales@converters.tv

Phone +61 249689313   Fax +61 249689314

www.converters.tv

Summary of Contents for VTB-100

Page 1: ...B 100 Operation Manual Please browse our online catalogue to view our full product range 44 48 Maitland Road Mayfield East NSW 2304 Australia sales converters tv Phone 61 249689313 Fax 61 249689314 ww...

Page 2: ...5 Do not put heavy objects on top of the converter 6 Put the unit in an open space that has good ventilation 7 If the unit is acting abnormally keep the unit away from TV or other electronic equipmen...

Page 3: ...control Supports 3 2 pull down for film mode Supports MTS for NTSC system NICAM for PAL Supports 15pin D Sub graphic card VGA in 15pin D Sub monitor VGA out and DVI Monitor DVI out Supports Teletext o...

Page 4: ...s when the TV BOX is powered up and ready to operate Receive the Infrared signal from the remote control 4 Decrease the sound volume 5 Increase the sound volume 6 Adjust channel decrease 7 Adjust chan...

Page 5: ...Video In port 5 S Video Please connect it to the S Video In port when the external Video device is S Video 6 Component Y Cb Cr Input Please connect them to the Component Y Cb Cr In port when the exter...

Page 6: ...Out to your PC external speakers 3 AUDIO R L In Please connect the external audio to the Audio In port 4 DVI Out Optional Use the DVI Cable male to male to connect to DVI supported Monitor or other vi...

Page 7: ...log TV and A V device connection please refer to the diagram below Notes Audio Video connection For audio connection pleas use RCA audio LTR connector For video connection please choose either RCA vid...

Page 8: ...o select channels 6 Press the Menu button and the OSD Main Menu window appears 7 Press or to select the OSD Sub Menu 8 Press ENTER for the he selected Sub Menu 9 If you don t want to select the Sub ME...

Page 9: ...SOUND Setting The SOUND Sub Menu provides BASS TREBLE BALANCE adjustment modes and the RESET mode 1 In the SOUND Sub MENU Press or button to choose the required item 2 Press Enter to select the item...

Page 10: ...ENTER to confirm the setting 1 AIRCATV for NTSC model only Before scanning channels please select appropriate frequency tables among AIR ANTENNA and CATV Cable To scan program channels automatically...

Page 11: ...ction is only available when you select your frequency table to CATV in AIRCATV function Press or and Enter button to enter the CHANNEL RENAME function After entered the CHANNEL RENAME function the Ch...

Page 12: ...e channel list screen Each screen shows 10 channels You can press to move to the next page The channel list will depend on the channels you ve scanned All the channels will be listed on the channel li...

Page 13: ...ontroller Erasing a channel For example to Erase CH 60 Use the Remote control unit to select CH60 and then enter the TV function sub menu press or button to enter CH Edit and then press or button to a...

Page 14: ...ard Press or and Enter button to enter the VIDEO STANDARD function The VIDEO STANDARD function is to precisely lock up the right channel during the AUTOSCAN process Please refer the Appendix B to sele...

Page 15: ...ed 2 Press the Enter button to choose the OSD POSITION another OSD POSITION sub menu appears Use or button to move the position of menu position on the display After setting press the Exit button to r...

Page 16: ...t value after you adjusted the display output values on ACTIVE PIXEL ACTIVE LINE TOTAL PIXEL TOTAL LINE functions Return to the SYSTEM SETTING Sub Menu press the Exit button When you don t find any su...

Page 17: ...of the TV BOX Press button on the remote control to adjust the output display values of TV Box To restore the default value please choose the DEFALUT item in the OUTPUT SELECT sub menu Please browse o...

Page 18: ...screen 6 BAND Press the button to switch AIR or Cable system For NTSC system only 7 AUTOSCAN Scan program channels automatically and save scanned channels 8 SLEEP Automatically switches off the TV Box...

Page 19: ...unction is only supported by USA NTSC area Locks the channel for security considerations 22 TTX ON TTX OFF for Most Pal system regions Activates the Teletext menu Press the button to disable the Telet...

Page 20: ...FAVORITE Press the button to switch on the Favorite Channel 34 FAV SET Sets the current channel to Favorite Channel 35 SURROUND Activates the surround effect 36 LOUDNESS Enhances the volume setting 3...

Page 21: ...avorite channel selection will follow the position sequence After selecting the position press the FAVSET button the channel will be set You can replace the channel on your favorite channel list Pleas...

Page 22: ...digit keys on the remote control Press PAGE and PAGE on the remote control to search subject pages foward and backward It shall remain the current page with the top line blinking in green color when...

Page 23: ...ection No Sound Check audio connections Make sure the speakers are working Press Volume up key on Remote Controller The remote control can t control the unit Make sure batteries are installed Check re...

Page 24: ...for NTSC system EC Female connector for Pal system VGA Output D Sub 15 pin Female connector VGA Input D Sub 15 pin Male connector DVI Output Optional DVI Female connector Power Consumption 15W nominal...

Page 25: ...ina Faso SECAM K Burundi SECAM K Cambodia NTSC M Cameroon PAL B Canada NTSC M M Canary Islands PAL B G Chile NTSC M China PAL D D Colombia NTSC M M Congo SECAM D Costa Rica NTSC M M Cuba NTSC M M Cypr...

Page 26: ...ea Rep of NTSC M G Kuwait PAL B M Laos PAL M G Lebanon SECAM B Lesotho PAL I Liberia PAL B Luxembourg PAL SECAM B Macao PAL B G L Madagascar SECAM K1 Malta PAL B K1 Malaysia PAL B H Mali SECAM K1 G Ma...

Page 27: ...pain PAL B I Sri Lanka PAL B G Sudan PAL B Suriname NTSC M Swaziland PAL B Sweden PAL B G Switzerland PAL B G Syria SECAM B G Taiwan NTSC M Tanzania PAL B M Thailand PAL B I Togo SECAM K Trinidad Toba...

Reviews: