background image


record will now play to the end, but you will have to stop the turntable rotation manually. (Return the 

tone arm to its rest manually and if the turntable is still rotating, switch off the unit by the volume control 

knob. Then set the auto stop control back to ON.) 


Phono encoding


1. Set the function button to PHONO mode and then insert a memory device (USB drive, SD or MMC 

card). 

2. Put your record onto the turntable and get it ready for playback. 

3. Press the record REC button. It will take about 3 - 4 seconds to read the memory device, then the 

USB or SD icon will be flashing on the LC display. 

4. Press the skip up or skip down button to select the desired mode (USB or SD) for encoding, then 

press  the  record  REC  button  again  to  confirm.  (You  can  skip  this  step  if  only  a  USB  drive  or  an 

SD/MMC card is inserted.) 

5. The system will start the encoding mode after a few seconds.   

6.  Lower  the tone  arm to  start  playback  of  the record.  During  encoding,  the  USB  or  SD  icon  will  be 

flashing on the display. 

7. 

To finish encoding, press the stop button. The display will show “END” and return to PHONO mode. 

NOTE

• The recording speed is 1:1. Recording will take as long as playing the record. 
• The recording format is preset at MP3 bit rate 128 kbps. 
 

The auxiliary input


Listening to a CD (or other auxiliary input)


1. Turn the volume knob clockwise to turn the equipment on.   

2. Use the function selector to select AUX mode, then connect the external audio device (such as a CD 

player) to the AUX IN socket at the front of the equipment. The audio signal from the external audio 

device will now be played through the system. 

3. If an external audio device is connected to the AUX IN socket, playing of the auxiliary device takes 

priority over cassette playback. 

AUX IN encoding


1. Use the function selector to select AUX mode and then insert a memory device (USB drive, SD or 

MMC card). 

2. Press the record REC button, it will take 3 - 4 seconds to read the memory device, then the USB or 

SD icon will be flashing on the LC display. 

3. Press the skip up or skip down button to select the desired mode (USB or SD) for encoding, then 

press  the  record  REC  button  again  to  confirm.(You  can  skip  this  step  if  only  a  USB  drive  or  an 

SD/MMC card is inserted.) 

4. The system will start the encoding mode after a few seconds. During encoding, the USB or SD icon 

will be flashing on the display. 

5. To finish encoding, press the stop button. The display 

will show “END” and return to AUX mode. 

NOTE

• The recording speed is 1:1. Recording will take as long as playing the CD (or other auxiliary input). 
• The recording format is preset at MP3 bit rate 128 kbps. 

Summary of Contents for BT-22-B

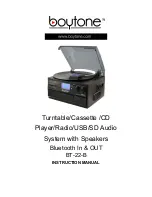
Page 1: ...Turntable Cassette CD Player Radio USB SD Audio System with Speakers Bluetooth In OUT BT 22 B INSTRUCTION MANUAL ...

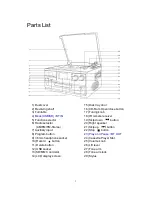
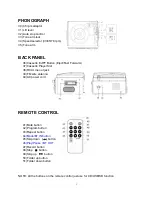
Page 2: ...eadphone socket 10 Record button 11 Delete button 12 USB socket 13 SD MMC card slot 14 LCD display screen 15 Disk tray door 16 CD Rom Open close button 17 Tuning knob 18 IR remote receiver 19 Skip down button 20 Right speaker 21 Skip up button 22 Stop button 23 Play and Pause BT OUT 24 Cassette Player Slot 25 Volume knob 26 Lift lever 27 Tone arm 28 Tone arm lock 29 Stylus ...

Page 3: ...ard 37 Cassette Player Slot 38 RCA Line out jack 39 FM wire antenna 40 AC power cord REMOTE CONTROL 41 Mute button 42 Program button 43 Repeat button 44 Mode BT IN button 45 Skip down button 46 Play Pause BT OUT 47 Record button 48 Stop button 49 Skip up button 50 Folder up button 51 Folder down button NOTE All the buttons on the remote control just use for CD USB SD function ...

Page 4: ...nd before all other connections have been made Do not cover any vents and make sure that there is a space of several centimeters around the unit for ventilation Caution Usage of controls or adjustments or performance of procedures other than those specified in this manual may result in hazardous radiation exposure This unit should not be adjusted or repaired by anyone except qualified service pers...

Page 5: ... a radio station It start auto searching and stop when a radio station is found Release the knob once a station has been found 5 Repeat the above step until your desired radio station is found 6 Adjust the volume knob to your desired volume level 7 AM reception the receiver has a built in AM bar antenna If reception is weak slightly rotate or reposition the unit to improve AM reception 8 FM recept...

Page 6: ...one arm will gently drop onto the record and playback will start 8 To stop playback move the lift lever towards the back to raise the tone arm The turntable will still be rotating but the record will stop playing To continue playback move the lift lever towards the front 9 To play a different piece on the record move the lift lever towards the back move the raised tone arm to the start of the piec...

Page 7: ...preset at MP3 bit rate 128 kbps The auxiliary input Listening to a CD or other auxiliary input 1 Turn the volume knob clockwise to turn the equipment on 2 Use the function selector to select AUX mode then connect the external audio device such as a CD player to the AUX IN socket at the front of the equipment The audio signal from the external audio device will now be played through the system 3 If...

Page 8: ...tte in the correct direction To avoid damaging the cassette we strongly recommend taking it out of the equipment after playing the cassette Cassette encoding 1 Set the function button to TAPE AUX BT IN mode and then insert a memory device USB drive SD or MMC card 2 Press the record REC button it will take 3 4 second to read the memory device then the USB or SD icon will be flashing on the LC displ...

Page 9: ...will start the encoding mode after a few seconds Insert your cassette into the playback slot During encoding the USB or SD icon will be flashing on the display To finish encoding press the stop button The display will show END and return to CD USB SD mode The USB Port and SD Card Slot Playback of music in MP3 WMA format via USB device or memory card The system is able to decode and playback all MP...

Page 10: ...ces in the MP3 encoding format it is not a malfunction of the system There are numerous USB and SD device producers and their products vary in solution and format We therefore cannot guarantee that this unit will support all USB and SD devices from every brand This system supports SD cards up to 8GB MP3 WMA track format requirements MP3 bit rate 32 kbps 256 kbps WMA bit rate 32 kbps 320 kbps Progr...

Page 11: ... the display Press the SKIP UP or SKIP DOWN button to select ALL on the display Press the record REC button again to confirm 3 The USB or SD icon will be flashing on the display while the system is copying the files tracks 4 When all files tracks have been copied the USB or SD icon will stop flashing on the display NOTE If you press the record REC button during playback in USB or SD mode the file ...

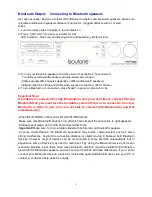
Page 12: ...ut devices 1 Turn the volume knob clockwise to turn the equipment on 2 Use the function selector to select AUX TAPE BT IN mode 3 Press Mode BT IN on panel or remote for 2 3 seconds LED indication Red color and flashing When succeed in connecting LED color in red and stable 4 Activate the Bluetooth function in your Bluetooth device such as Mobile Phone the device will enter to Bluetooth searching a...

Page 13: ...able system off and on to connect to the other Bluetooth in order to pair You are not able to connect with Bluetooth In and Out simultaneously When BT IN MODE cannot enter BT OUT MODE directly Make sure other Bluetooth devices Turn off which may impact the connection to right speakers Please repeat step 2 and 3 if did not connect at first time Important Make sure Turn on turntable Bluetooth before...

Page 14: ...nnection make sure the cable is firmly connected all controls on the CD player are properly set the disc tray is closed and the disc is clean and undamaged When playing music from a USB device or SD MMC card make sure the memory device is properly inserted in the USB port SD MMC card slot and the correct MODE is selected Problems with radio reception Make sure you are in an area that can receive s...

Reviews: