3
D
INSTALLATIONS-
ANLEITUNG
AUSSENSTATION FÜR
HAUSSPRECHANLAGEN HEC/301
Die Außenstation für Haussprech-
anlagen mit einer Taste ermöglicht
die komplette Anlagensteuerung.
Durch die Kombination mit den Ruf-
tastentableaus HEP/306-HEP/312D
können Anlagen mit bis zu maximal
64 Stromabnehmern geschaffen wer-
den.
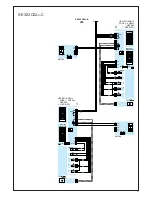
Die Außenstation benutzt für den
Anschluss der Innensprechstellen
den Bus BPT
X2 TECHNOLOGY
, der
in einer einzigen verdrillten Telefon-
schleife alle für den Anlagenbetrieb
erforderlichen Signale überträgt.
Über die Serienschaltung an die
erste Außenstation ist das Hinzu-
fügen drei weiterer Außenstationen
sowohl für Videosprech- als auch
Haussprechanlagen ohne die
Benutzung weiterer Geräte (Wähl-
schalter, Verteiler) möglich.
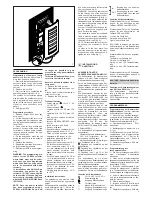
Die Außenstation verfügt über einen
geeigneten Sitz für den Set
Leuchtmeldung für Anlage besetzt
KHSO und für 3 Rufsets KHPS (oder
2 Rufsets KHPD).
Die Außenstation ist folgenderweise
ausgestattet:
- Lautsprecher- und Mikrofonsatz;
- LED mit Infrarotlicht für die
Beleuchtung des Subjekts;
- drei Spannungsteiler für die folgen-
den Funktionen (Abb. 4-5):
Regelung der Lautstärke an der
Außenstation;
Regelung der Lautstärke an der
Innensprechstelle;
P1
Regelung (von 1 bis 15 s) der
Aktivierungsdauer des Elektroschlos-
ses.
Die Außenstation ist mit einem
Tonsignal, der den Besetztzustand der
Anlage meldet, und mit einem aktiven
Elektroschloss ausgestattet.
Die mitgelieferten Kabel sorgen für
einen leichten Anschluss an die ver-
schiedenen Geräte der Außenstation.
Funktion der Klemmleisten
12÷16 V AC 14÷18 V DC
Stromversorgung
Ausgang Elektroschloss
Türöffnertaste
–
Masse für Elektroschloss
Ausgang Zusatzsteuerung 1
Ausgang Zusatzsteuerung 2
5
21
8
11
12
14
7
no longer be possible to gain
access to the entry panel standard
programming.
To restore default conditions, plea-
se refer to the related chapter.
Return to default conditions from
entry panel
1 -
Remove the SW1 jumper.
2 -
Close the earthed door open con-
tact.
A sound signal confirms that the ope-
ration has occurred.
3 -
Replace the SW1 jumper.
Technical features
• Power supply:
12÷16 V AC
14÷18 V DC.
• Current demand:
- on standby with 14 V DC max. 120
mA;
- operating with 14 V DC max. 150
mA;
- with door-lock release activated,
add 500 mA;
- for each HEP/306-HEP/312D, add
35 mA;
- for 64 receivers, add 64 mA.
• Secrecy of speech.
• Door-lock release command: pulse-
type for solenoid lock at 12 V 1 A.
• Timed solenoid door-lock release:
adjustable in the range 1 to 15 s.
• Installation activation time: 60 s.
• Call duration time: 30 s.
• Bus output: power supply at 15 V
DC for booster and receivers.
• Aux 1 command output: 3.5 V DC
at 1 mA (available only with entry
panel enabled, activation time
same as timed solenoid door-lock
release).
• Aux 2 command output: 3.5 V DC at
1 mA (always available in all entry
panels, activation time same as
timed solenoid door-lock release).
• Entry panel activation output: 3.5 V
DC at 1 mA (enabled for entire
duration of conversation).
• Working temperature range: -15 °C
to +50 °C.
Installation instructions
The embedding box must be fitted
flush with the wall at an appropriate
height.
Fit the spacer into embedding boxes to
avoid deformation (fig. 1). Using the
Allenkey s 2.5 supplied, unscrew the
lock screw and remove the front plate
from the chassis (fig. 2).
WARNING. Connecting cables must
be fed through one of the knockout
cable entry points, located at the bot-
tom of the embedding box (A in fig. 1).
Remove the two plugs protecting the
threaded holes in the embedding box
and secure the chassis using the two
screws supplied (fig. 3).
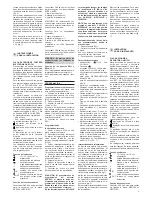
In order to fit additional buttons, fol-
low the instructions supplied with
each. Perform the wiring.
The name card can be removed and
filled in with the relevant information
by removing the card clip followed by
the actual card it self (fig. 6).
NOTE.
Personalized name cards can
be used up to a maximum of 2 mm
thick.
In order to fit the front plate, first
insert the upper part in the top moul-
ding and then, using a Allenkey s 2.5,
tighten the lock screw (fig. 7).
B IN
Buseingang von anderen
Außenstationen
B OUT
Busausgang zu den Innen-
sprechstellen oder anderen
Außenstationen
Funktion der Steckverbinder
Steckverbinder CN1 mit 5 Schaltstel-
lungen:
für den Anschluss an das
Tableau HEP/306 oder HEP/312D.
Steckverbinder CN3 mit 3 Schaltstel-
lungen:
für den Anschluss an die
Tasten KHPS oder KHPD.
1-rot:
an die Taste Nr.2.
2-orange:
an die Taste Nr.3.
3-gelb:
an die Taste Nr.4.
ACHTUNG. In Anlagen mit mehreren
Außenstationen ist die Beibehaltung
derselben Ruftastenanordnung erfor-
derlich.
Steckverbinder CN4:
schon angesch-
lossen.
1-schwarz:
zur Ruftaste Nr.1.
2-braun:
zur Ruftaste Nr.1.
3-grün:
zu den LED Tastenbeleuch-
tung.
4-gelb:
zu den LED Tastenbeleuch-
tung.
Steckverbinder CN5 mit 2 Schaltstel-
lungen:
für den Anschluss an den Set
Leuchtmeldung KHSO.
ACHTUNG. Unbenutzte Kabelleiter
isolieren.
Funktion der Überbrückungsklem-
men SW1 und SW2 (Abb. 5)
SW1
: automatische Programmie-
rung der Nummer der Außenstatio-
nen (Standard 1).
SW2
: Programmierung der Innen-
sprechstellen.
PROGRAMMIERUNG
Programmierung der Nummer der
Außenstationen
(nur bei mehreren
Außenstationen erforderlich)
1 -
Sich vor die an den Bus serienge-
schaltete letzte Außenstation stellen
(gewöhnlich die mit den nicht ange-
schlossenen Klemmleisten
B IN
).
2 -
Überbrückungsklemme SW1
abnehmen.
3 -
Bestätigungston abwarten (ca.
3÷15 s).
Die Ruftonanzahl zeigt die Zahl der
vorliegenden und programmierten
Außenstationen an (1 Rufton für
Hauptaußenstation und 1 Rufton je
Nebenaußenstation).
4 -
Überbrückungsklemme SW1 wie-
der einsetzen.
Programmierung der
Innensprechstellen
1 -
Die Überbrückungsklemme SW2
einer x-beliebigen Außenstation
abnehmen.
2 -
Hörer der zu programmierenden
Innensprechstelle abnehmen (für die
Telefonsprechstelle siehe Schnittstel-
lenanleitung IT/300).
3 -
Türöffner- und Zusatztaste 2 glei-
chzeitig für mindestens 1 s drücken
(die Toneinschaltung zur Außensta-
tion bestätigt den erfolgten Vorgang).
4 -
An der Außenstation die Ruftaste,
an die die Innensprechstelle zu kop-
peln ist, drücken.
5 -
Hörer wieder auflegen.
6 -
Vorgang ab Punkt 2 für alle restli-
chen Innensprechstellen wiederho-
len.
7 -
Überbrückungsklemme SW2 wie-
PROGRAMMING
Programming of number of entry
panels
(only required where there is
more than one entry panel)
1 -
Start with the last entry panel con-
nected in series to the bus (usually
the one with terminals
B IN
not con-
nected).
2 -
Remove jumper SW1.
3 -
Wait for the note confirming the
operation (approximately 3÷15 s).
The number of confirmation signals
also indicates the number of present
and programmed entry panels (1
signal for the main entry panel and 1
signal for each secondary entry
panel).
4 -
Refit jumper SW1.
Programming receivers
1 -
Remove jumper SW2 from any
entry panel.
2 -
Lift the handset of the receiver to
be programmed (for telephone sets,
see the instructions featured in inter-
face IT/300).
3 -
Press the door-lock release and
auxiliary 2 buttons at the same time
for at least 1 s (when audio towards
the entry panel is enabled, the ope-
ration is confirmed).
4 -
On the entry panel, press the call
button the receiver is to be associa-
ted with.
5 -
Replace the handset.
6 -
Repeat the operation from point 2
on for all remaining receivers.
7 -
Refit jumper SW2 to exit program-
ming.
WARNING. The programming pro-
cedure for the VSE/300 selector,
where fitted, must only be perfor-
med once you have programmed
which calls from the entry panels
are to be associated with which
receivers.
In installations with XA/300LR we
recommend you gather up the
receiver’s ID (SN) codes, applied
on the outside of the housing, and
enter them in the tables that come
with the XA/300LR, MPP/300LR and
IPC/300LR.
NOTE. Once the power supplier
has been programmed using a
PCS/300 or MPP/300LR unit, it will


