A.
Headrest.
B.
Harness strap slot.
C.
Back of the seat.
D.
Harness straps.
E.
Protectores del arnés.
F.
Locking buckle.
G.
Harness adjustment button.
H.
Buckle pad.
I.
Harness adjuster strap.
J.
Ergo seat cushion.
K.
Boosters height adjuster lever (15-36 Kg.).
L.
Height adjuster lever.
M.
Belt hook.
N.
Harness pad connector.
O.
Harness straps.
P.
Belt hook.
Q.
Metal harness connector.
2. SEAT PARTS AND FITTINGS.
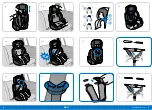
3. INSTALLING CHILD SEAT. GROUP 1.
Only suitable for
Group 1
, approx. 9
months to 4 years of age (9-18 Kg.)
WARNING
1.
Fit this child seat into the vehicle´s seat, making sure it is firmly
pressed against the vehicle seat backrest (3.1).
2.
Slip the belt through the
P
guides in the plastic backrest then
pass the belt once more through the next
P
guide and fasten the
safety belt to the vehicle anchor point. You will hear a “
click
” when
properly fastened (3.2, 3.3 y 3.4).
3.
Check that the seat belt is not twisted or tangled, that the lap
belt passes under the armrests and that the diagonal shoulder
belt passes over the headrest before proceeding then slip the
diagonal belt through the
N
guides
(3.5, 3.6 y 3.7)
4.
Place your knee on the seat of the child seat and hold the diagonal
shoulder belt. Pull it upwards to tighten it as much as possible
Finish tightening the vehicle seat belt by pulling the diagonal
shoulder belt upwards until there is no slack and the child seat is
securely installed (3.8).
5.
Make sure the vehicle’s safety belt is not twisted, also check that
the seat cover does not impede the movement of the vehicle’s
safety belt or prevent the installation of the seat in any way. To
release your child unbuckle the vehicle safety belt as described in
the instructions.
When the seat is being used for group 1, the belt should go under
the headrest and this should be in its lowest position.
4. HOW TO INSTALL THE CHILD CAR SAFETY SEAT. GROUP 2 Y 3.
Use
Group 2 y 3
only from approx.
4 to 6 years of age (15-25 kg)
WARNING
1.
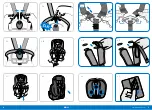
According to the child’s height the headrest can be adjusted up or
down. Place your hand on the headrest and press the lever while
pulling the seat down with the other hand so it does not move.
Always check that the harness straps are suitable for the height
of your child. (4.1).
2.
Place the child seat on the seat of the vehicle, ensuring it is
pressed firmly against the back of the vehicle seat (4.2).
3.
Place the child in the child restraint seat with height adjuster
K
at
the child’s shoulders (4.3).
4.
Fasten the belt, ensuring that the lap belt goes through the
guide under both armrests and that the diagonal shoulder belt
passes through guide over and guide under the armrest that is
next to the vehicle anchor point. You will hear a “
click
” when this
is properly fastened. Ensure that the belts are not twisted and
tighten by pulling the diagonal shoulder belt upwards (4.4).
Before installing the seat it is necessary to remove harness straps,
crotch straps and lap straps. Subsequently, install the seat belt
height adjustment as shown below.
IMPORTANT
Ensure that the belt has no slack.
20
BEL123
Child restraint system
21
www.babyqs.com
Group 1/2/3
EN
Summary of Contents for BEL123
Page 1: ...BEL123 LB517 9 35 kg Apto para Suitable for MANUAL DE USO INSTRUCTION FOR USE...
Page 3: ...4 5 www babyqs com BEL123 3 1 3 2 3 3 3 4 3 5 3 6 1 2 A B C F G I H M J K L N P O Q D E M P...
Page 4: ...6 7 www babyqs com BEL123 4 1 4 2 4 3 4 4 4 5 4 5 5 1 5 2 5 3 5 4 A B C 5 6 5 5...
Page 5: ...8 9 www babyqs com BEL123 5 7 5 8 5 9 5 10 5 11 6 1 6 2 6 3 6 6 6 7 6 5 6 4...
Page 14: ...26 27 www babyqs com BEL123...


