background image

 Page 30 

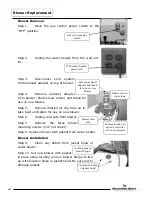
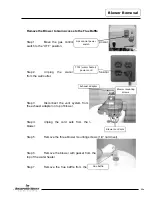
Blower Removal 

Step 1. 

Move the gas control power switch to the 

“OFF” position.

Step 2. 

Unplug the water heater from the wall out-

let.

Step 3.

Disconnect vent system

from exhaust adapter on top of blower. 

Step 4.  

Remove  exhaust  adapter 

from blower (blade screw driver) and retain for 
use on new blower.

Step 5. 

Remove dilution air clip from air in-

take boot and retain for use on new blower.  

Step 6. 

Unplug cord sets from blower. 

Step 7.  Remove the three blower 
mounting screws (1/4” nut driver). 

Step 8. Remove blower with gasket from water heater.

Blower Installation 

Step 9. 

Clean any debris from jacket head of 

water heater 

Step 10. Set new blower with gasket 
in place using locating pins on blower flange to line 
up with location holes in jacket head. Be sure not to
damage gasket.

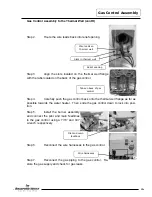
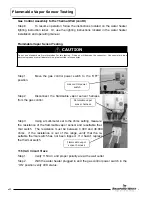
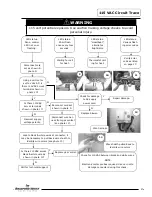
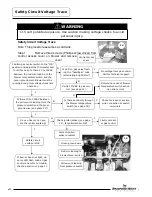
Gas control power 

switch 

TTW (water heater) 

power cord 

Blower cord 

sets

Blower mount-

ing screws 

Remove exhaust 

adapter and retain

for use on new 

blower 

Remove dilution air 

clip and retain for 

use on new blower 

Locating pins on 

blower flange 

Pin location holes

in jacket head

Blower Replacement 

30

Summary of Contents for TTW Eco-Defender

Page 1: ...g Guide and Instructions for Service To be performed ONLY by qualified service providers Models Covered by This Manual U1TW40S FRN U1TW50S FRN U1TW60T FRN U2TW50T FRN U2TW65T FRN UTW450S60FR N UTW465S60FR N Denotes Warranty Years Residential Ultra Low NOx Gas Water Heaters TTW Eco Defender ...

Page 2: ...nd Replacement ____________ 31 Thermal Well Testing ______________________________________ 34 Determine Water Temperature Inside Tank_____________________ 35 Gas Control and Thermal Well Testing and Replacement __________ 36 Flammable Vapor Sensor Testing and Replacement ______________ 40 115 VAC Circuit Trace _____________________________________ 40 Safety Circuit Voltage Trace___________________...

Page 3: ...eat to the nipples on top of the water heater Sweat the tubing to the adapter before fitting the adapter to the water connections It is imperative that heat is not applied to the nipples containing a plastic liner Turn off or disconnect the electrical power supply to the water heater be fore servicing Label all wires prior to disconnection when servicing con trols Wiring errors can cause improper ...

Page 4: ...ot water system If hydro gen is present there will be an unusual sound such as air escaping through the pipes as hot water begins to flow Do not smoke or have open flame near the faucet at the time it is open DO NOT ATTEMPT TO LIGHT ANY GAS APPLIANCE IF YOU ARE NOT CER TAIN OF THE FOLLOWING Liquefied petroleum gases propane gas and natural gas have an odorant added by the gas supplier that aids in...

Page 5: ...promotes reli able and consistent pilot and main burner ignitions to provide hot water on demand Integrated Immersion Thermal Well Gas Control with LED Was developed for ease of troubleshooting by providing simple diagnostic codes to pinpoint an installation or component performance issue New Powerful Blower Will eliminate problems with difficult venting situations Quieter and Cooler Blower Operat...

Page 6: ...into the combustion chamber and burner venturi the vapors are harmlessly ignited by the burner pilot flame If flammable vapors are in sufficient quantity to prevent normal combustion the burner and pilot flames are designed to shut down Should the flammable vapors continue to the burner the flame arrestor plate and burner screen prevent the flames from traveling backwards and igniting vapors outsi...

Page 7: ...sary to have special elec tronic pin type multi meter probes These probes are available at most electronic wholesale outlets Thermometer Used to measure water temperature An accurate thermometer is recommended Water Pressure Gage Used to measure water supply pressure Also used to determine tank pressure by adapting to the drain valve of the heater Gas Control Service Tool BWC part number 239 45991...

Page 8: ...pply pressure TCO Limit Residential 118o F 87o C Commercial 199o F 93o C Residential Temperature Set Point Range 60o F 16o C to 160o F 71o C approximate temperatures Commercial Tempera ture Set Point Range 80o F 27o C to 180o F 82o C approximate temperatures Blower Temperature Switch Normally closed opens 165o F 74o C auto reset 130o F 54o C Pressure Switch UTW1 Models Normally open closes on vacu...

Page 9: ...h the Roof 1 45 13 7 7 2 1 Through the Roof 2 40 12 2 7 2 1 Through the Roof 3 35 10 7 7 2 1 Through the Roof 4 30 9 2 7 2 1 3 Diameter 7 6 cm PVC Vent Connector Lengths Terminating of Elbows Maximum Straight Length ft m Minimum Straight Length ft m Through the Wall 1 115 35 0 10 3 1 Through the Wall 2 110 33 5 10 3 1 Through the Wall 3 105 32 0 10 3 1 Through the Wall 4 100 30 5 10 3 1 Through th...

Page 10: ...ough the Roof 1 55 16 8 7 2 1 Through the Roof 2 50 15 2 7 2 1 Through the Roof 3 45 13 7 7 2 1 4 Diameter 10 2 cm PVC Vent Connector Lengths Terminating of Elbows Maximum Straight Length ft m Minimum Straight Length ft m Through the Wall 1 175 53 3 10 3 1 Through the Wall 2 170 51 8 10 3 1 Through the Wall 3 165 50 3 10 3 1 Through the Wall 4 160 48 8 10 3 1 Through the Wall 5 155 47 2 10 3 1 Thr...

Page 11: ...Retry after 2 minutes Soft Lockout Retry after 5 minutes TCO Limit Lockout Indefinite see page 34 to reset Verify Resistive Delay Retry after 2 minutes repeats 5 times Simulated Resistive Load Lockout Indefinite cycle power to reset Hardware Error Lockout Indefinite self clears if fault clears for at least 15 seconds M BLOWER BK W R BL W BK Honeywell W PILOT G Y G SWITCH BLOWER SWITCH PRESSURE R B...

Page 12: ... circuit is closed the gas control waits 4 seconds the gas control LED flashes 2 times with a 3 second pause The gas control waits 2 minutes Then the blower runs for 30 seconds This cycle re peats until the safety circuit opens 3 Blower energizes 4 Pressure switch proves blower vent system operation If the pressure switch does not close within 30 seconds the gas control LED flashes 3 times with 3 ...

Page 13: ...ith 3 second pause Flame Sensor If flame is lost the pilot and main valves are shutdown The blower runs for 15 seconds The gas control attempts to re light the pilot 4 times If unsuccessful the blower is shutdown and the gas con trol proceeds to a 5 minute lockout The gas control re attempts to light the pilot starting at Normal Heating Sequence 2 9 Thermostat Satisfies Gas control LED flashes onc...

Page 14: ...use The error self clears if the fault clears for at least 15 seconds C Water Temperature in excess of ECO Energy Cut Off Limit The gas control immediately turns off the pilot and main valves The gas control LED proceeds to flash 4 times with a 3 second pause To reset the gas control rotate the setpoint knob to the minimum set ting for at least 6 seconds before returning to desired temperature set...

Page 15: ...3b above If the circuit closes again by the end of the inter purge the recycle counter is incre mented if the recycle count has not reached its limit 4 another trial for ignition begins If the recycle count has been reached the gas control turns off the blower and flashes 6 times then 2 times with a 3 second pause The gas control waits 5 minutes before repeating ig nition sequence 4 Trial for Igni...

Page 16: ... times then 3 times with a 3 sec ond pause The gas control waits 5 minutes before repeating the igni tion sequence B Flame Sensed Out of Sequence The gas control only looks for pilot flame when the blower is running If flame is present when the pilot valve is not open the gas control proceeds to wait for flame loss and flashes 5 times with 3 second pause This continues until flame is lost once the...

Page 17: ...itch or blower 3 Faulty pressure switch 1 3 See Pressure Switch Testing on page 25 Three flashes three second pause Pressure switch or blower temperature switch not working open position 1 Vent blockage or improper vent configuration 2 Pressure switch tubing kinked or blocked 3 Faulty pressure switch 4 Blower not spinning up to speed 5 Blower temperature or exhaust temperature too high 6 Faulty bl...

Page 18: ...es three second pause Soft Lockout Pilot flame extinguished system auto resets after 5 minutes 1 Unstable pilot 2 Pilot tube block or restricted 3 Oxidation build up on pilot electrode 4 Wire damage to pilot assembly or bad connection at gas control 5 Insufficient combustion air 6 Insufficient gas pressure 1 See Burner Inspection on page 20 2 4 See Pilot Inspection Testing and Replacement on page ...

Page 19: ...place thermal well 4 Verify control is not wet or physically damaged 5 Reset control on off switch 6 Replace gas control if 8 3 error persists See Thermal Well Testing on page 34 Eight flashes four flashes three second pause Gas control fault detected 1 Verify control is not wet or physically damaged 2 Reset control on off switch 3 Replace gas control if 8 4 error persists 1 Replace gas control if...

Page 20: ...pilot and burn with a blue flame with a minimum of yellow tips After 5 minutes of operation the burner screen will become radiant and the flame will soften and turn or ange If the burner screen does not become radiant after 5 minutes of op eration it must be cleaned see burner cleaning procedure below Burner Cleaning Procedure Step 1 Move the gas control power switch to the OFF position Step 2 Unp...

Page 21: ...dline with a 3 4 wrench from the gas control Step 8 Disconnect the spark igniter flame sensor wire from gas control Step 9 Remove the burner assembly from the com bustion chamber Step 10 Remove manifold mount from burner inner door by removing 2 1 4 hex drive screws Burner Maintenance 4 1 4 hex drive screws Pilot and main feedlines Spark igniter flame sensor wire Gas control Burner assembly Right ...

Page 22: ...bris build up from the manifold mount Step 14 Remove main burner orifice from feed line 3 8 wrench Inspect and clean if necessary Step 15 Reassemble the burner assembly and reinstall into the water heater Restore gas supply and check for gas leaks Step 16 To resume operation follow the instructions located on the wa ter heater lighting instruction label Or use the lighting instructions located in ...

Page 23: ...ive screws holding the right side inner door in place Step 6 Disconnect the pilot tube using a 7 16 wrench and the main burner feedline with a 3 4 wrench from the gas control Step 7 Disconnect the spark igniter flame sensor wire from gas control Pilot Maintenance Pilot and main feedlines Outer Door TTW water heater power cord 4 1 4 hex drive screws Right side inner door Spark igniter flame sensor ...

Page 24: ...there is no continuity Step 12 Visually inspect the spark igniter flame sense electrode for de terioration Replace the pilot assembly if necessary The electrode should not be in contact with pilot hood If it is in contact with the pilot hood carefully adjust electrode to a gap distance of 3 32 from the pilot hood Step 13 Visually inspect the spark igniter flame sense electrode for oxi dation build...

Page 25: ...and check for gas leaks Step 17 To resume operation follow the instructions located on the wa ter heater lighting instruction label Or use the lighting instructions located in the water heater installation and operating manual Pressure Switch Testing Step 1 Move the gas control power switch to the OFF position Step 2 Remove the three screws Phillips screw driver from the con trol access cover on t...

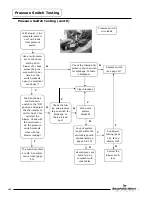
Page 26: ...start the blower Check with the multi meter Do the pressure switch contacts close with the blower running The switch contacts are OK See safety circuit trace page 40 Check the tubing and pressure tap on switch for blockage Is there a blockage Check the tub ing and pressure tap on switch for blockage Is there a block age Clear blockage Replace switch see page 27 Is the vent system blocked Is vent s...

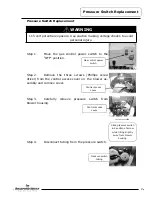
Page 27: ...er Step 3 Carefully remove pressure switch from blower housing Step 4 Disconnect tubing from the pressure switch Pressure Switch Replacement Gas control power switch WARNING 115 volt potential exposure Use caution making voltage checks to avoid personal injury Control access cover Slide pressure switch in direction of arrow while tilting slightly away from blower housing Control access cover Press...

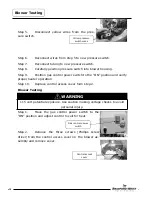
Page 28: ...ify proper heater operation Step 10 Replace control access cover form step 2 Blower Testing Step 1 Move the gas control power switch to the ON position and adjust control to call for heat Step 2 Remove the three screws Phillips screw driver from the control access cover on the blower as sembly and remove cover Blower Testing Gas control power switch Yellow pressure switch wires WARNING 115 volt po...

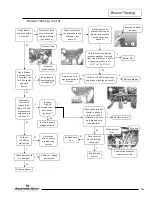
Page 29: ...cross termi nals shown in photo 7 Incorrect supply voltage polarity Reconnect cord set shown in photo 4 Is there 115VAC between blue wire and ground wire see photo 8 Replace blower Does cord set have electrical continuity Replace cord set Replace gas control See pressure switch testing on page 25 With blower running and exhaust adapter removed from top of blower is there a negative pressure of 2 1...

Page 30: ...emove the three blower mounting screws 1 4 nut driver Step 8 Remove blower with gasket from water heater Blower Installation Step 9 Clean any debris from jacket head of water heater Step 10 Set new blower with gasket in place using locating pins on blower flange to line up with location holes in jacket head Be sure not to damage gasket Gas control power switch TTW water heater power cord Blower co...

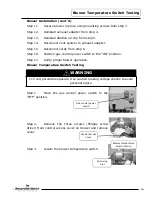
Page 31: ...e ON position Step 17 Verify proper blower operation Blower Temperature Switch Testing Step 1 Move the gas control power switch to the OFF position Step 2 Remove the three screws Phillips screw driver from control access cover on blower and remove cover Step 3 Locate the blower temperature switch Gas control power switch Control access cover Blower temperature switch location Air mixing inlet WARN...

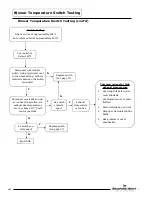
Page 32: ...sconnect wire leads to switch Using multi meter set to the ohms setting Is there continuity between the switch terminals Do switch contacts open Exhaust temperature is too hot Do switch con tacts open Replace switch see page 33 Switch OK Common causes for high exhaust temperature 1 Vent length is below mini mum allowable 2 Vent diameter not to speci fication 3 Restricted dilution air inlet 4 Missi...

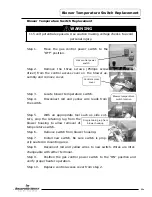
Page 33: ...al of temperature switch Step 6 Remove switch from blower housing Step 7 Install new switch Be sure switch is prop erly seated in mounting area Step 8 Reconnect red and yellow wires to new switch Wires are inter changeable with either terminal Step 9 Position the gas control power switch to the ON position and verify proper heater operation Step 10 Replace control access cover from step 2 WARNING ...

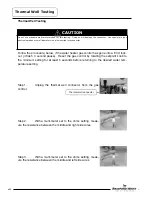
Page 34: ... the thermal well connector from the gas control Step 2 With a multi meter set to the ohms setting meas ure the resistance between the middle and right side wires Step 3 With a multi meter set to the ohms setting meas ure the resistance between the middle and left side wires Thermal Well Testing CAUTION Do not use standard multi meter probes for this testing Doing so will damage the connector Use ...

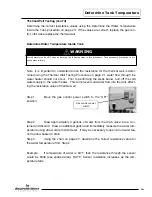
Page 35: ...tance value of thermal well Step 1 Move the gas control power switch to the OFF position Step 2 Draw approximately 4 gallons of water from the drain valve into a con tainer and discard Draw an additional gallon and immediately measure the water tem perature using an accurate thermometer It may be necessary to open a hot water fau cet to allow heater to drain Step 3 Using the chart on page 23 deter...

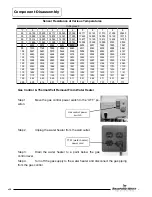
Page 36: ...12185 70 11884 11592 11308 11032 10763 10502 10248 10000 9760 9526 80 9299 9078 8862 8653 8449 8250 8057 7869 7685 7507 90 7333 7165 7000 6839 6683 6531 6383 6238 6098 5961 100 5827 5697 5570 5446 5326 5208 5094 4982 4873 4767 110 4663 4562 4464 4368 4274 4183 4094 4006 3922 3839 120 3758 3679 3602 3527 3453 3382 3312 3244 3177 3112 130 3048 2986 2925 2866 2808 2752 2697 2643 2590 2538 140 2488 24...

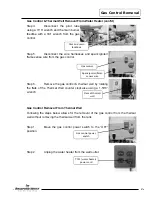
Page 37: ...ating the flats of the Thermal Well counter clockwise using a 1 5 16 wrench Gas Control Removal From Thermal Well Following the steps below allows for the removal of the gas control from the thermal well without removing the thermal well from the tank Step 1 Move the gas control power switch to the OFF position Step 2 Unplug the water heater from the wall outlet Gas Control Removal Pilot and main ...

Page 38: ...ol into the back of the gas control Step 7 Pivot the tool towards the water heater as far as possible Lift straight up on the gas control The gas control should move about 1 8 Hold the gas control in position and remove the tool Lift straight up on the gas control to remove it completely from the thermal well Gas Control Assembly to the Thermal Well Step 1 Install the threaded end of the thermal w...

Page 39: ...s the water heater Then slide the gas control down to lock into posi tion Step 5 Install the burner assembly and connect the pilot and main feedlines to the gas control using a 7 16 and 3 4 wrench respectively Step 6 Reconnect the wire harnesses to the gas control Step 7 Reconnect the gas piping to the gas control Re store the gas supply and check for gas leaks Gas Control Assembly Wire leads on t...

Page 40: ...d resettable ther mal switch The resistance must be between 3 000 and 48 000 ohms If the resistance is out of this range verify that the re settable thermal switch has not been tripped If it hasn t replace the thermal switch 115 VAC Circuit Trace Step 1 Verify 115VAC and proper polarity are at the wall outlet Step 2 With the water heater plugged in and the gas control power switch in the ON positi...

Page 41: ...n photo 10 Check for damage to AC supply power cord Repair damage Replace blower Is there 115VAC across terminals shown in photo 11 Incorrect supply voltage polarity Reconnect cord set shown in photo 9 Disconnect wire har ness from gas control see photo 12 Locate black white wires at connector it may be necessary to pull back wire sheath to identify wire colors see photo 13 Is there 115VAC across ...

Page 42: ...ht dim No voltage from gas control Call for technical support Verify 115VAC to gas con trol see page 41 Is there 10 to 13VAC between the yellow wire leading from the pressure switch and the green ground wire see photo 27 Is there continuity through the blower temperature switch see page 31 Check for loose or broken wire connection at switch terminals Do you hear or can you see the igniter sparking...

Page 43: ...system from the exhaust adapter on top of blower Step 4 Unplug the cord sets from the blower Step 5 Remove the three blower mounting screws 1 4 nut driver Step 6 Remove the blower with gasket from the top of the water heater Step 7 Remove the flue baffle from the Blower Removal Gas control power switch TTW water heater power cord Exhaust adapter Blower mounting screws Blower cord sets Flue baffle ...

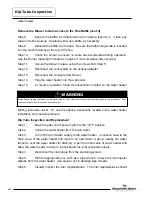
Page 44: ...e lighting instructions located in the water heater installation and operating manual Dip Tube Inspection and Replacement Step 1 Move the gas control power switch to the OFF position Step 2 Unplug the water heater from the wall outlet Step 3 Turn off the cold water supply to the water heater Connect a hose to the drain valve of the water heater and route to an open drain Open a nearby hot water fa...

Page 45: ...nd route to an open drain Open a nearby hot water faucet to vent the water heater for draining Open the drain valve of water heater and allow the water heater to drain to a point below the outlet connection nipple Step 4 Disconnect the outlet nipple from the plumbing system Step 5 With an appropriate tool such as a pipe wrench remove the outlet nip ple anode from the water heater Use caution not t...

Page 46: ...control power switch to the OFF po sition Step 2 Unplug the water heater from the wall outlet Step 3 Remove the outer door Step 4 Remove 4 1 4 hex drive screws from the right side inner door Step 5 Remove 3 1 4 drive screws from the left side burner door Inner Door Removal Gas control power switch Blower water heater power cord Connectors attached to resettable thermal switch Outer door 3 1 4 hex ...

Page 47: ...ollowing the Inner Door Gasket Replacement Procedure If not replacement of the inner door gaskets is not necessary Inner Door Gasket Replacement Procedure Step 1 Completely remove all gasket and adhesive residue from the right and left side inner doors as needed Step 2 U s i n g RTV sealant apply a 1 8 bead to secure t h e Inner Door Gasket Replacement Flammable vapor sensor Flammable vapor sensor...

Page 48: ...t Do not route these through the concave channel with the feedline Step 4 Firmly place the right side inner door flange against the left side inner door flange Step 5 Using the 1 4 hex drive screws removed in Step 4 of the Inner Door Re moval Procedure on page 32 secure the two flanges together Do not over tighten the screws Step 6 Align the right side inner door to the combustion chamber and veri...

Page 49: ...rom the gas control Step 5 Disconnect the spark igniter flame sensor wire from gas control Step 6 Remove the burner assembly from the combustion chamber Step 7 Clean the ScreenLok flame arrestor using a stiff brush compressed air and or a shop vacuum to remove any scale or other debris accumulation Using a soft brush clear jacket openings from any dirt dust restrictions or other obstructions Step ...

Page 50: ... Ohms of resistance PSI Pounds per Square Inch RPM Revolutions per Minute VAC Volts Alternating Current W C Inches of Water Column C Degrees Centigrade F Degrees Fahrenheit NOTES ____________________________________________________________ ____________________________________________________________ ____________________________________________________________ Common Terms 50 ...

Page 51: ...ew 8 18 x 1 2 5 Blower Gasket 19 Brass Drain Valve 33 Burner 6 Blower Power Cord 20 Flammable Vapor Sensor Clip 34 Pilot Assembly 7 Vent Adapter w Vent Term 21 Flammable Vapor Sensor 35 Screw 8 18 x 1 2 8 Condensate Hose Kit 22 Flammable Vapor Sensor Harness 36 Pilot Orifice 9 Heat Trap Outlet 23 Thermowell 37 Manifold Mount 10 Hot Water Outlet Anode 24 Gas Control 38 FVIR Sensor Plate 11 Flue Baf...

Page 52: ...Email parts bradfordwhite com techserv bradfordwhite com www bradfordwhite com ...

Reviews: