background image

24 

Operating Guidelines 

For The Bradley Smart Smoker® with iSmoke Technology® Model BS 916 and BS 916 CE 

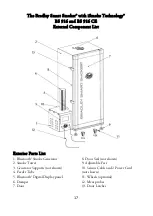
Refer to Part Numbers in External Components List Page 17. 

Seasoning & Preparation For Use 

Ideal 

ambient

 o

perating 

temperature 

range 

for your Bradley Smoker is between 4°C 
to 21°C (40°F to 70°F). Extreme 
temperatures lower or higher will affect 
the performance and outcome of the food. 
Do not store in freezing temperatures. 

Seasoning Method


Seasoning the Bradley Smoker® is an 

ongoing process, the more you use it, the 
better tasting your foods will be. 
• Clean Racks, Bisquette Cover, Drip Bowl

and rectangular Tray and place in smoker. 
• Fill the Drip Bowl 3/4 full of water.

• Load the Feeder Tube with 5 Bisquettes.
The 2 extra Bisquettes are to push the final 
Bisquette onto the Burner. The last 2 

Bisquettes will not advance to the Burner. 

• Note: each Bisquette burns for 20 minutes.

• Open the Damper at the top of the
Smoker Tower. 
• Plug smoker into its own designated

outlet. 
• Turn on the Smoke Generator by

pressing the Generator On/Off Button 
(Page 21). 
• Pre-heat Bisquette Burner for 20 minutes.

• Press Bisquette Advance Button until a
bisquette is on the Bisquette Burner (E). 

• Turn on the smoker (Page 2

2

) and set the

temperature to medium about 66°C 
(150°F). Wait for 20 to 30 minutes. 

• Smoke the tower continuously at 66°C
(150°F) for 1 hour, or until Bisquettes are 
out. 

• Your Smoker will be seasoned having

reached 66°C (150°F) and having produced 
smoke for 1 hour. 

Getting Started 

• After seasoning the smoker, refill the Drip

Bowl 3/4 of water. 
• Turn on the Smoke Generator by
pressing the Generator On/Off button. 

This pre-heats the Bisquette Burner. 
• Press the Bisquette Advance Button to
push a Bisquette onto the Bisquette burner 

(E). 

Note: After the advance button has been 

pressed, a new cycle will start, (or) in 
approximately 20 minutes the next Bisquette 

will advance. 

• Preheat oven to the desired temperature
you want to cook at. Place your food onto 

the cooking racks and load them into the 
smoker. 
• Set the damper at the desired opening.

Do not close the damper all the way when 
the smoke is running, as this could damage 
the smoke generator 

• You may need to adjust the oven
temperature to reach the desired set point. 

Note: The actual temperature is the air 
temperature inside the tower. To get a more 

accurate temperature of the food being 

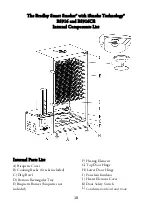
smoked, use supplied meat probes (12). Keep 
in mind that the ambient temperature will 

affect the cooking temperature of the smoker. 

Remember to clean your smoker after 

each use. 

Summary of Contents for BS916

Page 1: ... 1 866 508 7514 info bradleysmoker com www bradleysmoker com Printed in China Imprimé en Chine Impreso en China Gedruckt in China March 2016 Mars 2016 Marzo de 2016 März 2016 Model Name The Bradley Smart Smoker 120V Models BS916 240V Models BS916CE ...

Page 2: ...es and acids In addition the Bradley Smoker meets both North American and European appliance standards There are eleven different woods of the Bradley Flavor Bisquettes that are made especially for your smoker Alder Apple Cherry Hickory Maple Mesquite Oak Pecan Pacific Blend Special Blend and Whisky Oak For recipes ideas please have a look on the enclosed recipes booklet and on our website www bra...

Page 3: ...d use Do not use any other type of wood other than Bradley Flavor Bisquettes Lift and move smoker with care to prevent strains and back injuries Use caution when reaching into or around smoker It is recommended that a fire extinguisher be placed near the smoker Refer to your local authority to determine proper size and type of fire extinguisher Longer detachable power supply cords or extension cor...

Page 4: ...nce in a safe way and understand the hazards involved Cleaning and user maintenance shall not be made by children without supervision Steam cleaner is not to be used Do not plug in the smoker until it is fully assembled When in Use Do not leave unattended Do not cover or seal the racks or drip tray with aluminum foil This can cause severe damage to your smoker Do not move smoker when in use Do not...

Page 5: ...an the smoker with excessive amounts of water Instead use a damp cloth Maintenance Procedures Use caution when handling and cleaning your smoker as some metal edges may be sharp Clean out the Drip Bowl Dispose of all burnt Bisquettes carefully as they may still be hot Wash the Drip Tray Racks Bottom Rectangular Tray and Drip Bowl with hot water and dish detergent or put them in the dishwasher Remo...

Page 6: ... and undue wear and tear can be avoided Bisquettes Will Not Burn Completely Check to see if other electrical equipment is plugged into the circuit The smoker should be plugged into its own dedicated wall circuit Check to make sure the Bisquettes burner is free of residue build up Smoker Oven Not Reaching Temperatures Allow smoker oven time to preheat Remember once food is put in the oven the tempe...

Page 7: ...d Smoker Tower Sensor Receptacle B Plug the Short Power Cord 2 into the back of the Smoke Generator Female Receptacle D and then into the back of the Smoker Tower Male Receptacle C push firmly Plug the Long Power Cord 3 into the power receptacle E Set Up Smoker Tower Place Racks B onto side supports Place Bisquette cover A above the Bisquette Burner E Align the cover keyholes to the three support ...

Page 8: ...at interference will not occur in a particular installation If this equipment does cause harmful interference to radio or television reception which can be determined by turning the equipment off and on the user is encouraged to try to correct the interference by one or more of the following measures Reorient or relocate the receiving antenna Increase the separation between the equipment and recei...

Page 9: ...ist Exterior Parts List 1 Bluetooth Smoke Generator 2 Smoke Tower 3 Generator Supports not shown 4 Feeder Tube 5 Bluetooth Digital Display panel 6 Damper 7 Door 8 Door Seal not shown 9 Adjustable Feet 10 Sensor Cable and 2 Power Cord not shown 11 Wheels optional 12 Meat probes 13 Door Latches ...

Page 10: ...ternal Parts List A Bisquette Cover B Cooking Racks 6 racks included C Drip Bowl D Bottom Rectangular Tray E Bisquette Burner bisquettes not included F Heating Element G Top Door Hinge H Lower Door Hinge I Porcelain Insulator J Heater Element Cover K Door Safety Switch L Condensation bowl and hook ...

Page 11: ... for outdoor use and the connection to the extension cord should be dry and off the ground CAUTION TO ENSURE CONTINUED PROTECTION AGAINST RISK OF ELECTRICAL SHOCK CONNECT TO PROPERLY GROUNDED OUTLET ONLY CAUTION DISCONNECT FROM POWER OUTLET BEFORE CLEANING OR SERVICING DO NOT IMMERSE DO NOT EXPOSE TO RAIN This device complies with Industry Canada licence exempt RRS standard s Operation is subject ...

Page 12: ...t air temperature b Amount of product in the smoker c Internal temperature of whatever you re smoking d Displayed temperature readings are for reference only 5 NEVER fully close your smoker vent 6 Empty and refill your water bowl every 2 hours 7 When cooking or smoking foods that are heavy with grease and fat please place the pie plate or bowl directly under the food to catch as much of the render...

Page 13: ...inated On Off button to start up the generator screen The Generator screen will go through the animated start screen Choose your operating language Language selection will happen only very first time you power the smoker on There are 15 operating languages to choose from Note If you choose the wrong language press the statistics button and you can change the language again ...

Page 14: ...quette icon and choose 1 or 2 to advance bisquettes onto burner once or twice respectively After the Bisquette has advanced the main screen will return Oven timer Touch or press Oven Time numbers to adjust desired cooking time Example For 3hrs and 30 mins press 0 3 3 0 After 2 seconds the timer will start and the main screen will return Longest oven time setting is 9 40 hours Setting Oven Temperat...

Page 15: ...peratures by built in selection of meats and internal cooking temperature levels Auxiliary Display Functions Child safety lock disables all the touchscreen functions on the generator and the lock turns red This will not affect the remote device Screen brightness can be adjusted by pressing the brightness icon Temperature can be changed between Fahrenheit and Celsius by pressing F or C icon respect...

Page 16: ... Bisquette Burner E Turn on the smoker Page 22 and set the temperature to medium about 66 C 150 F Wait for 20 to 30 minutes Smoke the tower continuously at 66 C 150 F for 1 hour or until Bisquettes are out Your Smoker will be seasoned having reached 66 C 150 F and having produced smoke for 1 hour Getting Started After seasoning the smoker refill the Drip Bowl 3 4 of water Turn on the Smoke Generat...

Page 17: ...ling charges are the responsibility of the original consumer purchaser for all out of warranty parts orders Serial number of the smoker must be provided on all warranty claims Bradley Technologies excludes from its warranty the following Defects damage resulting from accident abuse misuse alteration improper assembly installation and vandalism are not covered Damage resulting from weather conditio...

Reviews: