

Pre-Installation Information
Overview
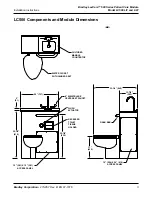
The Bradley LavCare module is a patient water closet and lavatory station in one unit. The unit
has three access panels for ease of installation and maintenance. The LC500 countertop is made
from cultured marble and the water closet is stainless steel.
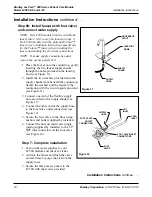
Supplies required for installation:
(6) wall anchors and bolts to secure cabinet to wall at 3/4 mounting holes
Steel angles and hardware for anchoring the water closet (if concrete is lightweight or
less than 4 thick)
4 floor/wall closet waste connection fittings
Shims (for water closet or cabinet installation, if necessary)
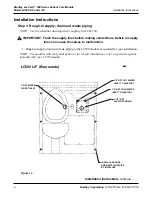
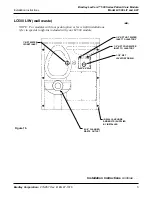
Supply piping to water closet and faucet or foot valve
Waste outlet piping to water closet
P-trap and drain piping
Silicone caulk
Bradley LavCare 500 Series Patient Care Module
Model LC500 L/F and L/W
Installation Instructions
2
Bradley Corporation
215-857 Rev. B; EN 97-1016
Bradley LavCare 500 Module Warranty Information
Bradley Corporation warrants to commercial and institutional purchasers only each unit free from defects in material and workman-
ship under normal use and service upon the following terms and conditions:
1. This warranty is limited to replacing or repairing, at our option, transportation charges prepaid by the purchaser, any Bradley unit or
part thereof which our inspection shall show to have been defective within the limitations of this warranty.
2. The period during which LC500 components are warranted is one (1) year, measured from the date of our invoice.
3. This warranty does not cover installation or any other labor charges and does not apply to any units which have been damaged by
accident, abuse, improper installation or improper maintenance.
4. The replacement or repair of defective units as stated in this warranty shall constitute the sole remedy of the purchaser and the sole
liability of Bradley Corporation under this warranty. Bradley Corporation shall not otherwise be liable under any indirect damages
caused by defects in the repair or replacement thereof.
5. This warranty extends only to commercial and institutional purchaser and does not extend to any others, including consumer customers of
commercial institutional purchasers.
6. This warranty is in lieu of all other warranties, expressed or implied, including any implied warranty of merchantability or fitness for
a particular purpose or otherwise.
IMPORTANT
Read this entire instruction sheet to ensure proper installation.
Flush all the water supply lines before making connections.
File these instructions with the owner or maintenance department.


