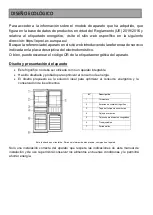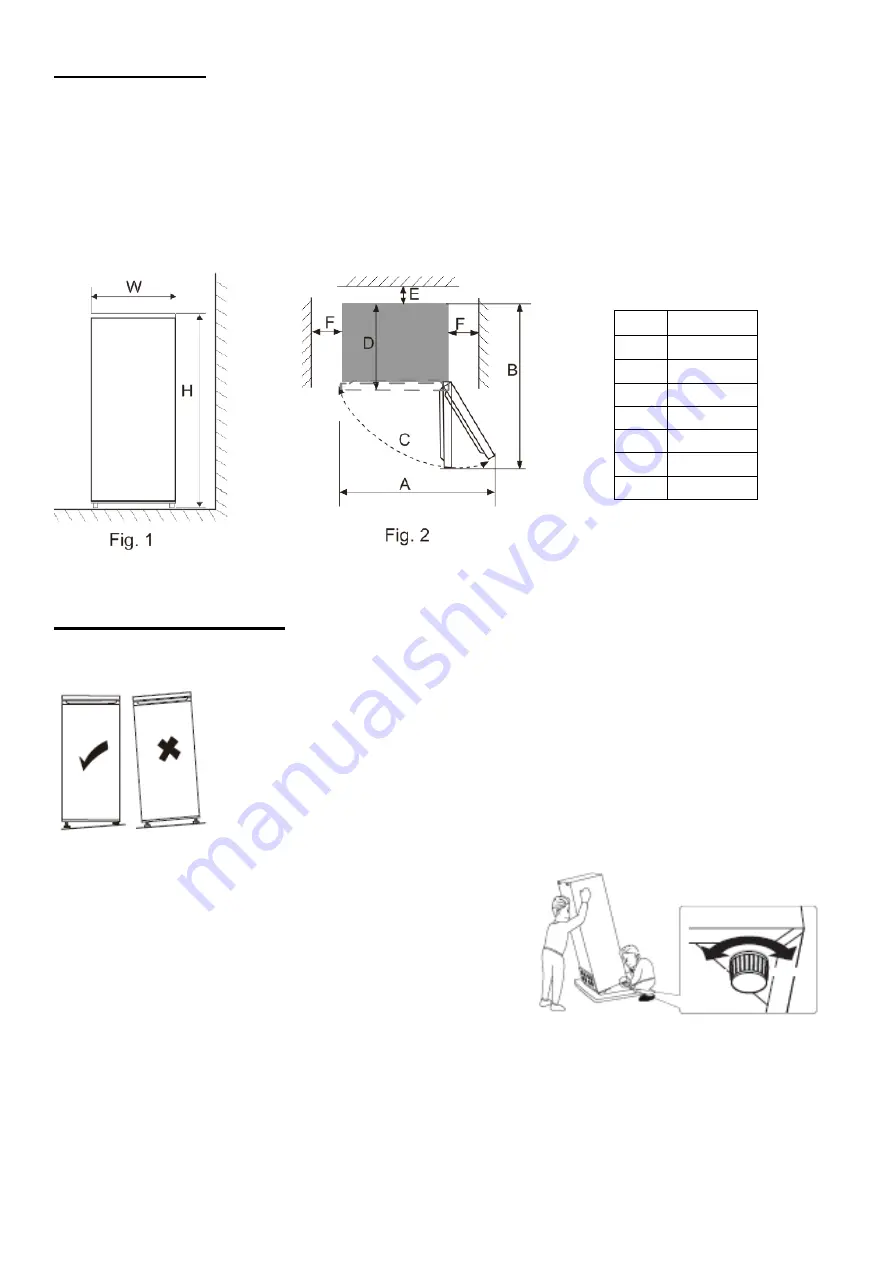
Space required
•
Choose a location that is not directly to sunlight.
•
Choose a location with enough space so that the refrigerator can open easily.
•
Allow for a safety distance on the right-hand side (F), left-hand side (F), back (E) and
above the appliance when installing it. This allows optimising product performance,
reduces your power consumption and therefore limits your electricity bill (see diagram
below).
•
Make sure that air can freely circulate behind the appliance.
Note that this appliance is not designed for built-in installation.
Levelling the appliance
Choose a place to install the refrigerator on a flat surface.
If the appliance is not level, the doors will not be correctly aligned and
compartment sealing will not be ensured.
To level the appliance laterally, adjust the two adjustable feet on the front of
the product.
Once the appliance is installed, ensure that it is slightly inclined rearwards. In
this way, it will be easier to close the door. If necessary, adjust the setting of
the adjustable feet.
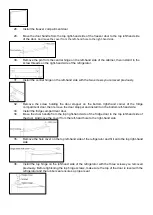
Procedure for adjusting the feet at the front of the product
W
540mm
D
550mm
H
1593mm
A
910mm
B
1055mm
C(°)
130 ±5
E
50mm
F
100mm
Raise
Lower
Summary of Contents for 3660767975439
Page 66: ...BRANDT 60 www brandt com BRANDT...
Page 67: ......
Page 68: ...8...
Page 69: ...3 8 48 5...
Page 70: ......
Page 71: ...R600a R600a...
Page 72: ...2019 2016 https eprel ec europa eu QR 1 2 3 4 5 6 7...
Page 73: ...5 6 mm Booster 6 4 C 0 0 C 1 6 C 2 12 C 3 18 C 4 18 C...
Page 74: ...0 1 2 3 4...
Page 75: ...2 SN 10 C 32 C SN ST 10 C 38 C SN T 10 C 43 C N 16 C 32 C ST 16 C 38 C T 16 C 43 C...
Page 76: ...2 55 56 57 58 59 60 61...
Page 77: ...62 63 64 65 66 67 68 69 70 71 72...
Page 78: ...F F E W 540mm D 550mm H 1593mm 910mm B 1055mm C 130 5 E 50mm 100mm...
Page 79: ......
Page 80: ...4 C 30 5 4 3 2 1 5 5 o 1 o 5 26 5 3 1 ok...
Page 81: ...60 3 5...
Page 82: ...24 24...
Page 83: ...LED 1...
Page 84: ......
Page 85: ...24...
Page 86: ...www brandt gr...

