10
•
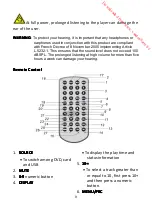
To return to DVD root menu
•
To switch PBC on/off (VCD)
7.
AUDIO
AUDIO
AUDIO
AUDIO
•
To select an audio language
(DVD)
•
To select an audio channel
(MP3, CD, VCD)
8.
9.
10.
MODE
MODE
MODE
MODE
•
To access to video setup page
11.
VOL+
VOL+
VOL+
VOL+
12.
13.
14.
15.
16.
STEP
STEP
STEP
STEP
17.
SEARCH
SEARCH
SEARCH
SEARCH
•
•••
To go to a track, title or
chapter you want
18.
SUBTITLE
SUBTITLE
SUBTITLE
SUBTITLE
•
To select a subtitle language
(DVD)
19.
ANGLE
ANGLE
ANGLE
ANGLE
•
To select a DVD viewing angle
if available
20.
TITLE
TITLE
TITLE
TITLE
•
To return to DVD title menu
21.
ENTER
ENTER
ENTER
ENTER
/
22.
SETUP
SETUP
SETUP
SETUP
23.
VOL-
VOL-
VOL-
VOL-
24.
REPEAT
REPEAT
REPEAT
REPEAT
25.
SLOW
SLOW
SLOW
SLOW
26.
PROGRAM
PROGRAM
PROGRAM
PROGRAM
27.
ZOOM
ZOOM
ZOOM
ZOOM
GETTING
GETTING
GETTING
GETTING STARTED
STARTED
STARTED
STARTED
Installing
Installing
Installing
Installing main
main
main
main and
and
and
and slave
slave
slave
slave screens
screens
screens
screens to
to
to
to Car
Car
Car
Car Seats
Seats
Seats
Seats
1. Slide the support straps through the slot on the back of the two
screens.
2. Place the straps around the headrest of the car front seats.
3. Centre the screens then buckle the strap securely.
Connecting
Connecting
Connecting
Connecting Power
Power
Power
Power
To connect power from inside a car, connect the supplied car adapter
to the
DC
DC
DC
DC IN
IN
IN
IN 9-12V
9-12V
9-12V
9-12V
jack of the unit.
Downloaded from www.vandenborre.be

