14
It is not permitted to carry out repairs and maintenance in other way than
specified by the producer. It means namely the forbiddance of using unoriginal
spare parts or carrying out of changes on the product without the approval of the
producer.
ALWAYS
test jack function after carrying out the maintenance.
ALWAYS
mark disabled or repaired jack with appropriate inscription (i.e.
„OUT OF
OPERATION“
).
NEVER
carry out maintenance if there is the load on the jack.
NEVER
work with the jack that is under repair!
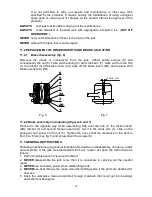
11.2 REPLACEMENT OF BRAKE INSERTS AND BRAKE ADJUSTING
11.2.1 Brake disassembly (fig. 6)
Demount the (crank or crank-lever) from the jack. Unbolt safety screws (6) and
consequently the nut (5). Take out the spring (4) and crank arm (7). Take out from the hub
(1) the ratchet (3) with brake insert (2A), take off the brake insert (2B), and replace both
brake inserts (2A) (2B).
Fig. 6
Fig. 7
11.2.2 Brake assembly and adjusting (figures 6 and 7)
Proceed in the opposite way when assembling. Slip over the hub (1) the friction insert
(2B); ratchet (3) and second friction insert (2A). Set it in the crank arm (7), slide on the
spring (4) and screw on the nut (5). Tighten the nut so that the clearance in the dent is
from 4 to 6 mm (see fig. 5) and screw down the screws (6).
11.3 GENERAL INSTRUCTIONS
Following instructions give general important information on disassembly, check up, repair
and assembly. If the jack was dismounted from any reason act upon the instructions as
follows.
1. Perform maintenance in clean environment.
2.
NEVER
disassemble the jack more than it is necessary to carrying out the needful
repair.
3.
NEVER
use excessive power when dismantling parts.
4.
NEVER
use heat (fire) as the mean when dismantling parts, if the parts are destined for
next use.
5. Keep the workplace clean and without foreign materials that could get into bearings
and other movable parts.
7
6
5
4
2A
3
2B
1
4 till 6 m m


