background image


Page 

2

 of 

11


IN0021 Rev11 Dec 2020 

I. 

LOCATION, FIXED DUTY 


Locate  the  pump  as  close  as  possible  to  the  liquid  to  be  transferred.    Provide  the 
necessary  space  around  the  pump  for  inspection  and  servicing.    If  possible,  allow 
several  inches  of  clearance  below  the  pump  and  motor  to  allow  easy  access  to  the 
bottom seal plate-to-tank fixing cap screws.  These cap screws must be removed for 
servicing. 
 
The pump should be mounted on a fixed and firm base by means of bolts.  The ambient 
temperature of the location should not exceed 40

C. 


II. 

INSTALLATION 


Connect the pump using suitable polymer pipe.  The pump suction line should not be 
smaller  than  63mm  OD  (2”  NB).    It  is  recommended  for  optimum  operation  that  the 
discharge  pipe  is  also  63mm  OD.    All  piping  must  be  air  tight;  especially  that  of  the 
suction line. 
 
Your pump is made of some of the finest engineering materials available today.  A few 
simple precautions, taken during the initial installation, will insure many long years of 
trouble-free operation. 
 
The pipe should be connected to the pump using suitable union rings with a 2¾” BSP 
thread. 
 

CAUTION 


Tighten the  pump fittings  by hand only as much  as is required to ensure  a 
tight connection.  Excessive torque is unnecessary and may cause damage 
to the pump – we do not recommend the use of a strap wrench or similar.  
 
The  weight  of  the  pipe  work  should  be  supported  independently  and  not 
carried by the pump. 


The pump motor must be wired for the proper voltage and rotation, in accordance with 
the wiring diagram supplied with the motor, packed inside the terminal box.  All wiring 
should be carried out by a licensed electrician in accordance with local codes.  Ensure 
that  the  motor  frame  is  grounded.    The  supply  voltage,  phase,  full  line  current  and 
frequency are given on the motor rating label.  

III 

ROTATION 


Your  pump  is  specifically  designed  to  rotate  in  a  counter-clockwise  direction  when 
viewing the motor from the pump end.  Please see direction of arrow on the label fixed 
to the fan cover.  Three-phase motors can rotate in either direction.  Interchanging any 

Summary of Contents for J ECX Series

Page 1: ...SS STEEL and NON METALLIC SEAL IMPORTANT ALL ELECTRICAL WORK SHOULD ONLY BE UNDERTAKEN BY QUALIFIED ELECTRICIANS WARNING Before disconnecting electrical connections ensure that electricity supply is s...

Page 2: ...al installation will insure many long years of trouble free operation The pipe should be connected to the pump using suitable union rings with a 2 BSP thread CAUTION Tighten the pump fittings by hand...

Page 3: ...ated into our self lubricating shaft seal The liquid being pumped cools and lubricates the seal Running the pump dry will damage the seal Always keep liquid in the pump tank No further lubrication of...

Page 4: ...is pump should always be secured to the motor shaft using a suitable adhesive such as Loctite 499 or similar When activating the pump again reverse the above procedure Replace the gasket between the t...

Page 5: ...k for clogging blockage SYMPTOM II MOTOR DOES NOT TURN PROBABLE CAUSES AND RECOMMENDED ACTION a No Power to Motor Check all power switches are on check that fuse or circuit breaker is correctly set ch...

Page 6: ...e suction conditions if pump is starved of flow e g reduce suction lift increase pipe size and reduce number of valves and connection in pipeline Increase discharge pressure and reduce flow by throttl...

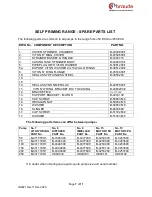
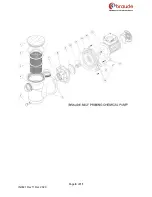
Page 7: ...G B 4480200 2 12 BRACKET M C B 4377800 13 SUPPORT BRACKET MOTOR B 4474100 14 CAP SCREW B 50683 M6 14 HEXAGON NUT B 50204 M6 14 WASHER B 50684 M6 16 SLINGER B 2848600 17 CAP SCREW B 51722 M8 17 WASHER...

Page 8: ...Page 8 of 11 IN0021 Rev11 Dec 2020...

Page 9: ...Page 9 of 11 IN0021 Rev11 Dec 2020 Outle...

Page 10: ...a form for completion or you can download a form here Please email the completed form to sales braude co uk You will be issued with a returns reference number 3 Return the item and the returns form sh...

Page 11: ...materials or workmanship and subject to the Company s general conditions of sale and warranty the Company undertakes to correct at its discretion by repair or replacement any such defect occurring wi...

Reviews: