Page 35
Lift
Disposal
Procedure
1. Return lift to an authorized dealer for draining of the hydraulic system.
2. Transport lift to a recycling center for recycling.
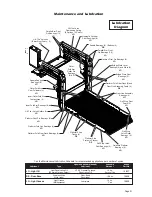
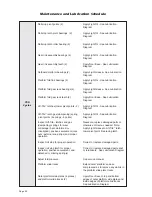
Maintenance and Lubrication Schedule
Tighten, repair or replace if needed.
Replace if needed.
Tighten or replace if needed.
Replace damaged parts and lubricate if
needed.
Apply Light Grease during reassembly
procedures.
Replace if needed.
Tighten, replace or correct as
needed
Apply Door-Ease or replace if needed.
See Lubrication Diagram.
Resecure or replace if needed.
Resecure, repair or replace if needed.
Check to see that the lift is securely
anchored to the vehicle and there are
no loose bolts, broken welds, or stress
fractures.
Replace decals if worn, missing or
illegible. Replace antiskid if worn or
missing. See Decals and Antiskid
section.
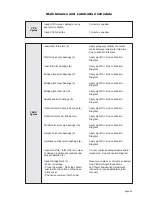
,QVSHFWF\OLQGHUVÀWWLQJVDQGK\GUDXOLF
connections for wear, damage or leaks
Inspect parallel arms, bearings and
pivot pins for visible wear or damage
Inspect parallel arm pivot pin mounting
bolts (8)
Inspect platform pivot pins, bearings
and vertical arms for wear, damage and
positive securement
Inspect inner/outer fold arms, saddle,
saddle support and associated pivot
pins and bearings for visible wear or
damage
Inspect gas springs (cylinders -4) for
wear or damage, proper operation and
positive securement
Inspect saddle bearings (2) / buttons (4)
Inspect vertical arm plastic
covers
Inspect power cable
Mounting
Decals and Antiskid
4500
Cycles
Repeat all previously listed inspection,
lubrication and maintenance procedures
DWF\FOHLQWHUYDOV
Consecutive
750 Cycle
Intervals
Summary of Contents for Century 2 CLXT
Page 42: ...Page 40...

