background image

Page 5

WA

RNING

Lift Operation Safety

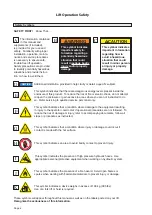
Keep operator and bystanders clear of area in which the lift operates.

Lift attendant must observe passenger at all times during lift operation.

Ensure adequate lighting exists in the lift operating area.

Whenever a wheelchair passenger (or standee) is on the platform, the:

• Passenger must be positioned fully inside yellow boundaries facing outward.

• Wheelchair brakes must be locked

• Bridge plate and roll stop must be up (vertical)

• Roll Stop latch must be fully engaged

• Passenger should grip both handrails (if able).

Wheelchair lift attendants should be instructed on any special needs and/or procedures  

required for safe transport of wheelchair passengers.

Load and unload clear of vehicular traffic.

Do not attempt to load or unload a passenger in a wheelchair or other apparatus that 

does not fit on the platform area.

The lift attendant shall not ride on the platform with the passenger.  The lift is intended  

for use by a single passenger.

Do not overload or abuse.  The load rating applies to both the raising and lowering 

functions.

Use caution when operating this equipment out of doors during electrical storms or 

similar electrical phenomena.

Use caution when operating this equipment in severe weather or environmental 

conditions (fog, rain, snow, ice, dust, etc.) 

Discontinue lift use immediately if any lift or vehicle interlock does not operate properly.

Do not operate or board the lift if you or your lift operator are intoxicated.

WA

RNING

WA

RNING

WA

RNING

WA

RNING

WA

RNING

WA

RNING

WA

RNING

WA

RNING

WA

RNING

WA

RNING

WA

RNING

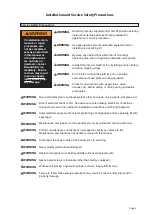
Lift Operation Safety Precautions 

Read manual and supplement(s) before operating lift.  

Read and become familiar with all safety precautions, 

operation notes and details, operating instructions and 

manual operating instructions before operating the lift.  

Load and unload on level surface only.

Engage vehicle parking brake before operating lift.

Provide adequate clearance outside the vehicle to accom-

modate the lift before opening lift door(s) or operating lift.

Inspect lift before operation.  Do not operate lift if you 

suspect lift damage, wear or any abnormal condition.

Do not use as a link bridge.

WA

RNING

WA

RNING

WA

RNING

WA

RNING

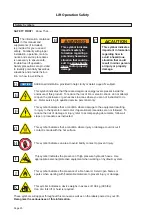
If the lift operating 

instructions, manual 

operating instruc-

tions and/or lift 

operation safety pre-

cautions are not fully 

understood, contact 

BraunAbility immedi-

ately.  Failure to do so 

may result in serious 

bodily injury and/or 

property damage.

WA

RNING

WA

RNING

WA

RNING

WA

RNING

Summary of Contents for L1100IB4061RP-2

Page 1: ...1 Rev A November 2015 Original Instructions International Owner Manual ISO 9001 2008 www braunability com international 631 West 11th Street Winamac IN 46996 USA Phone 1 574 946 6153 Fax 1 574 946 467...

Page 2: ...ou again for your business and enjoy your independence Sincerely The BraunAbility Employee Family OWNER S WARRANTY REGISTRATION War Card 07 ai PURCHASED FROM DATE INSTALLED NAME ADDRESS CITY TELEPHONE...

Page 3: ...3 Connect Interlocks 14 Lift Operating Instruction Decal 14 Platform Angle Adjustment 15 Tower Microswitch Adjustment 16 17 Installer Verification 18 19 Lift Operation Safety 20 22 Lift Operating Inst...

Page 4: ...ock do not attempt to open the enclosure or gain access to areas where you are not instructed to do so Refer servicing to qualified service personnel only This symbol indicates that a condition where...

Page 5: ...injury and or property damage WARNING WARNING Read this manual supplement s and lift posted operating instructions decals before performing installation operation or service procedures Use appropriate...

Page 6: ...r electric shock do not attempt to open the enclosure or gain access to areas where you are not instructed to do so Refer servicing to qualified service personnel only This symbol indicates that a con...

Page 7: ...lectrical storms or similar electrical phenomena Use caution when operating this equipment in severe weather or environmental conditions fog rain snow ice dust etc Discontinue lift use immediately if...

Page 8: ...ols Turn powered electric wheelchairs off when on lift platform Press the DOWN switch until the entire platform rests on ground level lowered fully and the roll stop is fully unfolded ramp position be...

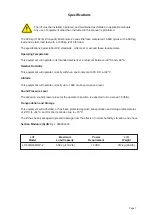
Page 9: ...65 C Relative Humidity This equipment will operate correctly within an environment at 50 RH at 40 C Altitude This equipment will operate correctly up to 1000 m above mean sea level Sound Pressure Leve...

Page 10: ...etailed in this manual Any use of equipment other than instructed in this manual is prohibited Pump Module Rear Hand Held Pendant Control Base Plate Base Plate Cover Top Parallel Arm 2 Adjustable Quie...

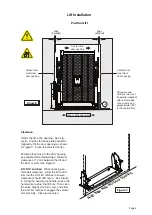
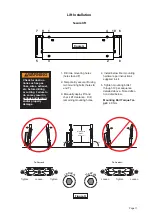
Page 11: ...and the door or wall See Figure D Lift Tite Latches When checking ve hicle wall clearance allow the lift to drift fully into the Lift Tite latches to ensure clearance should drift occur See Figure F U...

Page 12: ...ns It is not permissible for the base plate to overhang the step well Base plate support must be constructed in the step well for lift support The structure must be level with the existing floor and o...

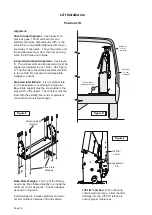
Page 13: ...n detail below Mounting Bolt Torque Tar get 40 Nm Check for obstruc tions such as gas lines wires exhaust etc before drilling or cutting Failure to do so may result in serious bodily injury and or pro...

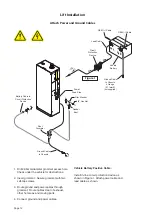
Page 14: ...et Route cables clear of exhaust other hot areas and moving parts 4 Connect ground and power cables Lift Installation Attach Power and Ground Cables Figure I Vehicle Battery Positive Cable Install in...

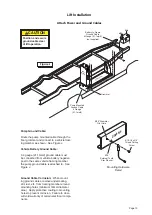
Page 15: ...gure J Vehicle Battery Ground Cable A 4 gauge 21 1mm2 ground cable must be connected from vehicle battery negative post to the same vehicle framing member the pump ground cable is attached to See Figu...

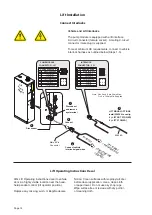
Page 16: ...S Install 32638A in cavity 5 LIFT NOT STOWED 9 LIFT STOWED VEHICLE SECURE SIGNAL Grey Red LIFT SIGNAL Yellow Light Blue PUMP MODULE CONNECTOR J21 6 5 4 3 2 1 SIGNAL DEFINITION NO 9 COND WIRE CODE 7 VE...

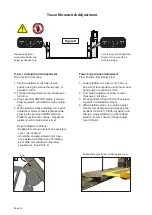
Page 17: ...tion of vehicle of vehicle Heel Ground Level Outboard roll stop must unfold flly Platform heel must lower fully Outboard Roll Stop Floor level Wedges option Figure C 2 1 Adjustment Procedure Platform...

Page 18: ...m saddle and the lower parallel arm See Photo B Tower 2 Up Switch Adjustment Floor Position from Below Floor 1 Lower platform a minimum of 15 25 cm below floor level position using the manual hand pum...

Page 19: ...croswitch inside the lift tower see Photo D Turn the switch adjust ment screw in or out as needed until the radius of the microswitch blade rides on the apex of the activation plate 3 Verify proper ad...

Page 20: ...period Verify that the vertical drift of the platform between the two measurements has not exceeded 15 mm Verify that the angular drift of the platform between the two measurements has not exceeded 2...

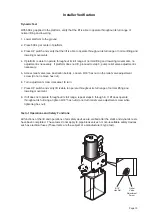
Page 21: ...Access relief valve see illustration below Loosen 9 16 hex nut on the relief valve adjustment screw do not remove hex nut 6 Turn adjustment screw clockwise 1 8 turn 7 Press UP switch and verify lift...

Page 22: ...or electric shock do not attempt to open the enclosure or gain access to areas where you are not instructed to do so Refer servicing to qualified service personnel only This symbol indicates that a co...

Page 23: ...electrical storms or similar electrical phenomena Use caution when operating this equipment in severe weather or environmental conditions fog rain snow ice dust etc Discontinue lift use immediately if...

Page 24: ...rols Turn powered electric wheelchairs off when on lift platform Press the DOWN switch until the entire platform rests on ground level lowered fully and the roll stop is fully unfolded ramp position b...

Page 25: ...rate lift Hand held Pendant Control 36514 Lift Power ON OFF Switch This switch must be in the ON position in order to activate the lift The green Power Indicator Light illuminates to signal power to t...

Page 26: ...ee Photo C Release switch 3 Unlock wheelchair brakes and unload passenger from platform OPEN DOOR S AND SECURE Lift Operating Instructions TO UNFOLD PLATFORM Stand clear and press the UNFOLD switch un...

Page 27: ...st be fully unfolded ramp position until the entire wheelchair or standee has crossed the roll stop See Photos E and F Notice Passenger must be positioned fully inside yellow boundaries J I 2 Press UP...

Page 28: ...2 Nm seats stops O P E N C L O S E AI B P Valve 1 30 92 O P E N C L O S E approximate 1 5 mm intervals Valve Tightening Specification Once valve seats stops tighten 2 to 3 Nm as shown Notice Close ba...

Page 29: ...lease valve and turn counterclockwise open 1 4 turn only until the platform reaches ground level and the roll stop unfolds See Photo C Down To Lower Using hand pump handle a Place slotted end of pump...

Page 30: ...ncy Stop E Stop Operating Instructions To Activate E Stop Push E Stop button down To Reset E Stop 1 Turn lift power OFF 2 Pull E Stop button up 3 Turn lift power ON Lift Pump Module E Stop Button Lift...

Page 31: ...and the surrounding area before applying lubricants Clean only with mild detergent and water Do not clean with solvents Allow the lift to dry thoroughly and apply lubricants as specified after every...

Page 32: ...aring 16 LO Lift Tite Latches Pivot Points 2 LO Lift Tite Latch Dampening Spring 2 springs 4 Points LO Saddle Support Bearings 8 LO Outer Fold Arm Cam Followers 4 LO Inner Outer Fold Arm Contact Area...

Page 33: ...ght Grease to both sides of slot See Lubrication Diagram Apply Light Oil See Lubrication Diagram Apply Light Oil See Lubrication Diagram Apply Light Oil See Lubrication Diagram Resecure replace damage...

Page 34: ...e lever bearings 2 Bridge plate lever slot 2 Saddle support bearings 8 Inner fold arm roller pin bearings 4 Inner fold arm cam followers 4 Parallel arm pivot pin bearings 16 Handrail pivot pin bearing...

Page 35: ...or replace if needed Tighten repair or replace if needed Replace if needed Tighten or replace if needed Replace damaged parts and resecure as needed Apply Light Grease during reassembly procedures Re...

Page 36: ...ubrication Schedule Apply Door Ease or replace if needed See Lubrication Diagram Resecure or replace if needed Resecure repair or replace if needed Check to see that the lift is securely anchored to t...

Page 37: ...nery Directive We hereby certify that the machinery described above conforms with the essential health and safety requirements of Council Directive 2006 42 EC on the approximation of the laws of the M...

Page 38: ...g to EN ISO 11204 Appendix A Measurements were made at a height of 1 5 m and 1 m from the Operator Position and Bystander positions 4 dB A The difference between the extraneous noise level and the sou...

Page 39: ...dapt se AUTOADAPT UK LTD Unit 1 Windsor Industrial Estate Rupert Street Aston Birmingham B7 4PR UK Phone 44 0 121 33 35 170 E mail contact autoadapt co uk Dual Parallel Arm Hydraulic Lift System Centu...

Page 40: ...ons descriptions and specifications in this manual are based on the latest product information available at the time of publication The Braun Corporation reserves the right to make changes at any time...

Reviews: