background image

    Before installation,please refer to the installation diagram.Lay water pipes 

    on the floor,position the power outlet and hot/cold water inlet pipes.Please 

    ask a professional plumber to complete the actual construction.

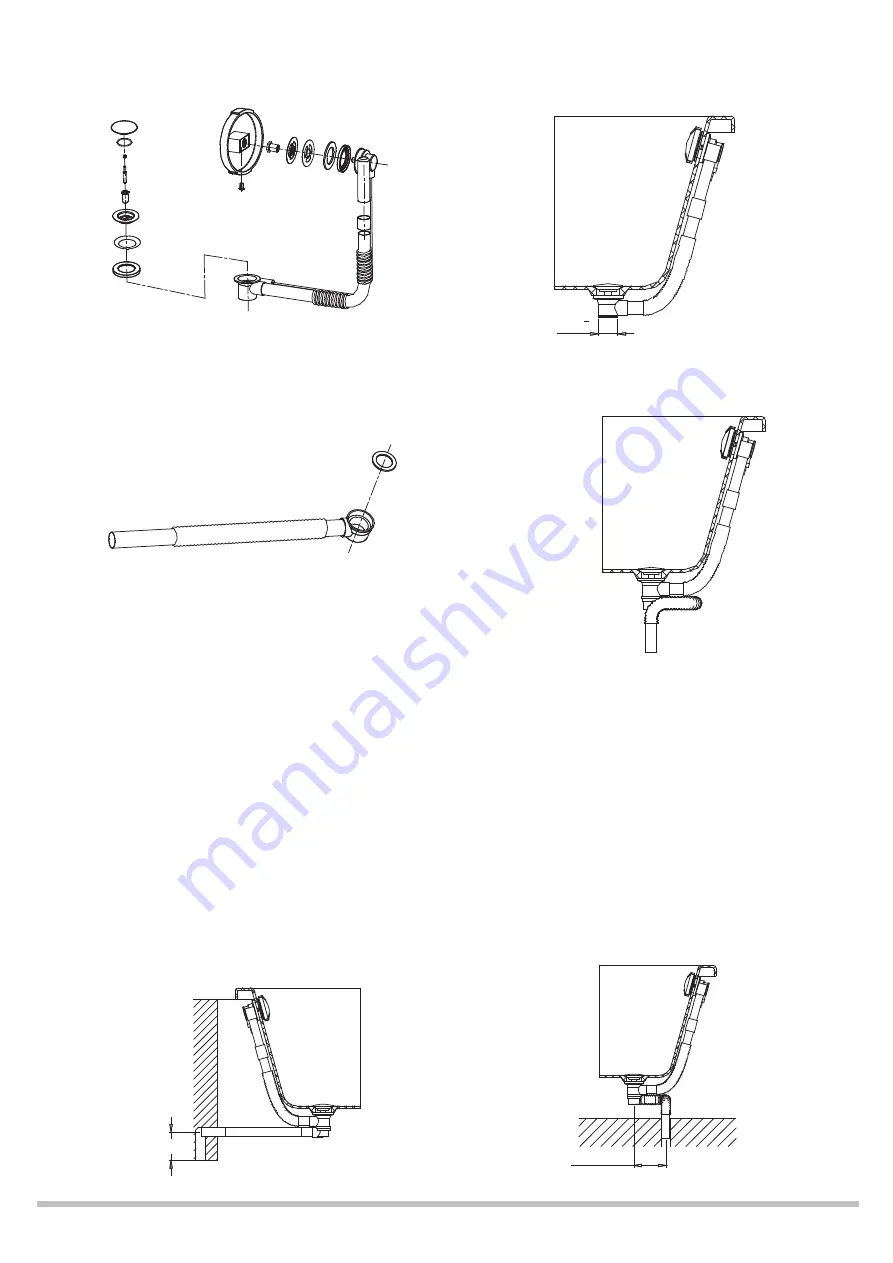
    Installation of the drainers:Install the drainers to the bathtub according to

    the installation instructions of the drainers. The figure below is 

    the installationillustration recommended by our company specificlly for the Drainer D409 series.    

    Installation of drain pipes:Install the drain pipes to the bathtub according 

    to the installation instructions of the drain pipes .The figure below is the 

    installation illustration recommended by our company for the Drain Pipe 

    P9098N series.

   Switch off the water drainage,pour water into the bathtub,and then check 

    whether there is water leakage.Make sure that the overflow adapter is 

    leak-proof.

     There are two kinds of drainage:drainage through the wall and drainage

      through the floor. If the drainage through the wall is used,the height of the

      drainer pipes must be lower than that of the internal drain outlet of the

      bathtub. The height is generally recommended to be 50 mm. If the drainage

      through the floor is used, the height of the drain outlet is recommended to

      be 120 mm above from the drain outlet. (Drainage through the floor is 

      recommended.) 

G1

1

2

120mm

50mm

Drainage through the wall

Drainage through the floor

Guangzhou BRAVAT Industrial Co., Ltd.

       Service Hot Line: 800-820-5330

Web:www.bravat.com

5

Summary of Contents for B25712W-6

Page 1: ...ge experience 4 Adjustable airflow free massage intensity setting 5 BODY CONTOUR airjet design aesthetic outline comfortable and ideal for lying bath 6 Smart cleaning system ensure hygienic and health...

Page 2: ...be responsible for any loss from that mistake 4 Professional help is required for installation of this product 5 Shut off power supply before installation 6 Keep the area around the Air Pump clean and...

Page 3: ...pump icon and lamp icon will be lit simultaneously and the timing will be cancelled touch the icon again the orange backlight will be lit simultaneously and the timing is set The settings become vali...

Page 4: ...floor at the same time F INSTALLATION STEP Hot Supply Power Socket Cold Supply Drainage outlet 1 2 3 4 1 2 3 4 N L 220 240V 50Hz 60Hz 910W IPX5 I TYPE BTU1 0 Connection Blueprint Of Massage Tub MAIN...

Page 5: ...stration recommended by our company for the Drain Pipe P9098N series Switch off the water drainage pour water into the bathtub and then checkwhether there is water leakage Make sure that the overflow...

Page 6: ...r to facilitate future maintenance Follow the drainage accessory installation instruction and connect drainage lines and supply lines with bathtub using silicon sealant or other soft sealants to seal...

Page 7: ...y if using in high hard water area where high calcium content in water would leave yellow spot after dirt attaching on bathtub surface 3 Please use soft cloth with neutral cleaner or soap to clean bat...

Reviews: