


4
OPERATING INSTRUCTIONS
Speed Control Dial
The food processor speed control dial
has two speeds settings plus "Pulse" and
"Turbo".
1 - Low
2 - High
The speed can be adjusted while the
food processor is in use.
Use of the Pulse/Turbo button allows
greater control over the texture of the
food being processed. Use "Pulse" when
the unit is in the "Off" position. Use
"Turbo" when the unit is in the "On"
position and you need a burst of power.
Please note that the "Pulse" and "Turbo"
is only intended to be used for short
"bursts" of processing.
Operating the Food Processor
Setting up:
1.
CAUTION
: Make sure that the unit is
unplugged from the power source and
the the Speed control dial is in the
"Off" position before inserting or
removing any attachments and before
cleaning.
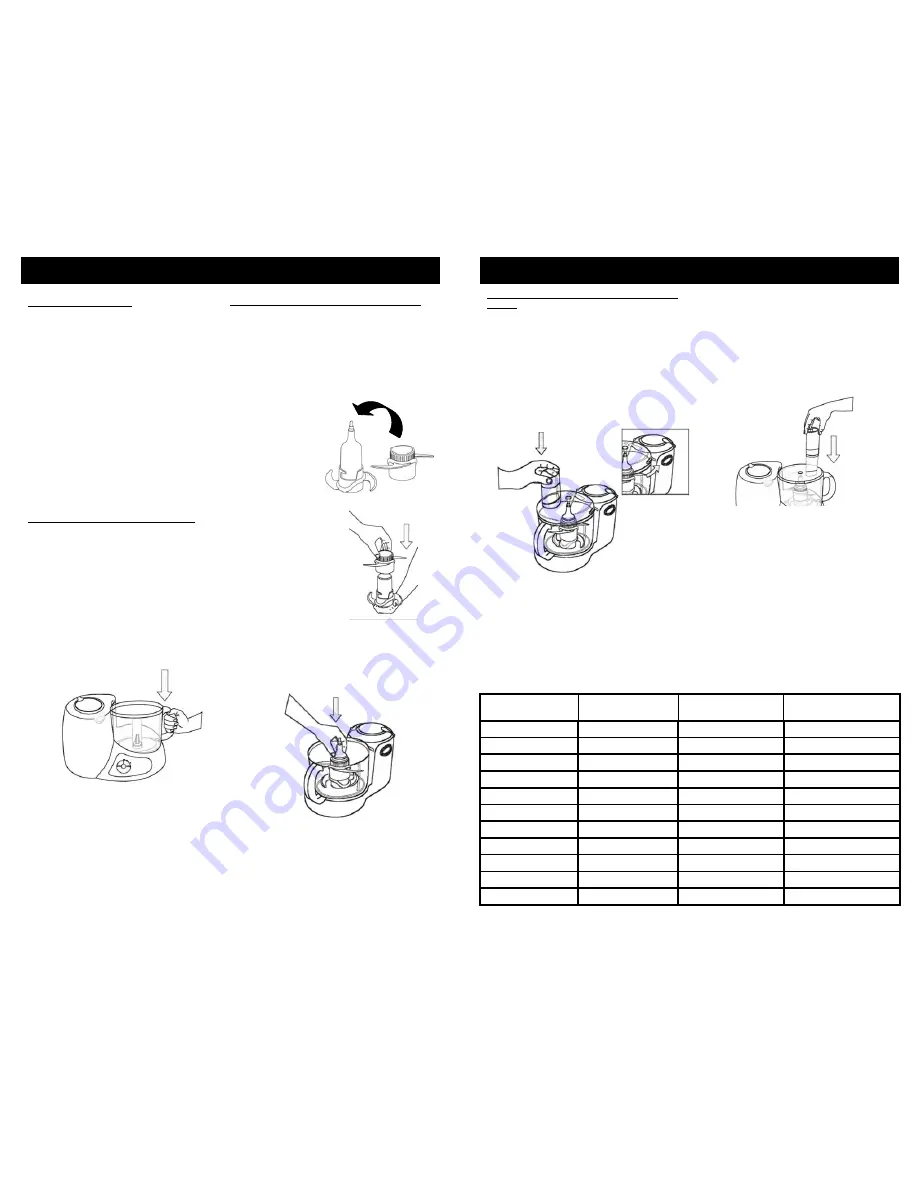
2. Place the food processor bowl onto
the processor body. There is no need
to turn the bowl. (Fig. 1)
3. When fitted correctly, the handle will
fit into the slot at the base of the unit.
2. Then insert onto the shaft of the
processor bowl. Always hold the
chopping blade by the upper plastic
part. (Fig. 4)
Main Blade
Double
Blade
Two Blades
Together
5. Now you are ready to use any of the
attachments that come with the unit;
i.e. the double chopping blade, dough
blade, etc.
Fig. 1
Fig. 2
Fig. 3
Fig. 4
Using The Double Chopping Blade
Always disconnect unit from power
source before cleaning or changing
accessories
.
WARNING: USE EXTREME CAUTION
WHEN HANDLING THE BLADES.
THEY ARE EXTREMELY SHARP.
ALWAYS REMOVE CHOPPING BLADE
COVER BEFORE USING.
The double chopping
blade may be
used with one
blade or with
two blades.
1. To use as
a double
blade, carefully
slip the separate
blade over the
shaft of the
main blade.
(Fig. 2 & Fig. 3)
Fig. 7
OPERATING INSTRUCTIONS
Using The Double Chopping Blade
(Cont.)
3. Place ingredients to be processed in
the bowl.
4. Then holding the processor lid by the
feeding tube, place the processor lid
onto the bowl and turn counter
clockwise to lock the lid in place.
Ensure that the lid tab has "clicked"
into place and that the arrow on the
lid is aligned with the dot on the unit.
(Fig. 5 & Fig. 6)
Fig. 5
Fig. 6
5. Plug the processor into a wall outlet.
6. Turn the speed control dial to the
desired speed setting.
8.
When finished processing the
ingredients, remove the processor lid
by turning clockwise.
9.
Remove the chopping blade first
before removing the processed food.
FOR SAFETY, ALWAYS USE THE
FOOD PUSHER WHEN PUTTING
FOOD INTO THE THE FEEDER TUBE.
NEVER FEED BY HAND.
10.
Do NOT
leave the appliance
unsupervised when it is in the "ON"
position.
7. Keep hands and utensils away from
the cutting blade while chopping
food., to reduce the risk of severe
injury to persons or damage to the
food processor. A scraper may be
used, but
ONLY
when the food
processor is
NOT
running and has
been unplugged.
Never
feed food by
hand. Always use the food pusher.
(Fig. 7)
PRODUCT
QUANTITY
RECOMMENDED
SPEED
OPERATION TIMES
Meat*
24.5 oz / 700 gr.
High/Turbo
15 - 30 seconds
Onions
24.5 oz / 700 gr.
Low
15 - 30 seconds
Nuts
21 oz / 600 gr.
High
15 - 30 seconds
Fish*
24.5 oz / 700 gr.
Pulse
15 - 30 seconds
Cheese
24.5 oz / 700 gr.
Pulse
15 - 30 seconds
Liquids (soups)
24.5 oz / 700 gr.
Pulse
20 seconds
Carrots
24.5 oz / 700 gr.
pulse
40-50 seconds
Bread
4 slices
Low
40 - 50 seconds
Apples
24.5 oz / 700 gr.
High
10 - 30 seconds
Parsley
Max 4 bunches
High/Turbo
10 seconds
Mayonnaise
Max 4 cups/1 liter
High
30 seconds
PROCESSING EXAMPLES WITH THE DOUBLE CHOPPING BLADE
The processing times indicated below are approximate and also depend on the
quantity of the food to be processed and the degree of fineness you require.
5
* Always allow food to cool before placing in the bowl.
* Remove all bones before processing.


