8
EN
• Seat the person whose hair you cut so that his/her
head is approximately at your chest level.
• For the best results, cut dry hair. Do not cut
• freshly washed hair, dry them with a towel and blow
dry.
• Comb the hair along the direction of hair growth.
• Always move the hair clipper against the direction of
the hair growth. You can cut hair along the direction
of hair growth, but keep in mind that the hair cut
against the growth will be shorter than the hair cut
along the growth.
• Move the hair clipper slowly during cutting hair.
USING THE ATTACHMENT COMBS
• The hair clipper set includes the attachment combs
(8, 9, 10, 11) intended for various remaining hair
length:
- (8) — 3 mm
- (9) — 6 mm
- (10) — 9 mm
- (11) — 12 mm
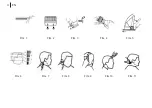
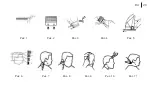
• Figure (6) shows which attachment combs are
recommended for use on different areas of the hair
on the head.
• To learn your hair clipper, start cutting hair with the
attachment comb with a maximum remaining hair
length (11) — 12 mm.
• After learning the hair clipper better you will be able
to use the attachment combs which leave shorter
hair.
part of the attachment until locking. Before starting
the haircut, make sure that the attachment is
securely fixed. To remove the attachment comb (8, 9,
10 or 11), press the latch and remove the attachment.
ADJUSTABLE BLADE SHIFTER
• During a haircut without attachment combs (8, 9, 10
or 11), you can also move the blade (2) by adjusting
the length of the hair left.
• In the upper shifter (3) position haircut will be the
shortest.
• In the lower shifter (3) position, the cutting length
is approximately the same as when using 3 mm
attachment comb (8).
• During the haircut you can change the position of the
regulator (3), and set the required length of the hair
to be left.
• If hair is jammed in the blades (1, 2) while cutting,
use the blade regulator (3), to release the jammed
hair you need to move the regulator (3) from the
upper position to the lower position several times,
or vice versa, this will help release the jammed hair
without removing the blades (1).
HAIR STYLING INSTRUCTIONS
• Before cutting hair switch the hair clipper on and
make sure that hair clipper operates normally and the
blades move smoothly. If there is excess oil on the
blades (1, 2), wipe it with a paper towel or a dry cloth.
Summary of Contents for BR3433
Page 1: ...Instruction manual BR3433 Hair clipper BR3433 brayer ru...
Page 2: ...EN 3 DE 12 RU 22 KZ 34...
Page 4: ...4 EN FIG 1 FIG 2 FIG 3 FIG 4 FIG 5 FIG 6 FIG 7 FIG 8 FIG 9 FIG 10 FIG 11...
Page 13: ...13 DE Abb 1 Abb 2 Abb 3 Abb 4 Abb 5 Abb 6 Abb 7 Abb 8 Abb 9 Abb 10 Abb 11...
Page 22: ...22 RU BR3433 1 2 3 4 5 0 I 6 7 8 3 9 6 10 9 11 12 12 13 RU...
Page 23: ...23 RU P 1 P 2 P 3 P 4 P 5 P 6 P 7 P 8 P 9 P 10 P 11...
Page 24: ...24 RU 80...
Page 25: ...25 RU...
Page 26: ...26 RU 3 60 1 2 1 2 1 2 1 1 2 2 1 1 1 2 1 2...
Page 28: ...28 RU 1 2 8 9 10 11 8 3 9 6 10 9 11 12 6 11 12 1 2 13 7 8 9 10 5 I...
Page 29: ...29 RU 9 11 8 8 9 10 11 10 8 9 3 6 10 11 9 12 11 8 9 10 11 8 9 10 11 3 3 5 5 0 4 1 2 13 1 2 3...
Page 31: ...31 RU 3...
Page 32: ...32 KZ BR3433 1 2 3 4 5 0 I 6 7 8 3 9 6 10 9 11 12 12 13 KZ...
Page 33: ...33 KZ 1 2 3 4 5 6 7 8 9 10 11...
Page 34: ...34 KZ 80...
Page 35: ...35 KZ...
Page 36: ...36 KZ 3 60 1 2 1 2 1 2 1 2 1 2 1 1 1 2 1 2 12...
Page 38: ...38 KZ 8 9 10 11 8 3 9 6 10 9 11 12 6 11 12 1 2 13 7 8 9 10 5 I...
Page 39: ...39 KZ 9 11 8 8 9 10 11 10 8 9 3 6 10 11 9 12 11 8 9 10 11 8 9 10 11 3 3 5 5 0 4 1 2 13...
Page 41: ...41 KZ 3...
Page 42: ......
Page 44: ...brayer ru...

