background image

BRAZILIAN FLAME

PRODUCT 

MANUAL 

Please read this user manual carefully before 

using or connecti ng your GRILL.

USE & CARE GUIDE

V01-20

Summary of Contents for BG-03

Page 1: ...BRAZILIAN FLAME PRODUCT MANUAL Please read this user manual carefully before using or connecting your GRILL USE CARE GUIDE V01 20 ...

Page 2: ...ATION WARNINGS 7 ELETRICAL SAFETY AND INSTALLATION WARNINGS 8 GAS SAFETY AND INSTALLATION WARNINGS 10 GAS CONNECTIONS 12 HARDWARE PACK 13 OPERATION PROPANE GAS GRILLS 17 CLEANING YOUR APPLIANCE 18 WARRANTY REGISTRATION 19 PARTS DIAGRAM 21 PARTS LISTS 22 HOW TO ORDER REPAIR PARTS 23 TROUBLESHOOTING ...

Page 3: ...AZILIAN FLAME Rotisserie Grills the models 3 skewer and 5 skewer smokeless infrared gas grills are synonymous of technology a pratical and economic way to host and enjoy the best grilling experience at yout home Within this Manual you will find the use instructions for safe use your rotisserie grill READ ALL INSTRUCTIONS BEFORE USING OR CONNECTING THIS PRODUCT AND KEEP IT HANDLY FOR FUTURE REFEREN...

Page 4: ...d result in carbon monoxide buildup which could result in injury or death 4 PRODUCT MANUAL APPLIANCE INSTALLATION This gas appliance must be installed in accordance with all local codes If installati on is planned in an area with no local codes the gas a ppliance must be installed in accord with the Nati onal Fuel Gas Code ANSI Z223 1 and storage and handling of liquefi ed petroleum gases ANSI NFP...

Page 5: ...appliance remains at a distance of at least 18 from any combustible material such as wood gyprock paper and plants Do not store combustible materials gasoline or flammable liquids or vapors around the appliance Adequate Ventilation Ensure there is adequate ventilation for both the appliance grill cart and or island cavity This is required not only for proper combustion but also to prevent gas buil...

Page 6: ...n Never test the appliance for gas leaks using a lighted match or any other open flame see leak test procedures using soap water solutions see section on Leak Testing The use of accessories regulators or components not recommended by the appliance manufacturer may cause injuries and will void warranty Never light the appliance with the hood closed and be certain that the burners are positioned and...

Page 7: ...sharp edges or drape over the countertop or tabletop where it can be pulled or tripped over unintentionally Outdoor extension cords should be used with products suited for outdoor use They are surface marked with suffix letters W A and with a tag stating Suitable for Use with Outdoor Appliances To protect against electrical shock the power cord and plug should be kept dry and off of the ground Do ...

Page 8: ...gh cylinder with right handed connection threads and this is the maximum size LP tank to be used The cylinder must be marked in accordance with the latest U S Department of Transportation specifications for LP gas cylinders CFR49 or National Standards of Canada CAN CSA B359 Cylinders Spheres and Tubes for the Transportation of Da ngerous Goods a Propane Tank with an ODP Overfill Prevention Device ...

Page 9: ...o open Apply the leak testing solution by spraying it o n joints of the gas delivery system Blowing bubbles in the soap solution indicates that a leak is present Stop a leak by tightening the loose joint resealing with thread sealant or Teflon tape removing sealant or tape in the event of a flared connection or by replacing the faulty part with a replacement part recommended by the manufacturer Do...

Page 10: ...y water Liquid Propane Gas and Tank Requirement A collar to protect the cylinder threads on the customer supplied tank An arrangement for gas vap or withdrawal A safety relief device having direct communicati on with the vapor space of the cylinder A method of mounti ng When not in use the tank shut off valve should be turned off Filling and Refilling LP Gas Cylinders All purging and refi lling of ...

Page 11: ... position Never store your LP cylinders indoors Make sure that when attaching components all connections are secured and fully tightened to prevent leakage If one is not already available it is recommended that an ON OFF shutoff valve be installed at the gas supply source and that the gas supply be turned off when LP Gas appliances are not in use Transporting and Storing LP Gas Transport only one ...

Page 12: ...hown below are included Single skewers 3 Skewer Model 2 units 5 Skewer Model 4 units Triple skewer 1 unit each model Fat collecti ng tray Gas hose with regulator 1 unit Adaptor to connect the valve Drip Tray for the upper tray models Power Cord Instructi ons manual Quick Installati on guide HARDWARE PACK ...

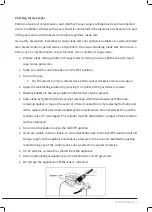
Page 13: ...he first time burn off any foreign matter and rid the unit of any odors by burning the unit on HIGH for about 10 minutes When lit the flame should have a mostly infrared color to it This appliance should be preheated before cooking with the main burner control settings on HIGH for five minutes with the glass door closed Prior to using your appliance verify that all of the following is correct Instal...

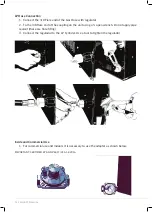
Page 14: ...it using a open wrench Do not apply pipe sealant these are fl are fi ti ng 3 Connect the regulador to the LP Cylinder Use a tool to ti ghten the regulador Inside and Commercial Use 1 For commercial use and indoors it is necessary to use the adapter as shown below IMPORTANT CERTIFIED BY ANSI Z83 11 CSA 1 8 2016 14 PRODUCT MANUAL ...

Page 15: ...ighter produces a spark Listen for the sound of the gas igniti ng and look for a fl ame through the burner If the burner does not light on the fi rst try repeat immediately For rear burner a slower turn of the knob is necessary This allows gas to accumulate in the rear burner to achieve igniti on 3 If the burner does not light in 5 seconds then wait fi ve minutes unti l the gas clears before att e...

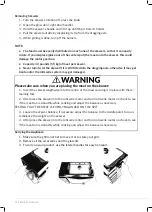
Page 16: ... Appliance 1 Make sure the grill is not hot to move it or to store your grill 2 Remove all the accessories and the glass lid 3 To carry on your product use the lateral handles for easy transport 16 PRODUCT MANUAL Please take care when you are placing the meat on the skewer 1 Insert the skewer lengthwise into the centre of the roast securing it in place with the re maining fork 2 Aft er place the s...

Page 17: ...hem Normally you won t run batt eries down completely since the running ti me with a full charge is up to 12 hours It varies depending on your usage but most grilling tasks take only about 1 hour If your batt ery is no longer charging it is ti me to replace the batt ery see instructi ons on page How to Order Repair Parts how to order a new batt ery 5 If aft er repeated use the run ti me seems to g...

Page 18: ...OT cover a damp appliance Do not use humid cloth to clean the glass door when it is still hot the glass may shatter Caution Do not open the grill during the burn off process Opening the glass door during the burn off process may cause a sudden grease fire flare up that could burn your face and arms Wait until the grill has cooled before opening Drip Tray Clean the drip try after each use Failure t...

Page 19: ...onsequential damages and Brazilian Flame Products liability is limited to the purchase price of the appliance only This warranty gives you specific legal rights and you may also have other rights which may vary from state to state This warranty is applicable in the United States and Canada only No one else is authorized to perform any obligations under this warranty High cooking temperatures exces...

Page 20: ...dealer To locate a dealer in your area visit www brazilianflame com To ensure prompt and accurate service please provide the following information when placing a repair part order Model Number Serial Number Part Name Part Number and Quantity of parts needed BG 03 SKEWER GAS MODEL PARTS DIAGRAM ...

Page 21: ...PRODUCT MANUAL 21 BG 05 SKEWER GAS MODEL PARTS DIAGRAM ...

Page 22: ...le RIO3 21 RIO5 21 22 Thermocouple support RIO3 22 RIO5 22 23 Nozzle of Gas RIO3 23 RIO5 23 24 Top Door Frame RIO3 24 RIO5 24 25 Door glass RIO3 25 RIO5 25 26 Connecting plate RIO3 26 RIO5 26 27 Magnet cover RIO3 27 RIO5 27 28 Magnet RIO3 28 RIO5 28 29 Lid handle RIO3 29 RIO5 29 30 Bottom door frame RIO3 30 RIO5 30 31 Bottom support for door frame RIO3 31 RIO5 31 32 Drip tray RIO3 32 RIO5 32 33 Su...

Page 23: ... When ordering parts first obtain the Model Number and Serial Number from the name plate on your equipment Then determine the Part Number not the Index Number and the Description of each part from the following illustration and part list Be sure to give all this information Appliance Model Number ___________________ Part Description ___________________ Appliance Serial Number ___________________ P...

Page 24: ...ll battery Inadequate grill temperature Poor combustion Adjust air shutter Inadequate gas pres sure Contact gas supplier for assistance Incorrect orifice valve setting Refer to gas conversion instructions in this manual Flames blow out Cold grill Preheat grill at least 5 minutes on HI with the grill lid closed Extreme wind Turn or shield grill Skewers will not rotate Dead battery Recharge the gril...

Page 25: ...e grill until it is dark on both sides Temperature 320 F Pork Ribs 55 minutes Temperature 300 F Chicken Pieces 50 minutes Temperature 350 F Whole Chicken 1h 30 minutes Temperature 350 F Vegetables 10 minutes You can use the baskets grills Temperature 320 F Salmon 20 minutes Season the salmon with salt black pep per lemon and virgin oil Marinate for 25 minutes Use the shirimp basket grill Roast the...

Page 26: ...ww brazilianflame com 1 833 753 9374 1 307 316 0901 If you have a general question about our products please e mail us at ola brazilianflame com If you have a service or repair question please contact your dealer brazilianflame ...

Reviews: